
MiniMax H3: First Frame Last Frame Videos in ComfyUI
MiniMax H3: First Frame Last Frame Videos in ComfyUI

1. Introduction
This tutorial focuses on the MiniMax H3 First Frame Last Frame feature within ComfyUI, which lets you generate high-quality videos by providing two images — a starting frame and an ending frame — and letting the model animate the transition between them. With up to 2K output, a maximum duration of 15 seconds, and native stereo audio, MiniMax H3 gives creators precise control over how a scene starts and finishes.
By the end of this guide, you'll know how to set up the workflow, configure it, and generate your own First Frame Last Frame videos with MiniMax H3 in ComfyUI.
MiniMax-H3 Available in The Hub
Create cinematic videos with first and last frame control and native stereo audio.
2. Requirements & Setup for MiniMax H3 First Frame Last Frame (ComfyUI)
Getting MiniMax H3 First Frame Last Frame up and running in ComfyUI starts with a handful of setup steps. Taking care of these first means the model is properly supported and the workflow runs without issues.
We're testing MiniMax H3 in this tutorial on an NVIDIA RTX 6000 Pro. Other GPUs will work too, but keep in mind that available VRAM plays a big role in the resolution, video length, and overall speed you can achieve.
Requirement 1: ComfyUI
You'll need ComfyUI running either locally or on a cloud GPU.
Local (Windows):
👉 How to Install ComfyUI Locally on Windows
Cloud GPU (RunPod):
👉 How to Run ComfyUI on RunPod with Network Volume
Requirement 2: Update ComfyUI
MiniMax H3 requires a recent version of ComfyUI with native support for the model. For this tutorial, make sure you are running ComfyUI version 0.30.0 or newer.
Keeping ComfyUI updated is important to ensure that the required H3 nodes and model support are available.
Windows Portable Users: Navigate to: ...\ComfyUI_windows_portable\update
Double-click: update_comfyui.bat
RunPod / Linux Users:
1 cd /workspace/ComfyUI && git pull origin master && pip install -r requirements.txt && cd /workspace1 cd /workspace/ComfyUI && git pull origin master && pip install -r requirements.txt && cd /workspaceAlternatively, you can update ComfyUI directly through the ComfyUI Manager. After updating, restart ComfyUI and verify that you are running version 0.30.0 or newer.
Requirement 3: Download the Required MiniMax H3 Models
Next, you'll need to download the MiniMax H3 model files required for the First Frame Last Frame workflow.
Below is a table showing the required files, their download pages, and where they should be placed inside your ComfyUI installation:
| File Name | Download Page | Folder |
|---|---|---|
| minimax_h3_fl2va_int8_convrot.safetensors | 🤗 HuggingFace | ..\ComfyUI\models\diffusion_models |
| qwen3vl_32b_minimax_h3_nvfp4_awq.safetensors | 🤗 HuggingFace | ..\ComfyUI\models\text_encoders |
| minimax_h3_video_vae_fp16.safetensors | 🤗 HuggingFace | ..\ComfyUI\models\vae |
| minimax_h3_audio_vae_fp32.safetensors | 🤗 HuggingFace | ..\ComfyUI\models\vae |
💡 Note: Make sure each model is placed in the correct folder. The two VAE files should both be placed inside the models\vae directory.
Requirement 4: Verify Your Folder Structure
Once all of the model files have finished downloading, verify that your ComfyUI folder structure matches the following:
1📂 ComfyUI/
2├── 📂 models/
3│   ├── 📂 diffusion_models/
4│   │   └── minimax_h3_fl2va_int8_convrot.safetensors
5│   ├── 📂 text_encoders/
6│   │   └── qwen3vl_32b_minimax_h3_nvfp4_awq.safetensors
7│   └── 📂 vae/
8│       ├── minimax_h3_video_vae_fp16.safetensors
9│       └── minimax_h3_audio_vae_fp32.safetensors
1📂 ComfyUI/
2├── 📂 models/
3│ ├── 📂 diffusion_models/
4│ │ └── minimax_h3_fl2va_int8_convrot.safetensors
5│ ├── 📂 text_encoders/
6│ │ └── qwen3vl_32b_minimax_h3_nvfp4_awq.safetensors
7│ └── 📂 vae/
8│ ├── minimax_h3_video_vae_fp16.safetensors
9│ └── minimax_h3_audio_vae_fp32.safetensorsWith ComfyUI updated to version 0.30.0 or newer, all required MiniMax H3 model files downloaded, and the folder structure verified, you're ready to load the First Frame Last Frame workflow and start generating videos with MiniMax H3.
3. Downloading and Loading the MiniMax H3 First Frame Last Frame Workflow
Now that ComfyUI has been updated and all the required MiniMax H3 model files are in place, it's time to download and load the First Frame Last Frame workflow into ComfyUI. The workflow includes the necessary nodes and settings to generate a video that transitions from a starting image to an ending image with MiniMax H3.
Step 1: Download the Workflow
First, download the MiniMax H3 First Frame Last Frame workflow JSON file. This file contains the complete workflow configuration and will allow you to quickly set up the generation process without having to build the workflow manually.
👉 Download MiniMax H3 First Frame Last Frame Workflow JSON
Step 2: Load the Workflow
Once you have downloaded the workflow JSON file, open ComfyUI.
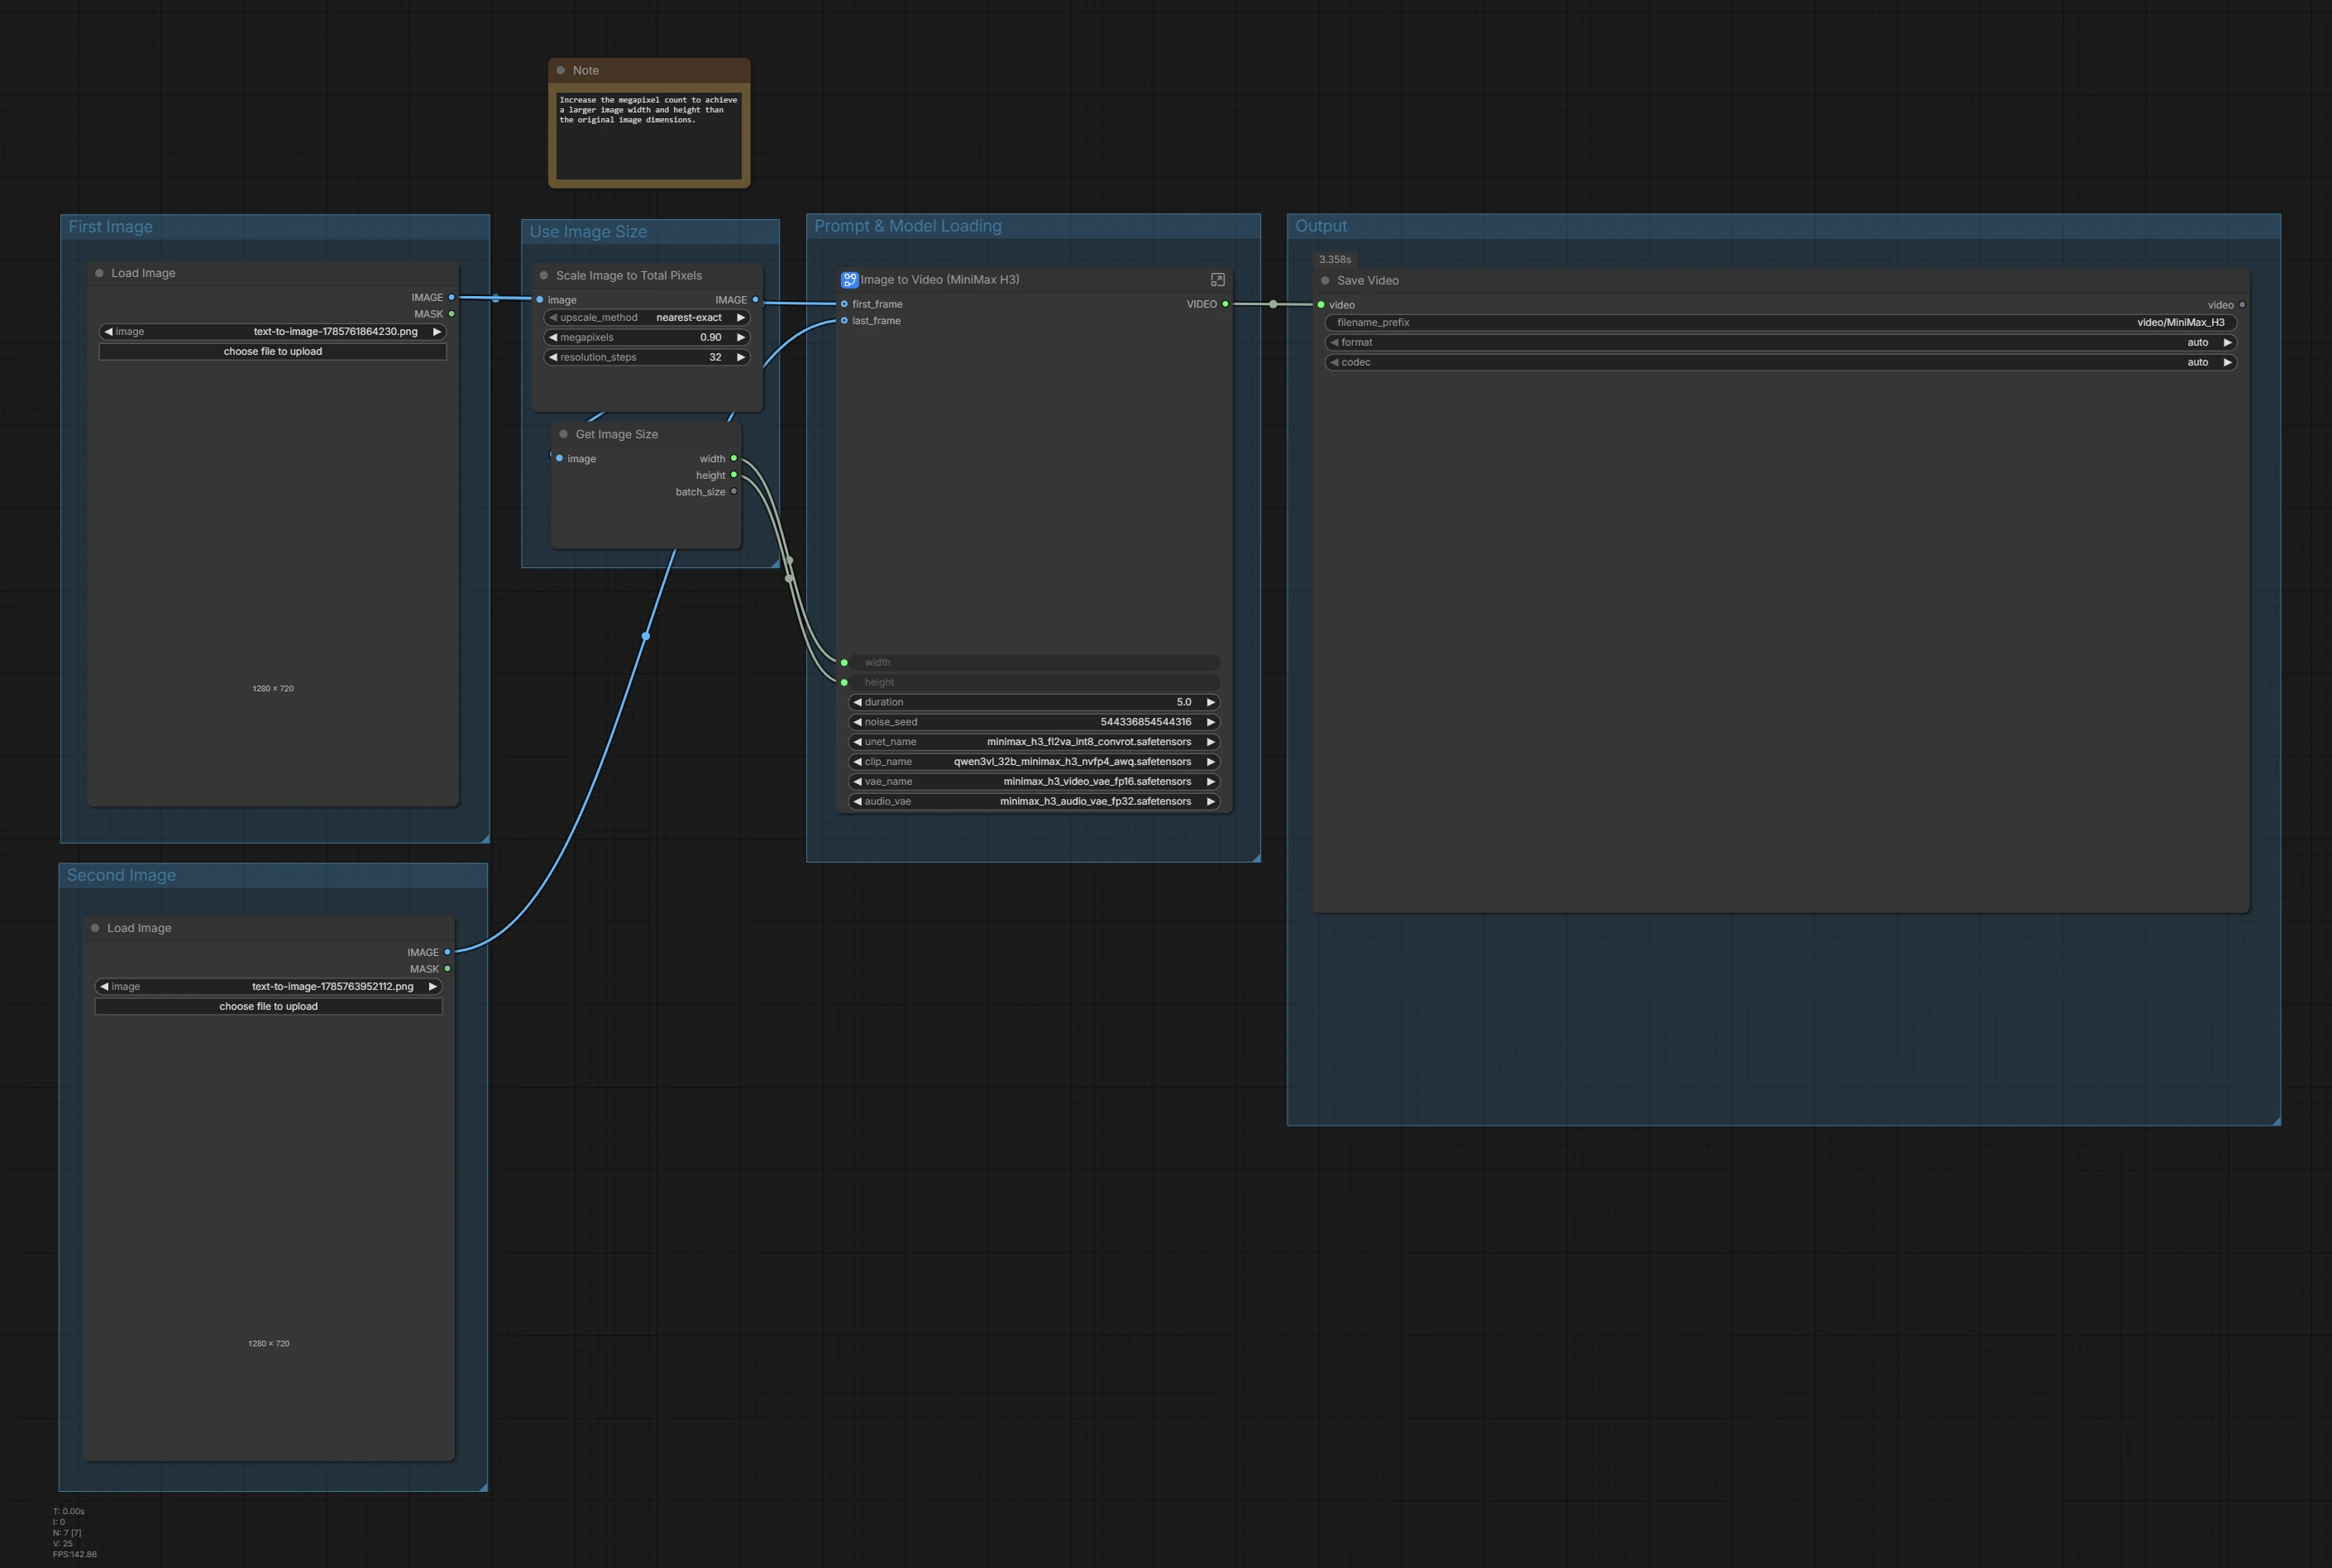
To load the workflow, simply drag and drop the JSON file into the ComfyUI interface. ComfyUI will automatically import the workflow and display all of the nodes and connections, including two separate image loader nodes — one for the first frame and one for the last frame.
Step 3: Verify the Models
After loading the workflow, check that all required MiniMax H3 models have been detected correctly.
Verify the following components:
- Diffusion Model: minimax_h3_fl2va_int8_convrot.safetensors
- Text Encoder: qwen3vl_32b_minimax_h3_nvfp4_awq.safetensors
- Video VAE: minimax_h3_video_vae_fp16.safetensors
- Audio VAE: minimax_h3_audio_vae_fp32.safetensors
Diffusion Model: minimax_h3_fl2va_int8_convrot.safetensors
Text Encoder: qwen3vl_32b_minimax_h3_nvfp4_awq.safetensors
Video VAE: minimax_h3_video_vae_fp16.safetensors
Audio VAE: minimax_h3_audio_vae_fp32.safetensors
If all four models are loaded correctly without any missing-model errors, the workflow is ready to use.
You can now move on to configuring the workflow settings and preparing your first and last frame images for First Frame Last Frame generation with MiniMax H3.
MiniMax-H3 Available in The Hub
Create cinematic videos with first and last frame control and native stereo audio.
4. Configuring the Workflow Settings
The workflow is simple by design — four steps, all mapped to the labeled groups in the graph:
- Load First Image — in the First Image group, use the Load Image node to upload your starting/first frame.
- Load Second Image — in the Second Image group, use the second Load Image node to upload your ending/last frame.
- Prompt — in the Prompt & Model Loading group, enter your prompt directly into the Image to Video (MiniMax H3) node. This is where the four MiniMax H3 models are also loaded. We used the following prompt: Extreme tight close-up, front-facing and locked on her face the entire time as she leans forward on the dragon, continuously moving toward the camera, the dragon’s horn and part of its scaled head visible only at the very bottom edge of the frame, long dark hair whipping hard toward and across the lens, intense focused expression, golden late-afternoon light; she launches off the dragon in a powerful jump, body flying free through the air as the camera stays glued to her face and follows her closely through the entire freefall, hair rushing harder toward the lens, golden light flaring and warping while the background dissolves from jungle haze into a collapsing temple with flying stone, she plummets straight toward camera then lands hard into the driver’s seat of a muddy open-top jeep, her face jolting on impact but still coming toward camera as her hands slam onto the wheel and gear stick at the bottom of frame, dust and debris spraying across her face toward the lens, the camera never pulling back, never zooming out, never changing distance, staying locked in the exact same extreme front-facing close-up on her face from start to finish while following her closely through the jump, flight, and landing, sound staying intimate and close around her breathing with wingbeats and rushing wind, a sharp exertion breath as she jumps, warping bass drop, hard impact thud and gasp, jeep engine roaring to life, tires screeching as the car drifts hard and accelerates away, debris still crashing in the distance.
- Megapixel — in the Use Image Size group, set the megapixel value on the Scale Image to Total Pixels node. This controls your output resolution.
Load First Image — in the First Image group, use the Load Image node to upload your starting/first frame.

Load Second Image — in the Second Image group, use the second Load Image node to upload your ending/last frame.

Prompt — in the Prompt & Model Loading group, enter your prompt directly into the Image to Video (MiniMax H3) node. This is where the four MiniMax H3 models are also loaded. We used the following prompt:
Extreme tight close-up, front-facing and locked on her face the entire time as she leans forward on the dragon, continuously moving toward the camera, the dragon’s horn and part of its scaled head visible only at the very bottom edge of the frame, long dark hair whipping hard toward and across the lens, intense focused expression, golden late-afternoon light; she launches off the dragon in a powerful jump, body flying free through the air as the camera stays glued to her face and follows her closely through the entire freefall, hair rushing harder toward the lens, golden light flaring and warping while the background dissolves from jungle haze into a collapsing temple with flying stone, she plummets straight toward camera then lands hard into the driver’s seat of a muddy open-top jeep, her face jolting on impact but still coming toward camera as her hands slam onto the wheel and gear stick at the bottom of frame, dust and debris spraying across her face toward the lens, the camera never pulling back, never zooming out, never changing distance, staying locked in the exact same extreme front-facing close-up on her face from start to finish while following her closely through the jump, flight, and landing, sound staying intimate and close around her breathing with wingbeats and rushing wind, a sharp exertion breath as she jumps, warping bass drop, hard impact thud and gasp, jeep engine roaring to life, tires screeching as the car drifts hard and accelerates away, debris still crashing in the distance.
Extreme tight close-up, front-facing and locked on her face the entire time as she leans forward on the dragon, continuously moving toward the camera, the dragon’s horn and part of its scaled head visible only at the very bottom edge of the frame, long dark hair whipping hard toward and across the lens, intense focused expression, golden late-afternoon light; she launches off the dragon in a powerful jump, body flying free through the air as the camera stays glued to her face and follows her closely through the entire freefall, hair rushing harder toward the lens, golden light flaring and warping while the background dissolves from jungle haze into a collapsing temple with flying stone, she plummets straight toward camera then lands hard into the driver’s seat of a muddy open-top jeep, her face jolting on impact but still coming toward camera as her hands slam onto the wheel and gear stick at the bottom of frame, dust and debris spraying across her face toward the lens, the camera never pulling back, never zooming out, never changing distance, staying locked in the exact same extreme front-facing close-up on her face from start to finish while following her closely through the jump, flight, and landing, sound staying intimate and close around her breathing with wingbeats and rushing wind, a sharp exertion breath as she jumps, warping bass drop, hard impact thud and gasp, jeep engine roaring to life, tires screeching as the car drifts hard and accelerates away, debris still crashing in the distance.
Megapixel — in the Use Image Size group, set the megapixel value on the Scale Image to Total Pixels node. This controls your output resolution.
Once these are set, queue the prompt and the Output group's Save Video node will save the finished clip.
That's it — load first image, load second image, prompt, megapixel, run.
Megapixel Setting
For our generation, we used 0.9 megapixels at 16:9. This took our 1280 × 720 first and last frame images and produced a 1280 × 736 video output — essentially 720p.
💡 Tip: If you want faster generations for testing prompts, drop the megapixel value to 0.4 (roughly 480p). It renders noticeably quicker and is a good way to iterate on a prompt before committing to a higher-resolution, slower generation at 0.9 or above.
Final Settings
For the first generation in this tutorial, we'll use:
| Setting | Value |
|---|---|
| First Frame Image | 1280 × 720 pixels (16:9) |
| Last Frame Image | 1280 × 720 pixels (16:9) |
| Mega Pixels | 0.9 |
| Output Resolution | 1280 × 736 (16:9, ~720p) |
| Duration | 5 seconds |
| Seed | Randomized |
| Prompt | Custom prompt describing the desired transition, camera movement, and audio |
The remaining workflow settings can be left at their default values.
Once these settings are configured, you're ready to generate your first First Frame Last Frame clip with MiniMax H3.
5. Generating First Frame Last Frame Examples with MiniMax H3
Now that we’ve configured the workflow in Section 4, let’s see what it can actually produce.
To start, we’ll use the exact setup from Section 4 — the same first frame, last frame, prompt, and settings — and look at the resulting video. Since the input images and prompt have already been shown in the previous section, there’s no need to repeat them here.
Example 1 — Dragon to Jeep
This first example uses the exact input and prompt from Section 4. This sequence takes the character from riding a dragon into a freefall, through a collapsing temple, and directly into the driver’s seat of a moving jeep, all while maintaining an extreme close-up on her face.
Result
This gives us our first look at the complete First Frame Last Frame workflow in action.
For the next three examples, I’ll show the first frame, last frame, and prompt used for each video, so you can see exactly how the different shots were constructed and use them as a reference for your own generations.
Example 2 — Live Action to Anime
This sequence starts as a photorealistic action shot of the character charging through an ancient temple before progressively transforming into a vibrant 2D anime style, with the action and camera movement continuing seamlessly throughout.
First Frame
Last Frame

Prompt
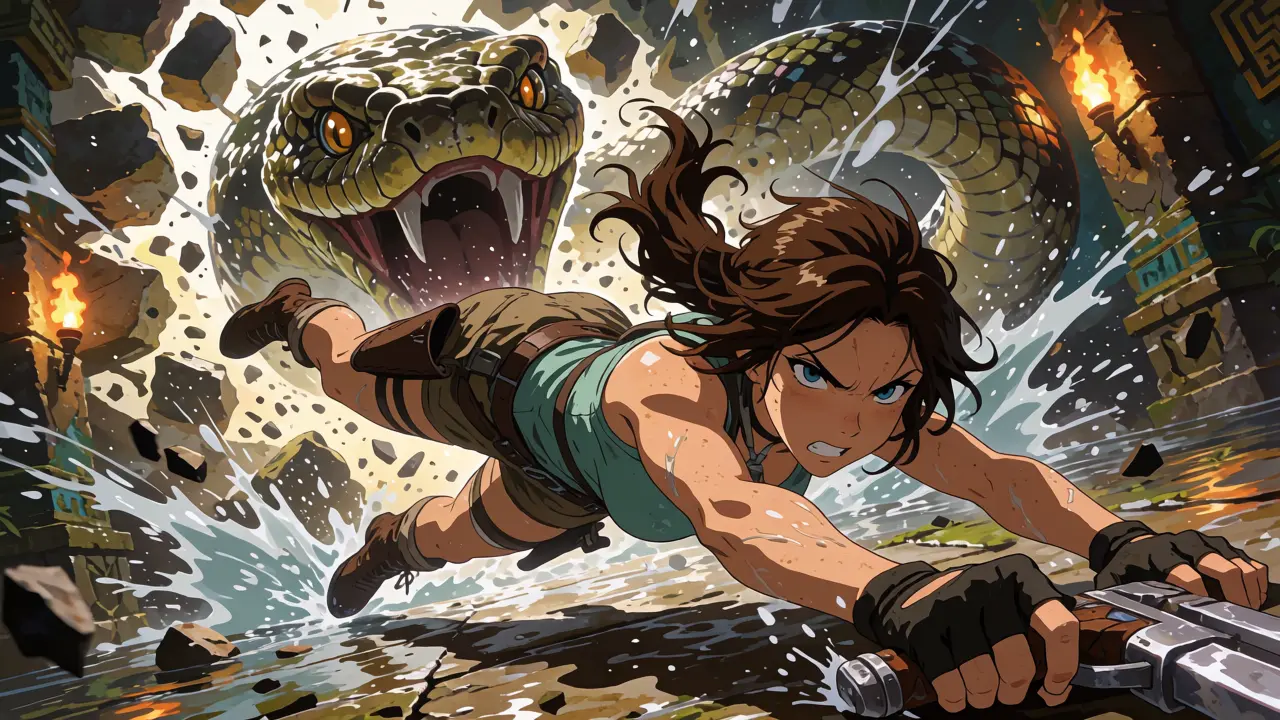
Extreme tight close-up, front-facing and locked on her face the entire time as she charges straight toward camera through exploding water in an ancient temple, photorealistic wet skin, dirt, and flying droplets, intense fierce expression, massive serpent jaws only at the edges of frame; the realism begins dissolving mid-charge as sharp anime linework races across her face, skin flattening into bold cel-shading, eyes enlarging and gaining hard highlights, hair turning into thick dynamic anime strands whipping toward the lens, the serpent behind her swelling into a huge stylized beast with glowing eyes and exaggerated fangs while water splashes transform into crisp white speed-line bursts, the whole frame completing the shift into vibrant 2D anime as she keeps driving forward with the same intensity, dual pistols now clear at the bottom of frame, camera never pulling back or changing distance, sound close and aggressive with rushing water, serpent roar, her sharp breaths, and a rising energetic hit as the style fully becomes cartoon.
Extreme tight close-up, front-facing and locked on her face the entire time as she charges straight toward camera through exploding water in an ancient temple, photorealistic wet skin, dirt, and flying droplets, intense fierce expression, massive serpent jaws only at the edges of frame; the realism begins dissolving mid-charge as sharp anime linework races across her face, skin flattening into bold cel-shading, eyes enlarging and gaining hard highlights, hair turning into thick dynamic anime strands whipping toward the lens, the serpent behind her swelling into a huge stylized beast with glowing eyes and exaggerated fangs while water splashes transform into crisp white speed-line bursts, the whole frame completing the shift into vibrant 2D anime as she keeps driving forward with the same intensity, dual pistols now clear at the bottom of frame, camera never pulling back or changing distance, sound close and aggressive with rushing water, serpent roar, her sharp breaths, and a rising energetic hit as the style fully becomes cartoon.
Result
Example 3 — Golem Chase to Dirt Bike
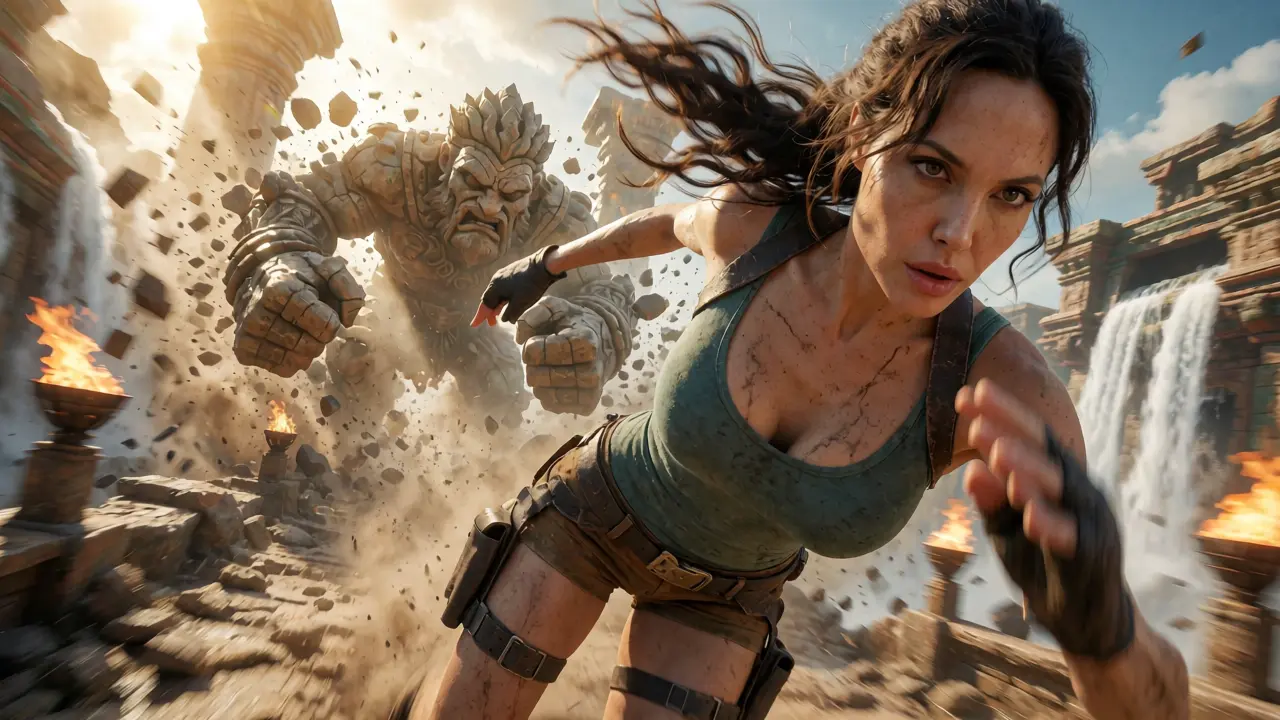
The character begins by sprinting through a collapsing temple while being chased by a massive stone golem. After the golem falls, the scene transitions into a jungle ruin as she leaps onto a dirt bike and continues racing toward the camera.
First Frame
Last Frame
Prompt
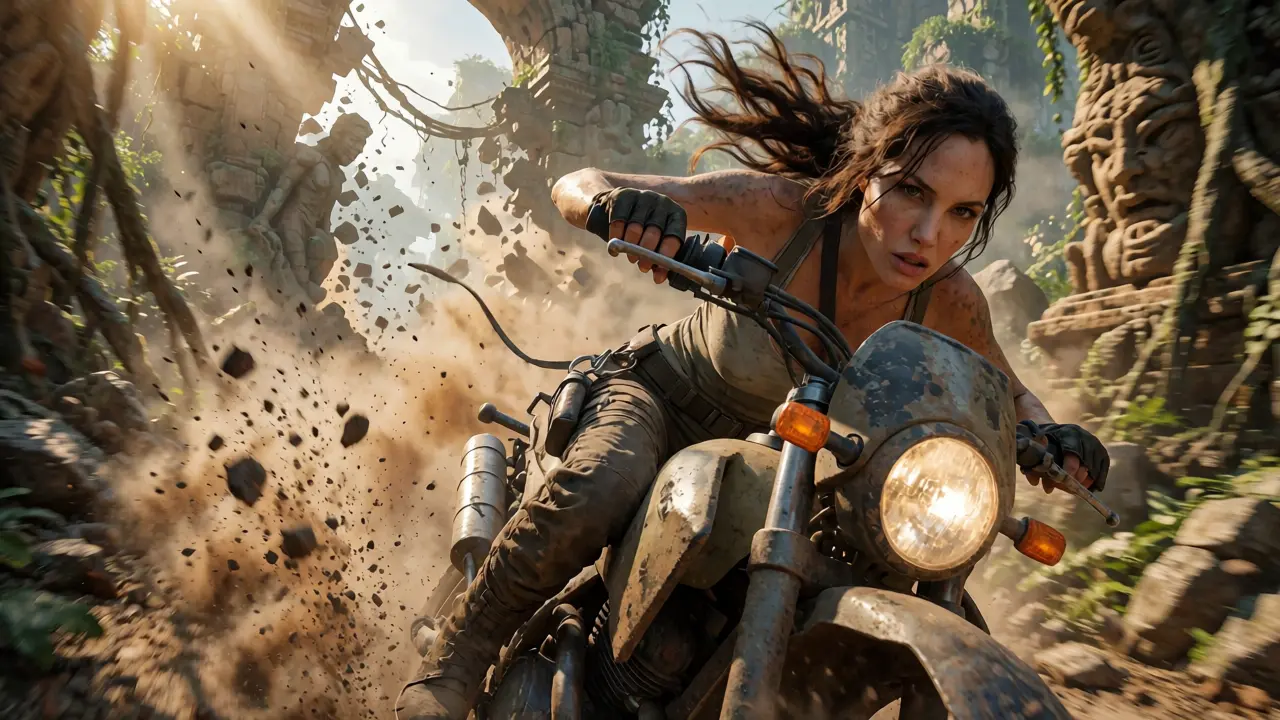
Extreme tight close-up, front-facing and locked on her face the entire time as she sprints toward camera through a crumbling temple, dirt-streaked skin, intense focused expression, a massive stone golem chasing and smashing the ground only at the edges of frame behind her; the golem keeps pursuing for a few beats before it suddenly stumbles and collapses in a cloud of dust and falling stone, she continues running hard as the temple background dissolves into dense jungle ruins, a short moment later she leaps and lands astride a muddy dirt bike mid-motion, face still driving straight toward camera, hair whipping hard toward the lens, hands gripping the handlebars at the bottom of frame, the bike immediately surges forward through the collapsing jungle temple, her body rising and falling with the rough terrain, dust and stone fragments blasting across her face as she continues racing toward camera for several continuous beats, the camera never pulling back, never zooming out, never changing distance, staying locked in the exact same extreme front-facing close-up on her face from the golem chase through its collapse and all the way through the extended bike ride, sound close and aggressive with heavy stone impacts and the golem’s roar, her sharp breaths, the crashing collapse, then roaring engine, skidding tires, rushing wind, and residual debris as she races on.
Extreme tight close-up, front-facing and locked on her face the entire time as she sprints toward camera through a crumbling temple, dirt-streaked skin, intense focused expression, a massive stone golem chasing and smashing the ground only at the edges of frame behind her; the golem keeps pursuing for a few beats before it suddenly stumbles and collapses in a cloud of dust and falling stone, she continues running hard as the temple background dissolves into dense jungle ruins, a short moment later she leaps and lands astride a muddy dirt bike mid-motion, face still driving straight toward camera, hair whipping hard toward the lens, hands gripping the handlebars at the bottom of frame, the bike immediately surges forward through the collapsing jungle temple, her body rising and falling with the rough terrain, dust and stone fragments blasting across her face as she continues racing toward camera for several continuous beats, the camera never pulling back, never zooming out, never changing distance, staying locked in the exact same extreme front-facing close-up on her face from the golem chase through its collapse and all the way through the extended bike ride, sound close and aggressive with heavy stone impacts and the golem’s roar, her sharp breaths, the crashing collapse, then roaring engine, skidding tires, rushing wind, and residual debris as she races on.
Result
Example 4 — Arrow Flight to Waterfall
The shot begins with the character releasing an arrow and then follows its flight through the jungle. After striking and breaking through its target, the camera continues forward into a hidden waterfall scene where the character delivers the final line, “Target Acquired.”
First Frame
Last Frame

Prompt

Extreme tight close-up, front-facing on her face as she draws a wooden bow in the jungle, dirt-streaked skin, intense focused expression, the arrow and bowstring only at the edges of frame; she releases the arrow with a sharp clean twang, the camera immediately moves directly behind the arrow and follows it smoothly toward screen-left, staying aligned with the shaft and looking straight along its flight path as it cuts through the dense canopy, leaves and branches whipping past, sunlight flickering across the shaft while it flies through open air toward a solid target; the arrow strikes the target cleanly and the target suddenly cracks and smashes open from the impact, breaking apart and revealing the sunlit cave waterfall behind it, the fragments flowing naturally out of frame as the camera continues forward seamlessly into the scene, revealing her kneeling completely wet, water dripping from her hair and skin, body gently rising and falling with the movement of the water, golden light rays cutting through the mist, her expression calm and satisfied as she says in a low confident voice “Target Acquired,” with TARGET ACQUIRED appearing subtly on screen as she says it; the camera never cuts, flowing continuously from the bow release through the arrow flight, impact, shattered target, and into the water scene, sound intimate and close with the crisp bow release, arrow whistling through leaves and air, sharp satisfying impact and cracking target that seamlessly becomes soft water lapping and dripping, her steady breaths, and the clear line at the end.
Extreme tight close-up, front-facing on her face as she draws a wooden bow in the jungle, dirt-streaked skin, intense focused expression, the arrow and bowstring only at the edges of frame; she releases the arrow with a sharp clean twang, the camera immediately moves directly behind the arrow and follows it smoothly toward screen-left, staying aligned with the shaft and looking straight along its flight path as it cuts through the dense canopy, leaves and branches whipping past, sunlight flickering across the shaft while it flies through open air toward a solid target; the arrow strikes the target cleanly and the target suddenly cracks and smashes open from the impact, breaking apart and revealing the sunlit cave waterfall behind it, the fragments flowing naturally out of frame as the camera continues forward seamlessly into the scene, revealing her kneeling completely wet, water dripping from her hair and skin, body gently rising and falling with the movement of the water, golden light rays cutting through the mist, her expression calm and satisfied as she says in a low confident voice “Target Acquired,” with TARGET ACQUIRED appearing subtly on screen as she says it; the camera never cuts, flowing continuously from the bow release through the arrow flight, impact, shattered target, and into the water scene, sound intimate and close with the crisp bow release, arrow whistling through leaves and air, sharp satisfying impact and cracking target that seamlessly becomes soft water lapping and dripping, her steady breaths, and the clear line at the end.
Result
And that’s just a glimpse of what’s possible with MiniMax H3 First Frame Last Frame. ☝️
MiniMax-H3 Available in The Hub
Create cinematic videos with first and last frame control and native stereo audio.
6. Conclusion
In conclusion, the MiniMax H3 First Frame Last Frame feature in ComfyUI offers a powerful way to create controlled, cinematic video content by defining exactly how a shot should begin and end. Throughout this tutorial, we explored the essential steps, from setting up the environment and downloading the necessary files to configuring the workflow and generating videos. The capabilities of MiniMax H3, including open weights and local generation, allow for high-quality outputs with native stereo audio, making it an invaluable tool for content creators who need precise start-and-end control over their shots.
As you continue to experiment with this technology, remember that practice is key. The more you work with the settings, prompts, and frame pairings, the better your results will become. Whether you are creating videos for social media, marketing, or personal projects, MiniMax H3's First Frame Last Frame workflow provides the tools you need to bridge your images into captivating video narratives.
Frequently Asked Questions
What is MiniMax H3 First Frame Last Frame and how does it work in ComfyUI?
What are the requirements for setting up MiniMax H3 First Frame Last Frame in ComfyUI?
How can I configure the workflow settings for generating videos with MiniMax H3 First Frame Last Frame?
Enjoyed this article? Share it with your network.