
MiniMax H3: Cinematic Videos from Images in ComfyUI
MiniMax H3: Cinematic Videos from Images in ComfyUI
1. Introduction
In the realm of digital content creation, the ability to transform static images into dynamic videos is a game-changer. This tutorial focuses on the MiniMax H3 Image-to-Video feature within ComfyUI, a powerful tool that allows users to generate high-quality videos from a single image. With capabilities such as up to 2K output, a maximum duration of 15 seconds, and the inclusion of native stereo audio, MiniMax H3 stands out as a versatile solution for creators looking to enhance their visual storytelling.
In this guide, we will walk you through the entire process of setting up and utilizing the MiniMax H3 Image-to-Video workflow. We will cover everything from the initial requirements and setup to the final generation of videos.
By the end of this tutorial, you will have a comprehensive understanding of how to leverage this technology to create engaging video content from your images. Whether you are a content creator, a marketer, or simply someone interested in video production, this tutorial will equip you with the knowledge to effectively use MiniMax H3 in ComfyUI.
MiniMax-H3 Available in The Hub
Create cinematic videos with first and last frame control and native stereo audio.
2. Requirements & Setup for MiniMax H3 Image-to-Video (ComfyUI)
Before you can start using MiniMax H3 Image-to-Video in ComfyUI, there are a few requirements you need to take care of. This ensures that the model is properly supported and that the workflow runs correctly.
For this tutorial, we’ll be testing MiniMax H3 using an NVIDIA RTX 6000 Pro. The workflow can also be adapted to other GPUs, but available VRAM will affect the resolution, video length, and overall generation performance.
Requirement 1: ComfyUI
You'll need ComfyUI running either locally or on a cloud GPU.
Local (Windows):
👉 How to Install ComfyUI Locally on Windows
Cloud GPU (RunPod):
👉 How to Run ComfyUI on RunPod with Network Volume
Requirement 2: Update ComfyUI
MiniMax H3 requires a recent version of ComfyUI with native support for the model. For this tutorial, make sure you are running ComfyUI version 0.30.0 or newer.
Keeping ComfyUI updated is important to ensure that the required H3 nodes and model support are available.
Windows Portable Users:
Navigate to: ...\ComfyUI_windows_portable\update
Double-click:: update_comfyui.bat
RunPod / Linux Users:
1
2cd /workspace/ComfyUI && git pull origin master && pip install -r requirements.txt && cd /workspace
1
2cd /workspace/ComfyUI && git pull origin master && pip install -r requirements.txt && cd /workspaceAlternatively, you can update ComfyUI directly through the ComfyUI Manager.
After updating, restart ComfyUI and verify that you are running version 0.30.0 or newer.
Requirement 3: Download the Required MiniMax H3 Models
Next, you’ll need to download the MiniMax H3 model files required for the Image-to-Video workflow.
Below is a table showing the required files, their download pages, and where they should be placed inside your ComfyUI installation:
| File Name | Download Page | Folder |
|---|---|---|
| minimax_h3_fl2va_int8_convrot.safetensors | 🤗 HuggingFace | ..\ComfyUI\models\diffusion_models |
| qwen3vl_32b_minimax_h3_nvfp4_awq.safetensors | 🤗 HuggingFace | ..\ComfyUI\models\text_encoders |
| minimax_h3_video_vae_fp16.safetensors | 🤗 HuggingFace | ..\ComfyUI\models\vae |
| minimax_h3_audio_vae_fp32.safetensors | 🤗 HuggingFace | ..\ComfyUI\models\vae |
💡 Note: Make sure each model is placed in the correct folder. The two VAE files should both be placed inside the models\vae directory.
Requirement 4: Verify Your Folder Structure
Once all of the model files have finished downloading, verify that your ComfyUI folder structure matches the following:
1📂 ComfyUI/
2├── 📂 models/
3│   ├── 📂 diffusion_models/
4│   │   └── minimax_h3_fl2va_int8_convrot.safetensors
5│   ├── 📂 text_encoders/
6│   │   └── qwen3vl_32b_minimax_h3_nvfp4_awq.safetensors
7│   └── 📂 vae/
8│       ├── minimax_h3_video_vae_fp16.safetensors
9│       └── minimax_h3_audio_vae_fp32.safetensors
1📂 ComfyUI/
2├── 📂 models/
3│ ├── 📂 diffusion_models/
4│ │ └── minimax_h3_fl2va_int8_convrot.safetensors
5│ ├── 📂 text_encoders/
6│ │ └── qwen3vl_32b_minimax_h3_nvfp4_awq.safetensors
7│ └── 📂 vae/
8│ ├── minimax_h3_video_vae_fp16.safetensors
9│ └── minimax_h3_audio_vae_fp32.safetensorsWith ComfyUI updated to version 0.30.0 or newer, all required MiniMax H3 model files downloaded, and the folder structure verified, you’re ready to load the Image-to-Video workflow and start generating videos with MiniMax H3.
3. Downloading and Loading the MiniMax H3 Image-to-Video Workflow
Now that ComfyUI has been updated and all the required MiniMax H3 model files are in place, it’s time to download and load the Image-to-Video workflow into ComfyUI. The workflow includes the necessary nodes and settings to generate videos from a source image with MiniMax H3.
Step 1: Download the Workflow
First, download the MiniMax H3 Image-to-Video workflow JSON file. This file contains the complete workflow configuration and will allow you to quickly set up the generation process without having to build the workflow manually.
👉 Download MiniMax H3 Image-to-Video Workflow JSON
Step 2: Load the Workflow
Once you have downloaded the workflow JSON file, open ComfyUI.
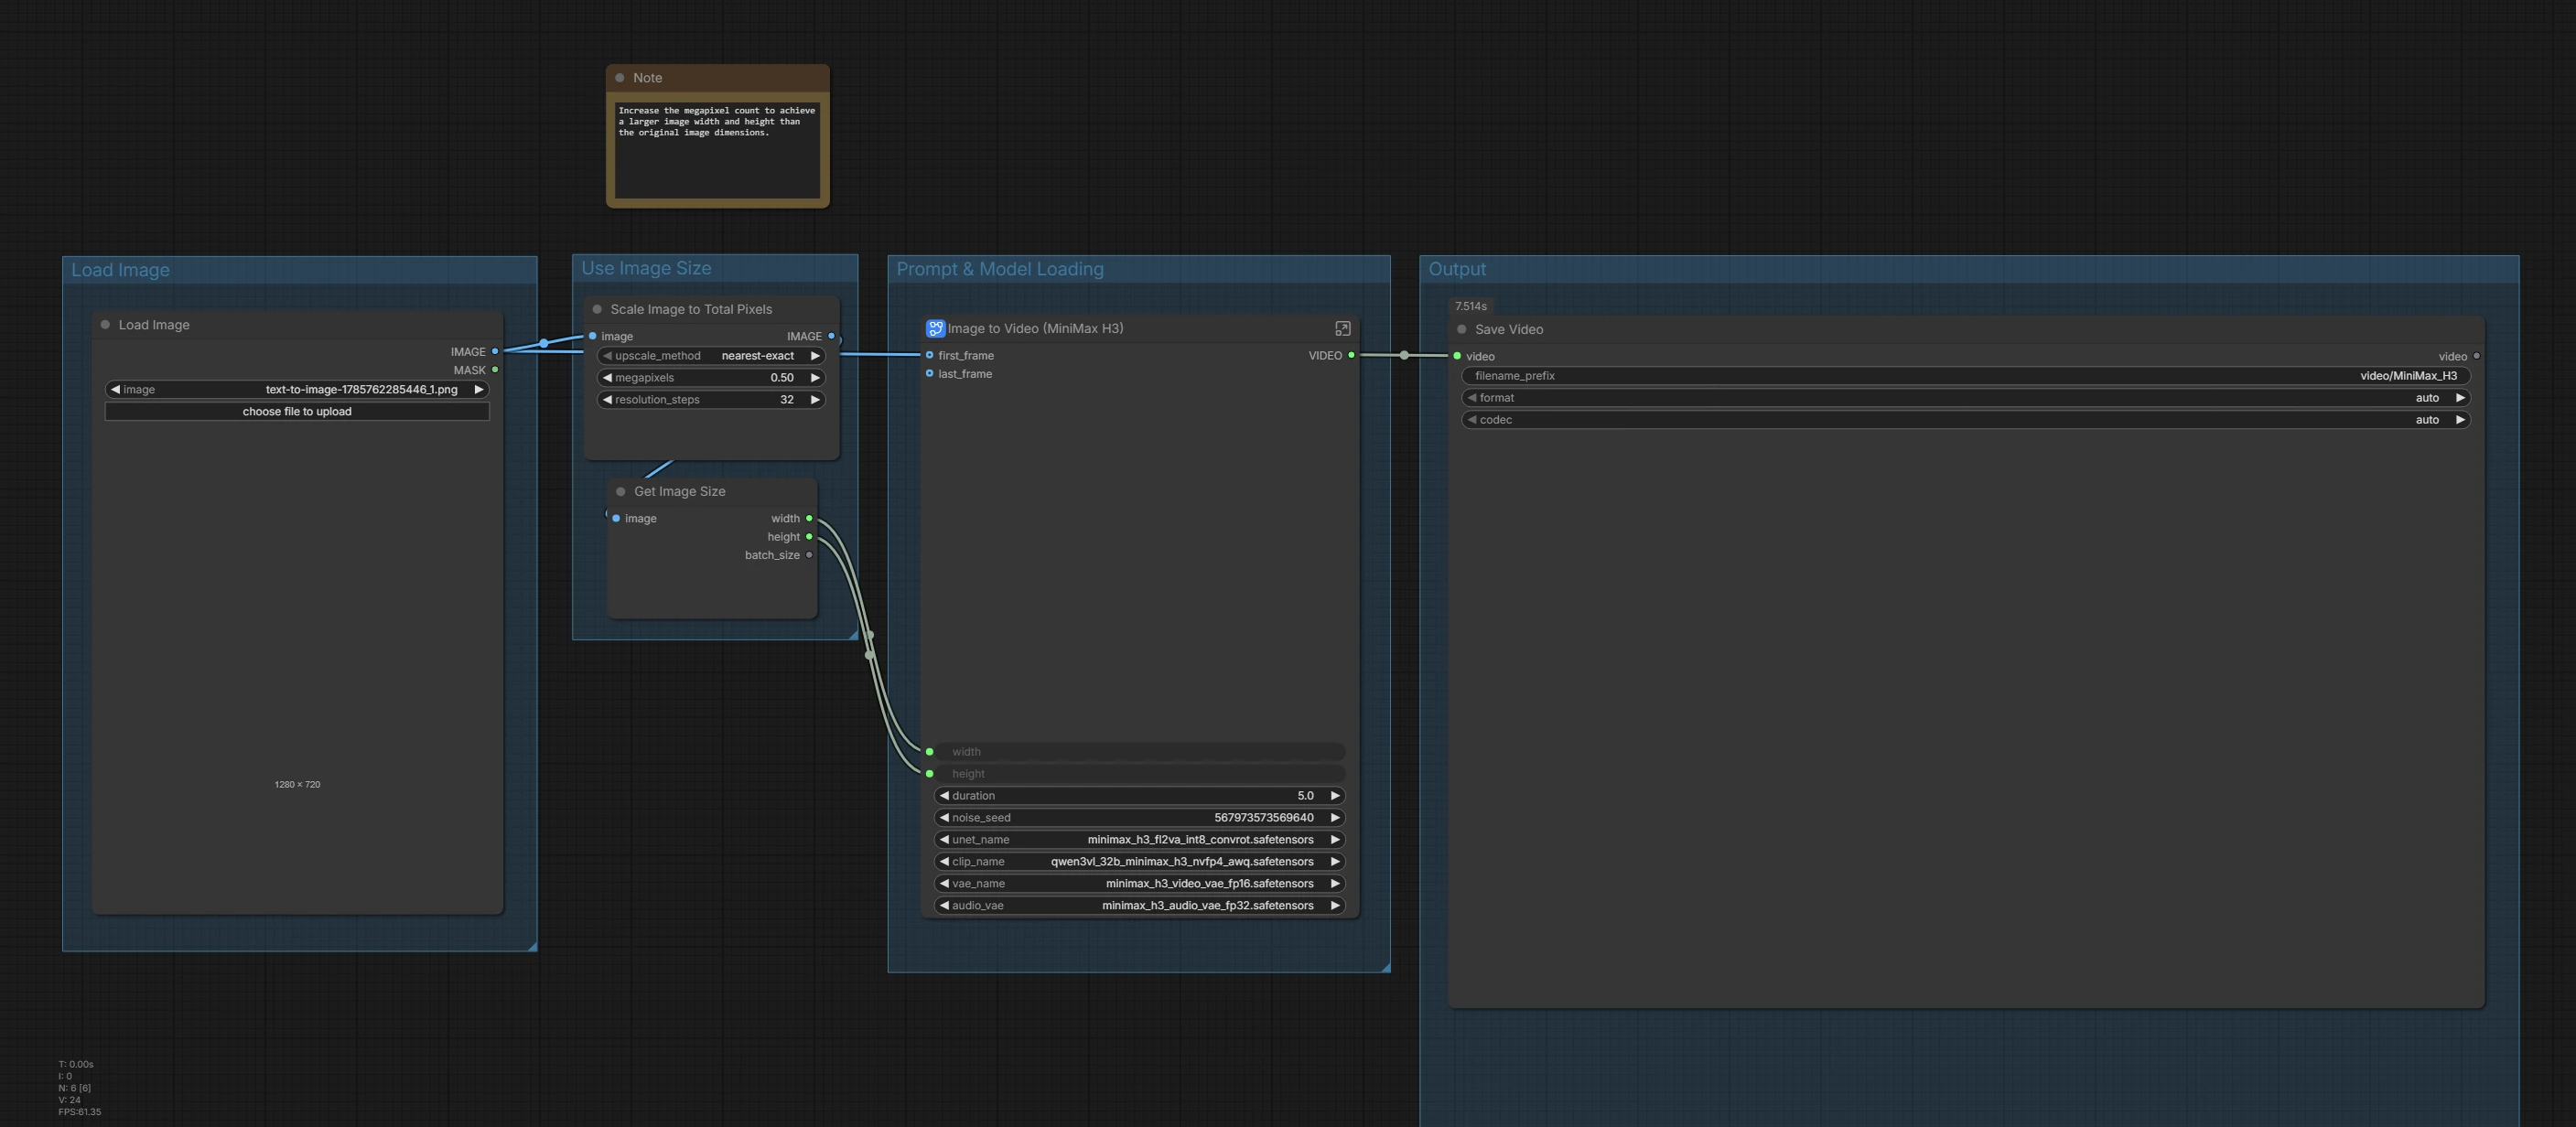
To load the workflow, simply drag and drop the JSON file into the ComfyUI interface. ComfyUI will automatically import the workflow and display all of the nodes and connections.
Step 3: Verify the Models
After loading the workflow, check that all required MiniMax H3 models have been detected correctly.
Verify the following components:
- Diffusion Model: minimax_h3_fl2va_int8_convrot.safetensors
- Text Encoder: qwen3vl_32b_minimax_h3_nvfp4_awq.safetensors
- Video VAE: minimax_h3_video_vae_fp16.safetensors
- Audio VAE: minimax_h3_audio_vae_fp32.safetensors
Diffusion Model: minimax_h3_fl2va_int8_convrot.safetensors
Text Encoder: qwen3vl_32b_minimax_h3_nvfp4_awq.safetensors
Video VAE: minimax_h3_video_vae_fp16.safetensors
Audio VAE: minimax_h3_audio_vae_fp32.safetensors
If all four models are loaded correctly without any missing-model errors, the workflow is ready to use.
You can now move on to configuring the workflow settings and preparing your source image for Image-to-Video generation with MiniMax H3.
MiniMax-H3 Available in The Hub
Create cinematic videos with first and last frame control and native stereo audio.
4. Configuring the Workflow Settings
With the MiniMax H3 Image-to-Video workflow loaded, you’re ready to configure the settings for your generation. The workflow is designed to keep things simple, with the main controls available directly in the Image to Video (MiniMax H3) node.
For most generations, you’ll primarily need to adjust three settings: prompt, image size, and video duration. The rest of the workflow can be left at its default settings.
Prompt
The prompt is the most important part of the MiniMax H3 workflow. Rather than simply describing what is already visible in your source image, use the prompt to tell the model what should happen throughout the video.
You can describe subject movement, camera movement, environmental changes, scene progression, transitions, dialogue, sound effects, music, and other audio elements. For more complex generations, prompts can also be structured into multiple shots or sections to describe how the scene develops over time.
For example, a simple prompt might describe a slow camera movement and subtle subject animation, while a more advanced prompt can define multiple shots, specific camera directions, transitions, and synchronized audio.
We’ll explore detailed prompting and several MiniMax H3 prompt examples later in this tutorial.
Image Size
For our first test runs, we’ll use approximately 0.5 megapixels rather than the full resolution of the uploaded image.
Our source images are 16:9 at 1280 × 720 pixels. When scaled to approximately 0.5 megapixels while maintaining the same aspect ratio, this results in a resolution of approximately 960 × 540 pixels.
Using a smaller image size keeps the first generations faster and more manageable while still providing enough resolution to test the workflow and evaluate the results.
Once the initial tests are complete, you can increase the image dimensions for higher-resolution generations.
Video Duration
The duration setting controls how long the generated video will be. Shorter clips are useful for testing prompts and experimenting with different movements, while longer durations give MiniMax H3 more time to develop a scene.
Keep in mind that increasing the duration also increases generation time and resource usage. The workflow automatically calculates the required frame count from the duration, so you don’t need to manually configure the number of frames.
For our initial generations, we’ll use a 5-second duration. This gives MiniMax H3 enough time to demonstrate motion and audio while keeping the generation process manageable.
Final Settings
For the first generation in this tutorial, we’ll use:
| Setting | Value |
|---|---|
| Source Image | 1280 × 720 pixels (16:9) |
| Mega Pixels | 0.5 (1.0 for original image upload dimensions) |
| Duration | 5 seconds |
| Seed | Randomized |
| Prompt | Custom prompt describing the desired motion, camera movement, and audio |
The remaining workflow settings can be left at their default values.
Once these settings are configured, you’re ready to generate your first Image-to-Video clip with MiniMax H3.
5. Generating Image-to-Video Examples with MiniMax H3
With everything configured, we’re ready to showcase our first image-to-video examples using MiniMax H3. For these examples, the videos are rendered at 720 × 2180 pixels, while maintaining the original 16:9 aspect ratio.
Below, you can see a selection of early image-to-video tests, showcasing how the generated characters, environments, movement, and cinematic effects translate from a still image into motion.
Watch the MiniMax H3 cinematic examples below 👇
MiniMax-H3 Available in The Hub
Create cinematic videos with first and last frame control and native stereo audio.
6. Conclusion
In conclusion, the MiniMax H3 Image-to-Video feature in ComfyUI offers a powerful way to create engaging video content from static images. Throughout this tutorial, we explored the essential steps, from setting up the environment and downloading the necessary files to configuring the workflow and generating videos. The capabilities of MiniMax H3, including open weights and local generation, allow for high-quality outputs with native stereo audio, making it an invaluable tool for content creators.
For those looking for even more control over video generation, check out the follow article:
👉 MiniMax H3: First Frame Last Frame Videos in ComfyUI, where we explore how to use first and last frames to guide the generation process and achieve more controlled results.
As you continue experimenting with MiniMax H3, you’ll quickly see how well it works for cinematic action shots, dynamic character movement, and atmospheric scenes. It’s also great for adding sound effects, text animations, and narration, making it a powerful tool for turning a single image into a polished, engaging video.
Frequently Asked Questions
What is MiniMax H3 and how does it work in ComfyUI?
What are the requirements for setting up MiniMax H3 Image-to-Video in ComfyUI?
How can I configure the workflow settings for generating videos with MiniMax H3?
Enjoyed this article? Share it with your network.