
Ideogram 4: Controlled Text-to-Image Generation in ComfyUI
Ideogram 4: Controlled Text-to-Image Generation in ComfyUI
1. Introduction
In the realm of image generation, Ideogram 4 stands out as a groundbreaking tool that redefines how we approach text-to-image models. This tutorial aims to guide you through the process of setting up and utilizing Ideogram 4 with ComfyUI, ensuring you can harness its full potential for creating stunning visuals. Ideogram 4 is not just another model; it is the first open-weight text-to-image model developed entirely from scratch, which means it offers unique capabilities that are not found in derivative models. One of its most significant features is the structured JSON prompting interface, which allows for precise control over various aspects of image generation, including layout, text placement, and visual composition. This is particularly beneficial for users who require high-quality typography and multilingual text rendering, as Ideogram 4 excels in these areas. In this tutorial, we will cover the essential requirements for running Ideogram 4, how to download and load the workflow, configure settings, and provide a practical example of poster generation. By the end of this guide, you will be equipped with the knowledge to create visually appealing designs that leverage the advanced capabilities of Ideogram 4.
Runpod Special Offer
Load $10, get up to $500 in bonus credits randomly!
2. Requirements & Setup for Ideogram-4 Workflow in ComfyUI (T2I)
Before running Ideogram 4 in ComfyUI, make sure your environment is properly configured. Start by installing ComfyUI and updating it to the latest version to ensure compatibility with the latest nodes, workflows, and FP8 models.
Ideogram 4 is a high-performance, VRAM-intensive model, especially when working with 2K outputs and structured text layouts. A GPU with 32 GB VRAM is recommended for smooth operation. If your local setup is limited, using a cloud GPU provider like Runpod is a practical alternative.
Requirement 1: ComfyUI Installed
You'll need ComfyUI running either locally or on a cloud GPU.
Local (Windows): 👉 How to Install ComfyUI Locally on Windows
Cloud GPU (RunPod): 👉 How to Run ComfyUI on RunPod with Network Volume
Requirement 2: Update ComfyUI
Keeping ComfyUI updated ensures compatibility with the latest workflows and model formats.
Windows Portable Users:
Navigate to:
1...\ComfyUI_windows_portable\update1...\ComfyUI_windows_portable\updateRun:
1
2update_comfyui.bat
1
2update_comfyui.batRunPod / Linux Users:
1
2cd /workspace/ComfyUI && git pull origin master && pip install -r requirements.txt && cd /workspace
1
2cd /workspace/ComfyUI && git pull origin master && pip install -r requirements.txt && cd /workspaceAlternatively, update directly via the Custom Node Manager inside ComfyUI.
Requirement 3: Download Ideogram 4 Model Files
Ideogram 4 uses a combination of diffusion models, a text encoder, and a VAE. Make sure all files are placed in the correct directories.
| File Name | Download Page | File Directory |
|---|---|---|
| ideogram4_fp8_scaled.safetensors | 🤗 Download Page | ..\ComfyUI\models\diffusion_models |
| ideogram4_unconditional_fp8_scaled.safetensors | 🤗 Download Page | ..\ComfyUI\models\diffusion_models |
| qwen3vl_8b_fp8_scaled.safetensors | 🤗 Download Page | ..\ComfyUI\models\text_encoders |
| flux2-vae.safetensors | 🤗 Download Page | ..\ComfyUI\models\vae |
Notes
- The diffusion models handle the core image generation process
- The Qwen3-VL encoder enables advanced prompt understanding and accurate text rendering
- The Flux2 VAE ensures high-quality image decoding and sharp output
The diffusion models handle the core image generation process
The Qwen3-VL encoder enables advanced prompt understanding and accurate text rendering
The Flux2 VAE ensures high-quality image decoding and sharp output
Requirement 4: Verify Folder Structure
Before launching ComfyUI, ensure your model files are placed in the correct directories. A proper folder structure is essential for the workflow to load without errors.
Your setup should look like this:
1📂 ComfyUI/
2├── 📂 models/
3│   ├── 📂 diffusion_models/
4│   │   ├── ideogram4_fp8_scaled.safetensors
5│   │   └── ideogram4_unconditional_fp8_scaled.safetensors
6│   ├── 📂 text_encoders/
7│   │   ├── qwen3vl_8b_fp8_scaled.safetensors
8│   ├── 📂 vae/
9│   │   └── flux2-vae.safetensors
1📂 ComfyUI/
2├── 📂 models/
3│ ├── 📂 diffusion_models/
4│ │ ├── ideogram4_fp8_scaled.safetensors
5│ │ └── ideogram4_unconditional_fp8_scaled.safetensors
6│ ├── 📂 text_encoders/
7│ │ ├── qwen3vl_8b_fp8_scaled.safetensors
8│ ├── 📂 vae/
9│ │ └── flux2-vae.safetensorsNotes
- Make sure all filenames match exactly (no extra extensions or renamed files).
- If models are not detected, reload ComfyUI after models are downloaded and are placed in the correct folder.
Make sure all filenames match exactly (no extra extensions or renamed files).
If models are not detected, reload ComfyUI after models are downloaded and are placed in the correct folder.
Once all files are correctly placed, restart ComfyUI to ensure everything loads properly before importing your workflow.
3. Downloading and Loading the Ideogram 4 Workflow
Once your environment is set up, the next step is to download and load the Ideogram 4 workflow into ComfyUI. This process is simple and only takes a few steps:
Step 1: Download the Workflow
👉 Download Ideogram-4 Text to Image Workflow
Start by downloading the Ideogram 4 workflow file in .json format. This file contains all required node configurations, model references, and prompt structure needed to generate images with proper text rendering and layout control.
Step 2: Load the Workflow in ComfyUI
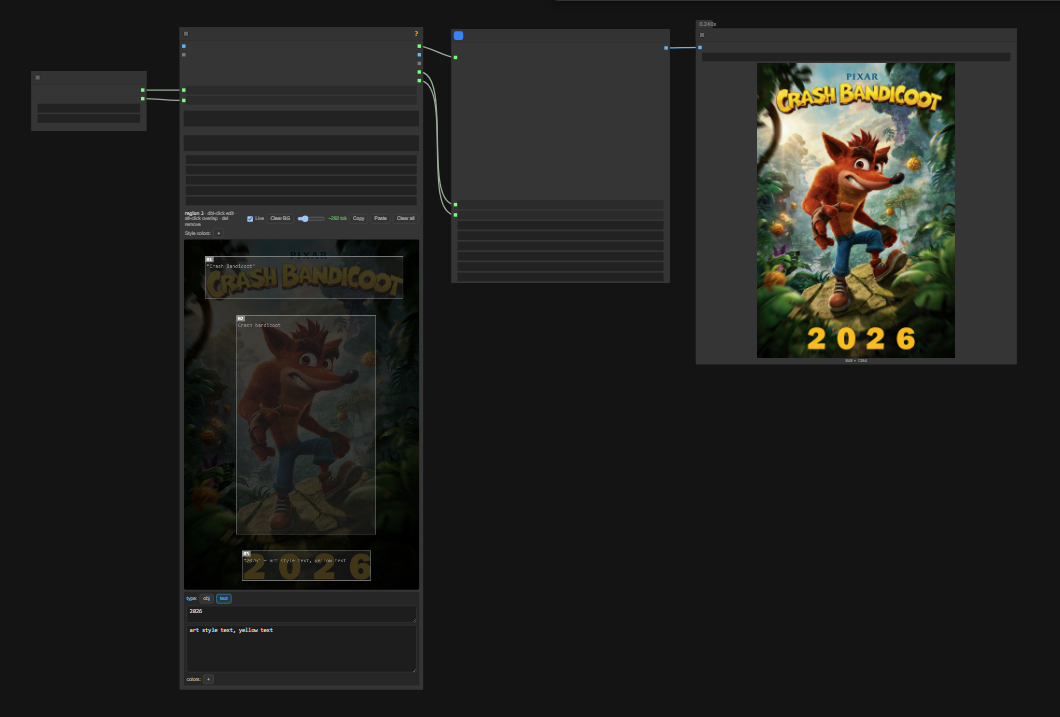
After downloading the workflow file, open ComfyUI.
To load the workflow, simply drag and drop the .json file into the ComfyUI interface. The workflow will automatically load, and all nodes will be arranged and ready for use.
Step 3: Verify Model Assignments
Once loaded, take a moment to confirm that all nodes are correctly assigned to the required models:
- Diffusion Model: ideogram4_fp8_scaled.safetensors
- Unconditional Model: ideogram4_unconditional_fp8_scaled.safetensors
- Text Encoder: qwen3vl_8b_fp8_scaled.safetensors
- VAE: flux2-vae.safetensors
Diffusion Model: ideogram4_fp8_scaled.safetensors
Unconditional Model: ideogram4_unconditional_fp8_scaled.safetensors
Text Encoder: qwen3vl_8b_fp8_scaled.safetensors
VAE: flux2-vae.safetensors
If any model is not assigned, click the node and manually select the correct file from the dropdown.
Step 4: Check for Missing Nodes
If any nodes appear red after loading the Ideogram-4 workflow, this usually indicates that your ComfyUI version is outdated and missing required core nodes are not installed or up to date to the newest version.
To fix this:
- Update ComfyUI to the latest version
- Restart ComfyUI after updating
Update ComfyUI to the latest version
Restart ComfyUI after updating
Once everything is updated, restart ComfyUI if prompted. After restarting, the red nodes should be resolved and the workflow will have access to the core nodes used in this workflow.
Once everything is correctly loaded and assigned, your workflow is ready for both standard prompt-based and/or structured JSON-based image generation with Ideogram 4.
Runpod Special Offer
Load $10, get up to $500 in bonus credits randomly!
4. Configuring the Workflow Settings
Configuring the workflow in Ideogram 4 plays a key role in how much control you have over your final results, especially when working with text-heavy designs like posters. While the model supports advanced structured prompting, there are two main approaches you can use depending on your workflow preference.
1. Natural Prompting
The simplest and most practical way to use Ideogram 4 is through natural language prompting directly inside the Text-to-Image node.
- Write your prompt normally (e.g., poster description, layout idea, text content)
- The model will handle text rendering surprisingly well without strict JSON structure
- Faster workflow with fewer steps
Write your prompt normally (e.g., poster description, layout idea, text content)
The model will handle text rendering surprisingly well without strict JSON structure
Faster workflow with fewer steps
In practice, this approach performs very well for most use cases, including posters. It’s also more reliable, since automatically generated structured layouts (e.g., via Gemma4) can occasionally introduce inconsistencies.
2. Structured JSON Prompting (Advanced)
For more precise control, Ideogram 4 supports structured JSON prompting, allowing you to define:
- Exact text content
- Bounding box positions (layout control)
- Font styles and sizes
- Color palettes
Exact text content
Bounding box positions (layout control)
Font styles and sizes
Color palettes
This is especially useful for complex layouts where precise positioning is important. Below is a structured JSON template that can be used directly within the Text-to-Image node, followed by a fully filled example.
1
2{
3    "high_level_description": "A cinematic poster for Crash Bandicoot 2026, vibrant, high-energy, stylized realism with cartoon elements",
4    "style_description": {
5        "aesthetics": "game key art, Pixar-like vibrancy mixed with realistic rendering",
6        "lighting": "golden hour sunlight with strong rim light, volumetric rays through jungle mist",
7        "medium": "digital illustration, game poster art",
8        "art_style": ""
9    },
10    "compositional_deconstruction": {
11        "background": "lush tropical jungle with ancient ruins, glowing plants, motion blur leaves, floating wumpa fruit",
12        "elements": [
13            {
14                "type": "text",
15                "bbox": [48, 89, 169, 932],
16                "text": "Crash Bandicoot",
17                "desc": ""
18            },
19            {
20                "type": "obj",
21                "bbox": [217, 222, 842, 816],
22                "desc": "Crash bandicoot"
23            },
24            {
25                "type": "text",
26                "bbox": [888, 246, 974, 794],
27                "text": "2026",
28                "desc": "art style text, yellow text"
29            }
30        ]
31    }
32}
1
2{
3 "high_level_description": "A cinematic poster for Crash Bandicoot 2026, vibrant, high-energy, stylized realism with cartoon elements",
4 "style_description": {
5 "aesthetics": "game key art, Pixar-like vibrancy mixed with realistic rendering",
6 "lighting": "golden hour sunlight with strong rim light, volumetric rays through jungle mist",
7 "medium": "digital illustration, game poster art",
8 "art_style": ""
9 },
10 "compositional_deconstruction": {
11 "background": "lush tropical jungle with ancient ruins, glowing plants, motion blur leaves, floating wumpa fruit",
12 "elements": [
13 {
14 "type": "text",
15 "bbox": [48, 89, 169, 932],
16 "text": "Crash Bandicoot",
17 "desc": ""
18 },
19 {
20 "type": "obj",
21 "bbox": [217, 222, 842, 816],
22 "desc": "Crash bandicoot"
23 },
24 {
25 "type": "text",
26 "bbox": [888, 246, 974, 794],
27 "text": "2026",
28 "desc": "art style text, yellow text"
29 }
30 ]
31 }
32}3. Using the Ideogram 4 Prompt Builder KJ Node
For users who want more control over their compositions without manually writing large JSON structures, the Ideogram 4 Prompt Builder KJ node provides a visual way to build structured prompts for Ideogram 4.
The node allows you to define the major components of the image separately:
- High Level Description – A concise description of the overall image concept.
- Background Prompt – Defines the scene, environment, and supporting visual elements.
- Style Settings – Select a predefined style and further customize: Art Style / Aesthetics Lighting Medium
- Art Style / Aesthetics
- Lighting
- Medium
- Style Colors (optional) – Guide the overall visual appearance and branding.
High Level Description – A concise description of the overall image concept.
Background Prompt – Defines the scene, environment, and supporting visual elements.
Style Settings – Select a predefined style and further customize:
- Art Style / Aesthetics
- Lighting
- Medium
Art Style / Aesthetics
Lighting
Medium
Style Colors (optional) – Guide the overall visual appearance and branding.
The most powerful feature of the node is its Bounding Box Builder, which allows you to create structured layouts visually. Each bounding box represents a specific region of the final image and can be assigned one of two element types:
- Object (obj) – Generates a visual element within the specified area.
- Text (text) – Renders text inside the defined placement box.
Object (obj) – Generates a visual element within the specified area.
Text (text) – Renders text inside the defined placement box.
This makes it easy to create posters, advertisements, magazine covers, social media graphics, and other layouts where both imagery and typography need to appear in specific locations.
For example, you could:
- Reserve the center of the image for the main character or product.
- Place a large title at the top of the poster.
- Position a tagline along the side.
- Add supporting visual elements in the corners.
Reserve the center of the image for the main character or product.
Place a large title at the top of the poster.
Position a tagline along the side.
Add supporting visual elements in the corners.
The Prompt Builder automatically converts these settings into the structured JSON format expected by Ideogram 4, making it much easier to create complex layouts without manually editing JSON. This provides a workflow that combines the flexibility of structured prompting with the convenience of a visual editor.
5. Image Generation Example with Ideogram 4
One of the most compelling use cases for Ideogram 4 is its ability to generate posters with structured text placement and clarity. In this section, we will walk through an example of creating an event poster, showcasing how to leverage the model's strengths effectively.
Example 1: Crash Bandicoot Poster
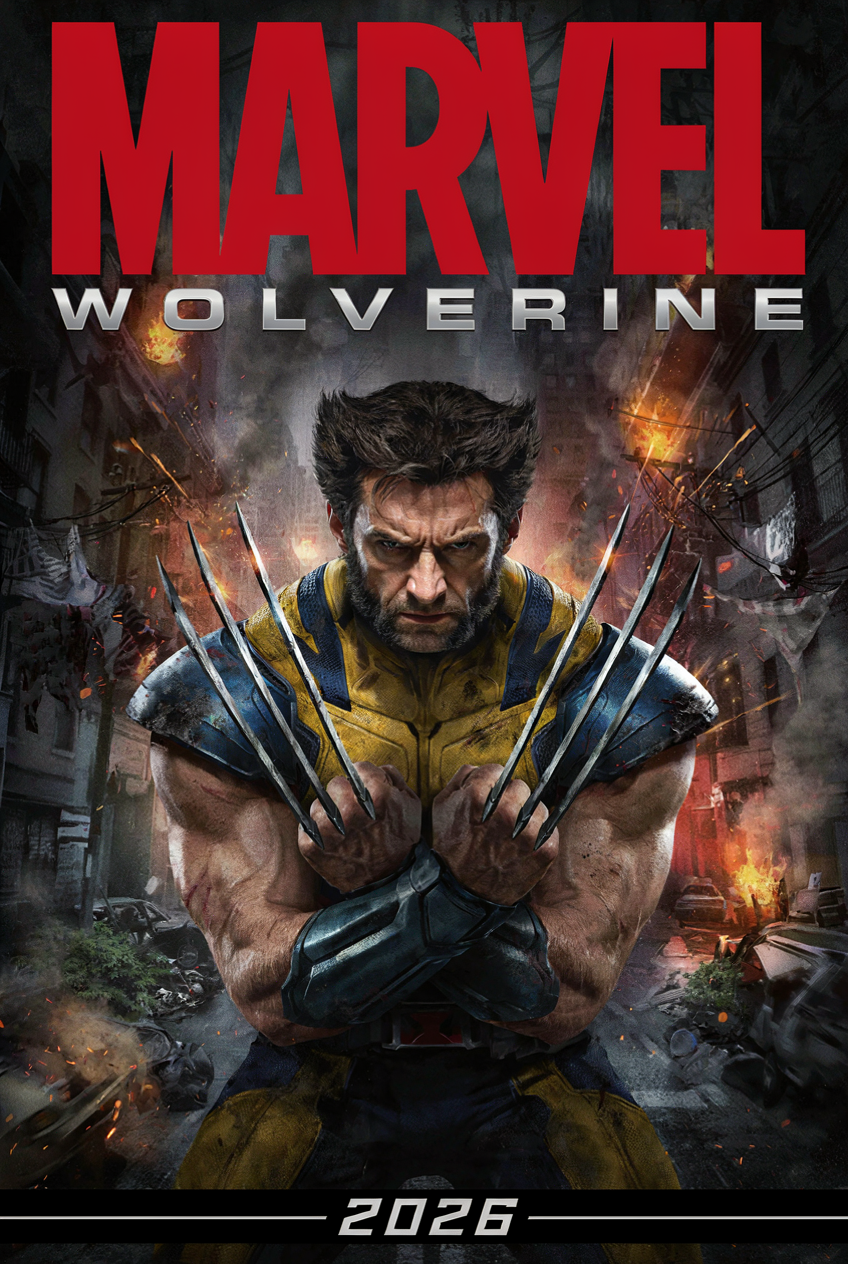
### Example 2: Marvel Poster

### Example 3: Call of Duty Poster
### Workflow Tips

To achieve the best results, consider the following tips:
- Use Ideogram 4 Prompt Builder KJ Node to lock text into specific positions, ensuring that each element is placed exactly where you want it.
- Maintain high contrast between text and background for optimal readability.
- Avoid overly complex backgrounds behind text, as this can detract from the message.
- Ensure consistent spacing and alignment throughout the poster/image to create a professional appearance.
Use Ideogram 4 Prompt Builder KJ Node to lock text into specific positions, ensuring that each element is placed exactly where you want it.
Maintain high contrast between text and background for optimal readability.
Avoid overly complex backgrounds behind text, as this can detract from the message.
Ensure consistent spacing and alignment throughout the poster/image to create a professional appearance.
Runpod Special Offer
Load $10, get up to $500 in bonus credits randomly!
6. Conclusion
Ideogram 4 is a powerful step forward in text-to-image generation, especially when it comes to text rendering and layout control. With its structured JSON training and support for bounding boxes and color palettes, it’s particularly well-suited for poster and design workflows.
While a 32 GB VRAM setup is recommended for smooth performance, the level of precision it offers makes it a strong choice for creators who need control over their compositions. Keep in mind that the model includes built-in safety filtering, so any “image blocked” messages come from the model itself, not ComfyUI.
Overall, Ideogram 4 is one of the most capable tools available for creating text-heavy and object layout-driven visuals.
Frequently Asked Questions
What are the minimum requirements to run Ideogram 4 with ComfyUI?
How does the structured JSON prompting system work in Ideogram 4?
What types of projects can benefit from using Ideogram 4?
Enjoyed this article? Share it with your network.