
How to Use SCAIL-2 for Video-to-Character Motion Transfer in ComfyUI
How to Use SCAIL-2 for Video-to-Character Motion Transfer in ComfyUI
1. Introduction
Character animation has taken a huge leap forward with SCAIL-2, the next generation of the popular SCAIL model. Unlike its predecessor, SCAIL-2 removes the need for intermediate pose representations entirely — no skeleton maps, no openpose overlays, no inpainting masks. Instead, it uses a fully end-to-end approach to transfer motion from a driving video directly onto a reference character image, producing smooth, 3D-consistent animations with remarkable fidelity.
SCAIL-2 was trained on 60,000 synthesized motion pairs and introduces a Unified Motion Transfer Interface that goes beyond what earlier models could achieve. This unlocks powerful emergent capabilities such as cross-identity character replacement, animal-driving scenarios, and zero-shot support for advanced control inputs like SAM3D mesh rendering.
In this tutorial, you will learn how to use SCAIL-2 inside ComfyUI for high-quality video motion transfer. The workflow supports a wide range of characters — from stylized anime figures to realistic human subjects — making it one of the most versatile character animation tools available today. By the end of this guide, you will have everything set up and will have generated your first end-to-end motion transfer animation.
Run SCAIL-2 in The HUB
Generate character animations from a source video and reference image.
2. Requirements for Running SCAIL-2 in ComfyUI
Before generating character animations with SCAIL-2, make sure your system meets the necessary hardware and software requirements. Since this workflow uses large video diffusion models, a powerful GPU with sufficient VRAM is strongly recommended.
For the best experience, we recommend:
- RTX 5090 (32GB VRAM) or higher for local setups
- Or use a cloud GPU provider like RunPod if your local hardware is limited
RTX 5090 (32GB VRAM) or higher for local setups
Or use a cloud GPU provider like RunPod if your local hardware is limited
Cloud environments can make setup much easier and allow you to run heavier workflows without worrying about VRAM limitations.
Requirement 1: Install ComfyUI (Local or Cloud)
To run the SCAIL-2 workflow, you need ComfyUI installed and running. You can either install it locally on your machine or launch it using a cloud GPU service.
Option 1: For a local installation on Windows, follow this guide:
👉 How to Install ComfyUI Locally on Windows
Option 2 (Recommended): Run ComfyUI on RunPod Running locally works with a strong GPU, but RunPod simplifies setup with pre-installed dependencies, faster cloud GPUs, and persistent storage for your models and outputs.
👉 How to Run ComfyUI on RunPod with Network Volume
Requirement 2: Download SCAIL-2 Model Files
To run the SCAIL-2 motion transfer workflow in ComfyUI, you need to download several required models. These models power the video generation, motion conditioning, and image encoding used by the workflow.
| File Name | Download Page | File Directory |
|---|---|---|
| wan2.1_14B_SCAIL_2_fp8_scaled.safetensors | 🤗 Download Page | ComfyUI/models/diffusion_models |
| wan21-lightx2v-i2v-14b-480p-cfg-step-distill-rank256-bf16.safetensors | 🤗 Download Page | ComfyUI/models/loras |
| umt5_xxl_fp8_e4m3fn_scaled.safetensors | 🤗 Download Page | ComfyUI/models/text_encoders |
| clip_vision_h.safetensors | 🤗 Download Page | ComfyUI/models/clip_vision |
| Wan2_1_VAE_bf16.safetensors | 🤗 Download Page | ComfyUI/models/vae |
💡 Note: Compared to SCAIL-1, the SCAIL-2 workflow no longer requires ControlNet, YOLOv10, or ViTPose models. SCAIL-2's end-to-end design eliminates the need for any external pose detection or skeleton extraction entirely.
💡 Note: Compared to SCAIL-1, the SCAIL-2 workflow no longer requires ControlNet, YOLOv10, or ViTPose models. SCAIL-2's end-to-end design eliminates the need for any external pose detection or skeleton extraction entirely.
Requirement 3: Verify Folder Structure
Before running the SCAIL-2 animation workflow, confirm that all model files are placed in the correct directories.
Your folder structure should look like this:
1📁 ComfyUI/
2└── 📁 models/
3    ├── 📁 diffusion_models/
4    │   └── wan2.1_14B_SCAIL_2_fp8_scaled.safetensors
5    ├── 📁 loras/
6    │   └── wan21-lightx2v-i2v-14b-480p-cfg-step-distill-rank256-bf16.safetensors
7    ├── 📁 text_encoders/
8    │   └── umt5_xxl_fp8_e4m3fn_scaled.safetensors
9    ├── 📁 vae/
10    │   └── Wan2_1_VAE_bf16.safetensors
11    ├── 📁 clip_vision/
12    │   └── clip_vision_h.safetensors
1📁 ComfyUI/
2└── 📁 models/
3 ├── 📁 diffusion_models/
4 │ └── wan2.1_14B_SCAIL_2_fp8_scaled.safetensors
5 ├── 📁 loras/
6 │ └── wan21-lightx2v-i2v-14b-480p-cfg-step-distill-rank256-bf16.safetensors
7 ├── 📁 text_encoders/
8 │ └── umt5_xxl_fp8_e4m3fn_scaled.safetensors
9 ├── 📁 vae/
10 │ └── Wan2_1_VAE_bf16.safetensors
11 ├── 📁 clip_vision/
12 │ └── clip_vision_h.safetensorsOnce verified, restart ComfyUI to detect the models. In the next section, we'll download and load the SCAIL-2 workflow JSON to get started with motion transfer animation.
3. Downloading and Setting Up the SCAIL-2 Workflow
Once you have confirmed that all requirements are met, the next step is to download and load the SCAIL-2 workflow into ComfyUI. This workflow is designed to streamline the setup process by pre-connecting all essential nodes needed for end-to-end video motion transfer.
Step 1: Download Workflow File
Begin by downloading the JSON workflow file specifically created for SCAIL-2. This file contains all the necessary nodes and configurations to facilitate high-fidelity character animation without any intermediate pose extraction steps.
👉 Download SCAIL-2 Workflow JSON
Step 2: Load Workflow in ComfyUI
After downloading the workflow file:
- Open ComfyUI.
- Drag and drop the JSON file onto the canvas.
Open ComfyUI.
Drag and drop the JSON file onto the canvas.
This action will automatically load all the nodes required for SCAIL-2, including the diffusion model loader, LoRA, CLIP Vision encoder, text encoder, VAE, and video combine nodes.
### Step 3: Verify Model Connections
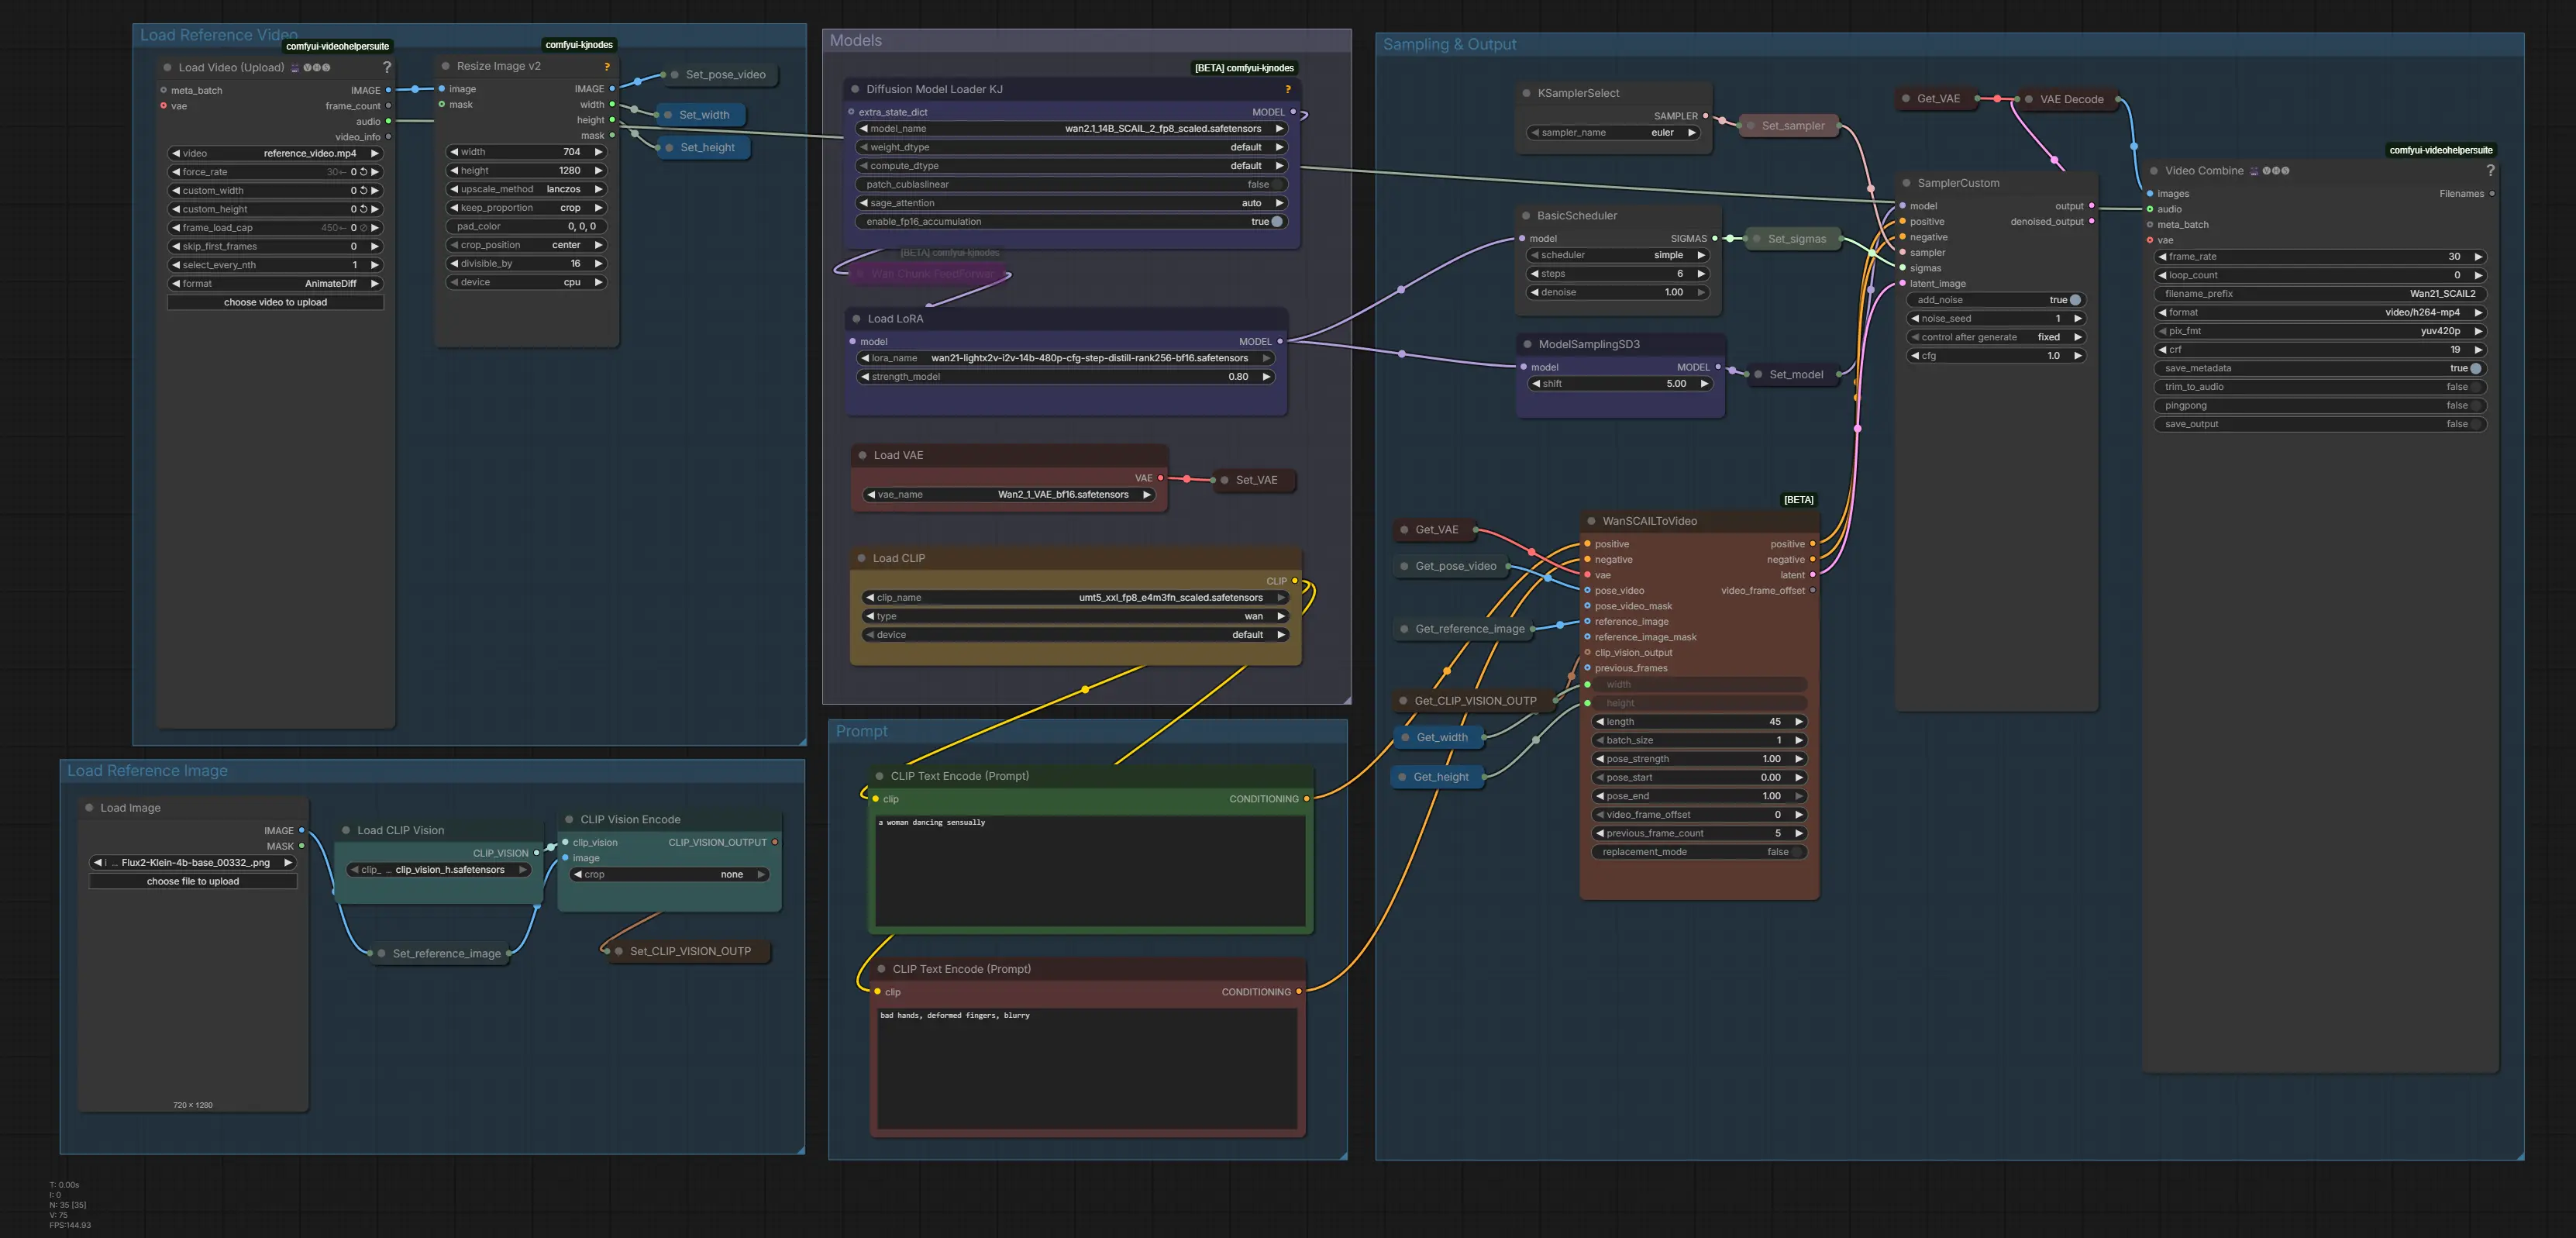
It's crucial to ensure that all model connections are correctly established.
- Nodes that appear red or show errors may indicate missing models or custom nodes.
- Install any required dependencies via the node manager and restart ComfyUI. The following are required by this workflow: ComfyUI-VideoHelperSuite KJNodes for ComfyUI
- ComfyUI-VideoHelperSuite
- KJNodes for ComfyUI
Nodes that appear red or show errors may indicate missing models or custom nodes.
Install any required dependencies via the node manager and restart ComfyUI. The following are required by this workflow:
- ComfyUI-VideoHelperSuite
- KJNodes for ComfyUI
⚠️ Important: The SCAIL2ColoredMask node requires the nightly version of ComfyUI (master branch). If you are running a stable release, switch to the master branch before running this workflow or the node will not be recognized and the workflow will fail.
Run SCAIL-2 in The HUB
Generate character animations from a source video and reference image.
4. Generating Your First Motion Transfer Animation with SCAIL-2
With SCAIL-2 successfully set up in ComfyUI, it's time to create your first end-to-end motion transfer animation. Because SCAIL-2 does not rely on pose extraction or skeleton intermediates, the workflow is cleaner and more straightforward than its predecessor. Here's a clear step-by-step process:
Step 1: Select Models
Begin by selecting the models you downloaded earlier. Make sure they are correctly loaded in the Step 1 Group of the SCAIL-2 workflow. This ensures all animation nodes have access to the right models:
- Diffusion Model: wan2.1_14B_SCAIL_2_fp8_scaled.safetensors
- LoRA: wan21-lightx2v-i2v-14b-480p-cfg-step-distill-rank256-bf16.safetensors
- Text Encoder (CLIP): umt5_xxl_fp8_e4m3fn_scaled.safetensors
- CLIP Vision: clip_vision_h.safetensors
- VAE: Wan2_1_VAE_bf16.safetensors
Diffusion Model: wan2.1_14B_SCAIL_2_fp8_scaled.safetensors
LoRA: wan21-lightx2v-i2v-14b-480p-cfg-step-distill-rank256-bf16.safetensors
Text Encoder (CLIP): umt5_xxl_fp8_e4m3fn_scaled.safetensors
CLIP Vision: clip_vision_h.safetensors
VAE: Wan2_1_VAE_bf16.safetensors
Step 2: Upload Driving Video and Reference Image
Provide a driving video and a reference character image:
- The driving video supplies the motion that will be transferred onto your character. This can be any video — a person dancing, an animal moving, or any other motion source.
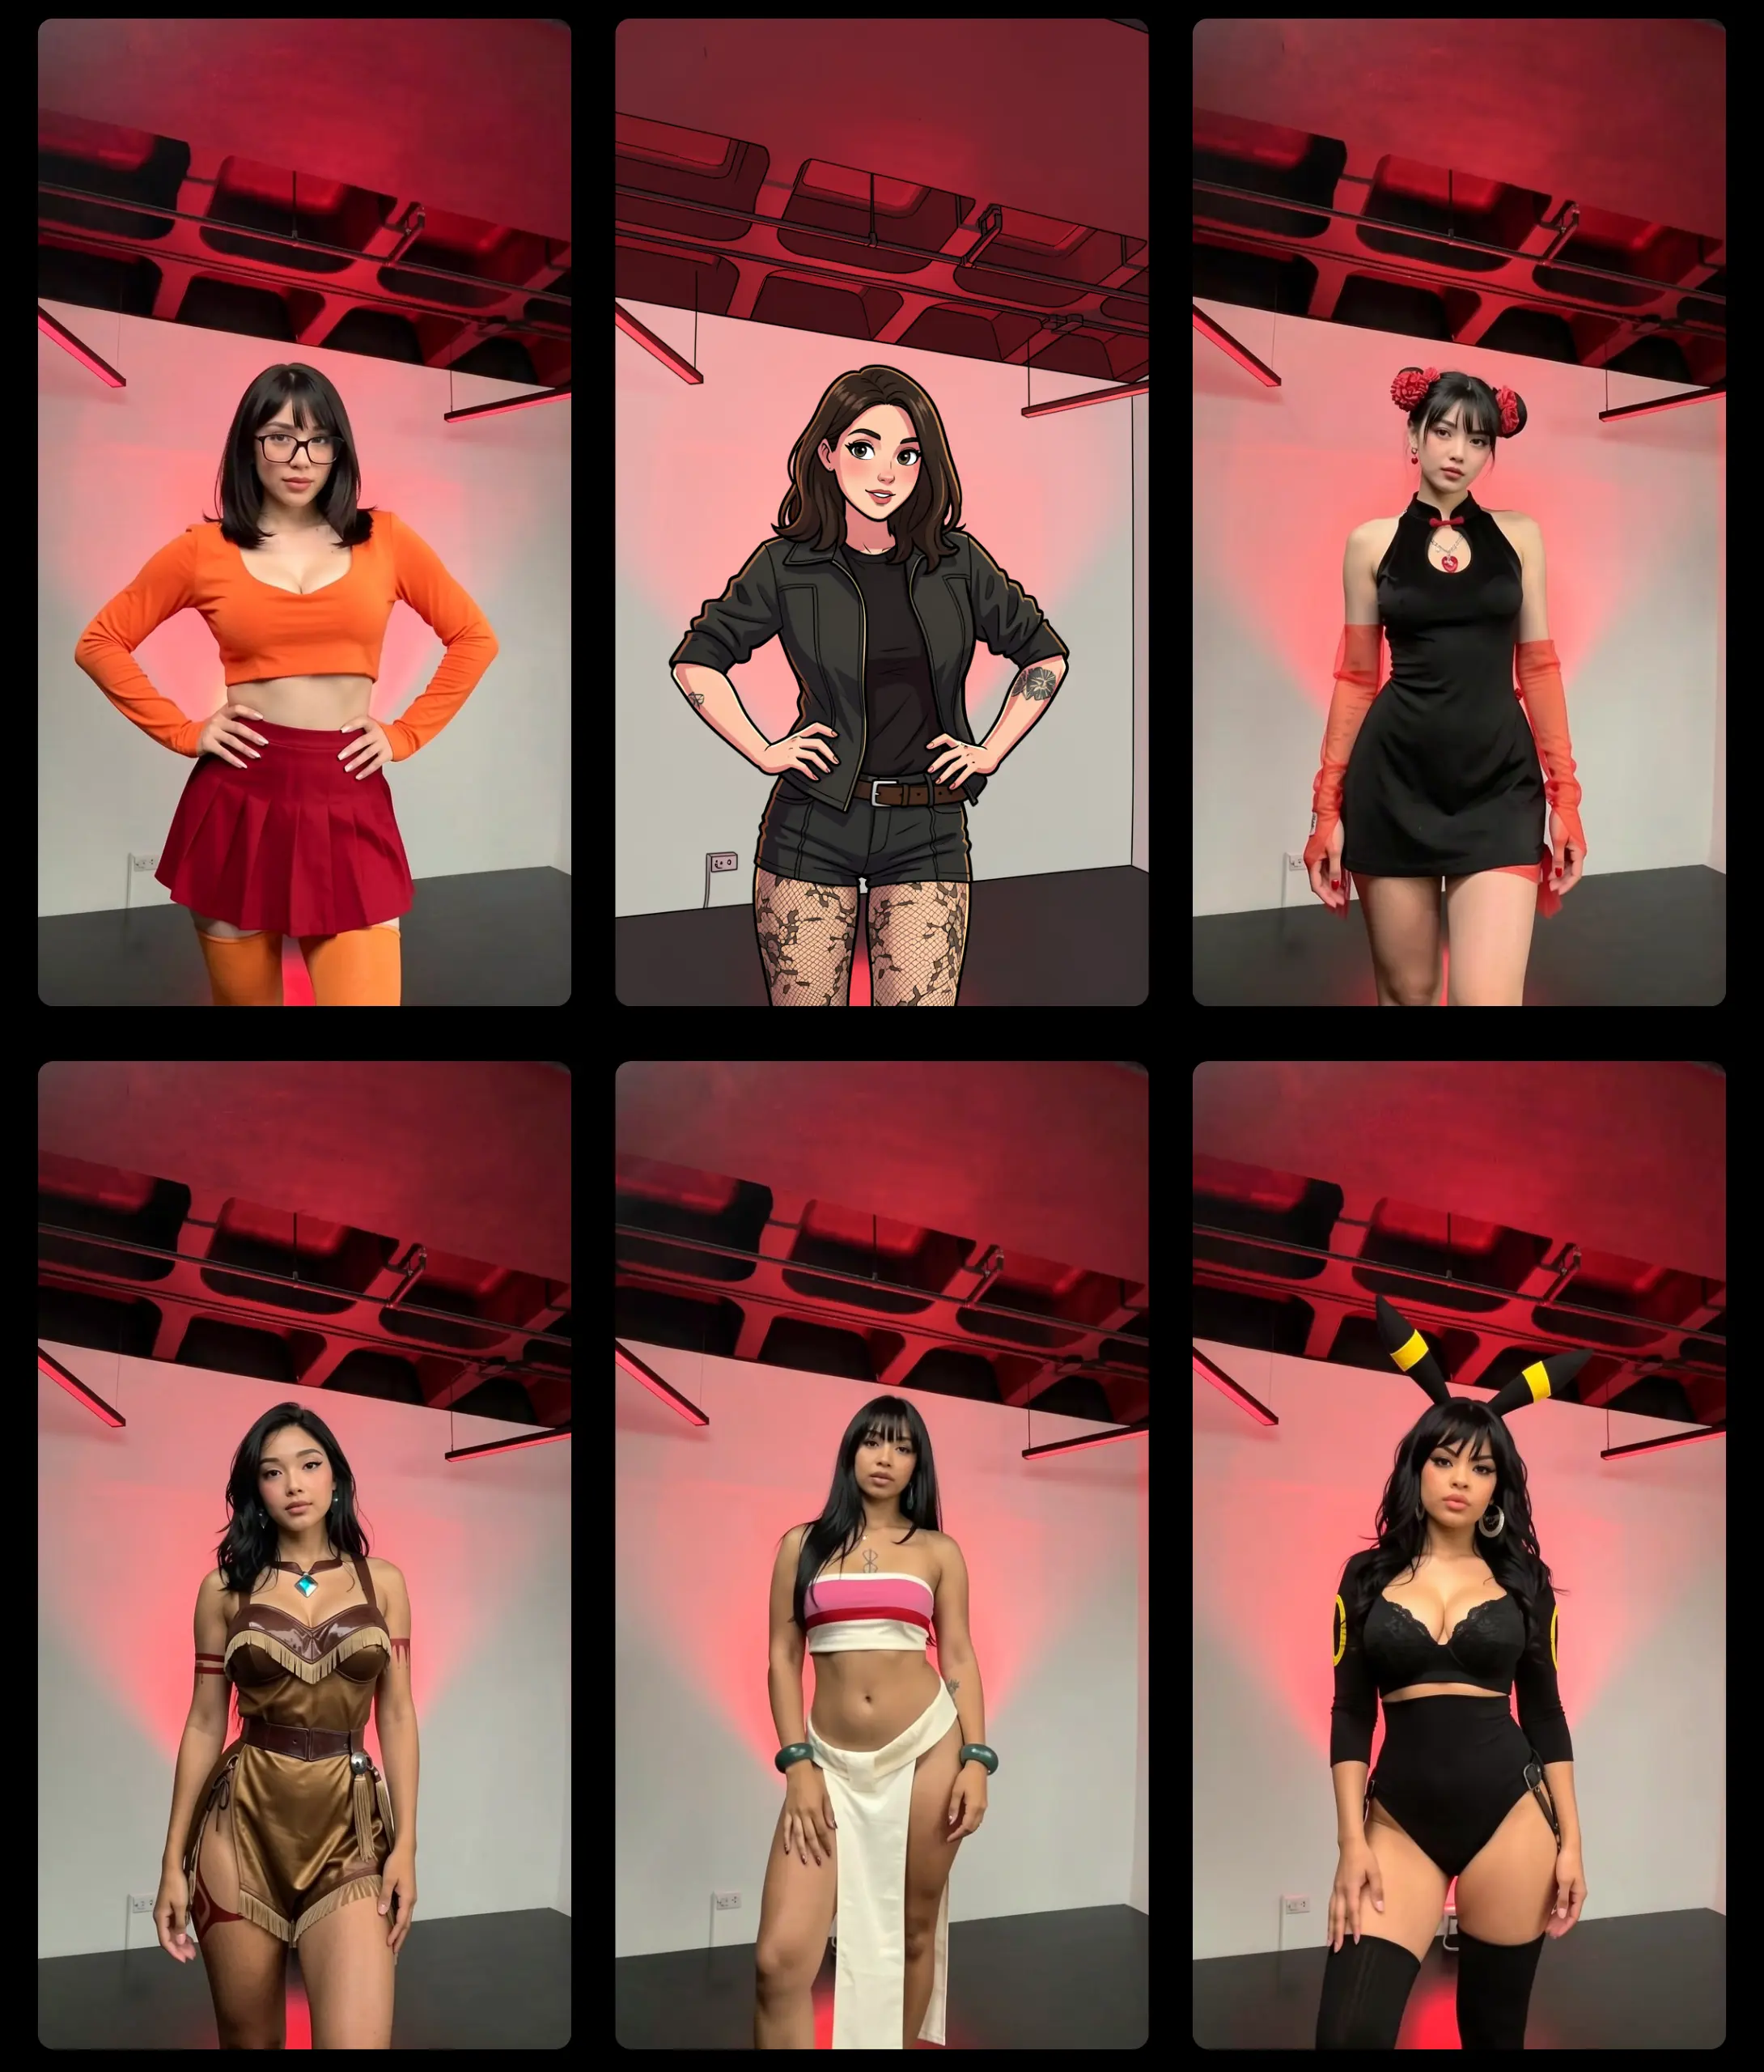
- The reference image defines the visual appearance and identity of the character that will be animated. I used the following reference images (created with Image to Image):
The driving video supplies the motion that will be transferred onto your character. This can be any video — a person dancing, an animal moving, or any other motion source.
The reference image defines the visual appearance and identity of the character that will be animated. I used the following reference images (created with Image to Image):
Because SCAIL-2 works end-to-end, there is no need to pre-process the driving video into pose maps or skeletons. The model handles all motion understanding internally.
Step 3: Set Resolution
Set the Width and Height for the output video.
⚠️ Important: Both values must be divisible by 16 to avoid tensor mismatches in the model. A recommended starting resolution is 704×1280 for portrait-oriented content, perfect for social media.
Step 4: Configure Prompts
Provide a positive prompt to guide the character's appearance and animation style, and a negative prompt to suppress unwanted artifacts.
Since motion is driven entirely by the input video rather than text, the positive prompt can be simple — for example:
"a woman sensually dancing"
"a woman sensually dancing"
For the negative prompt, standard quality suppressors work well:
"bad hands, deformed fingers, blurry"
"bad hands, deformed fingers, blurry"
Step 5: Sampling Settings
Configure the BasicScheduler and KSamplerSelect parameters for optimal results. The workflow uses the following recommended settings:
| Parameter | Value | Notes |
|---|---|---|
| scheduler | simple | Default scheduler for smooth generation |
| sampler | euler | Fast and reliable for video diffusion |
| steps | 6 | Balanced quality vs. speed |
| shift | 1 | Adjustment for scheduler alignment |
| cfg | 1 | Effectively uses the distilled LoRA guidance |
The workflow uses SamplerCustom with the distilled LightX2V LoRA for efficient high-quality generation. This combination reduces inference steps while maintaining motion fidelity.
Final Step: Generate Animation
Once all settings are correctly configured, click RUN. SCAIL-2 will transfer the motion from your driving video onto your reference character — completely end-to-end, with no intermediate steps required.
Then, just sit back and watch your character animation come to life. 🎬
💡 Tip: The workflow outputs video at 30 fps by default via the VHS VideoCombine node. You can adjust the frame rate there if needed.
💡 Tip: The workflow outputs video at 30 fps by default via the VHS VideoCombine node. You can adjust the frame rate there if needed.
5. Conclusion
In conclusion, SCAIL-2 in ComfyUI represents a groundbreaking advancement in AI-powered character animation and video motion transfer. By eliminating the need for intermediate pose representations, such as skeleton maps and openpose overlays, SCAIL-2 offers a cleaner and more efficient workflow for animating characters with driving videos. This model not only simplifies the animation process but also introduces exciting capabilities like cross-identity character replacement and animal-driven scenarios.
Whether you are a professional animator, a content creator, or simply exploring the world of character animation, SCAIL-2 provides a powerful tool to produce smooth, high-fidelity motion. Its end-to-end architecture, combined with its emergent abilities, makes it one of the most exciting open-source animation models available today. By following this tutorial, you are now equipped to harness the full potential of SCAIL-2 for your animation projects, allowing you to create captivating and dynamic character animations effortlessly.
Run SCAIL-2 in The HUB
Generate character animations from a source video and reference image.
Frequently Asked Questions
What is SCAIL-2 in ComfyUI?
How is SCAIL-2 different from SCAIL-1?
What are the requirements for running SCAIL-2 in ComfyUI?
Enjoyed this article? Share it with your network.