
How to Use Qwen Multi-Image Edit 2509 in ComfyUI
How to Use Qwen Multi-Image Edit 2509 in ComfyUI
1. Introduction
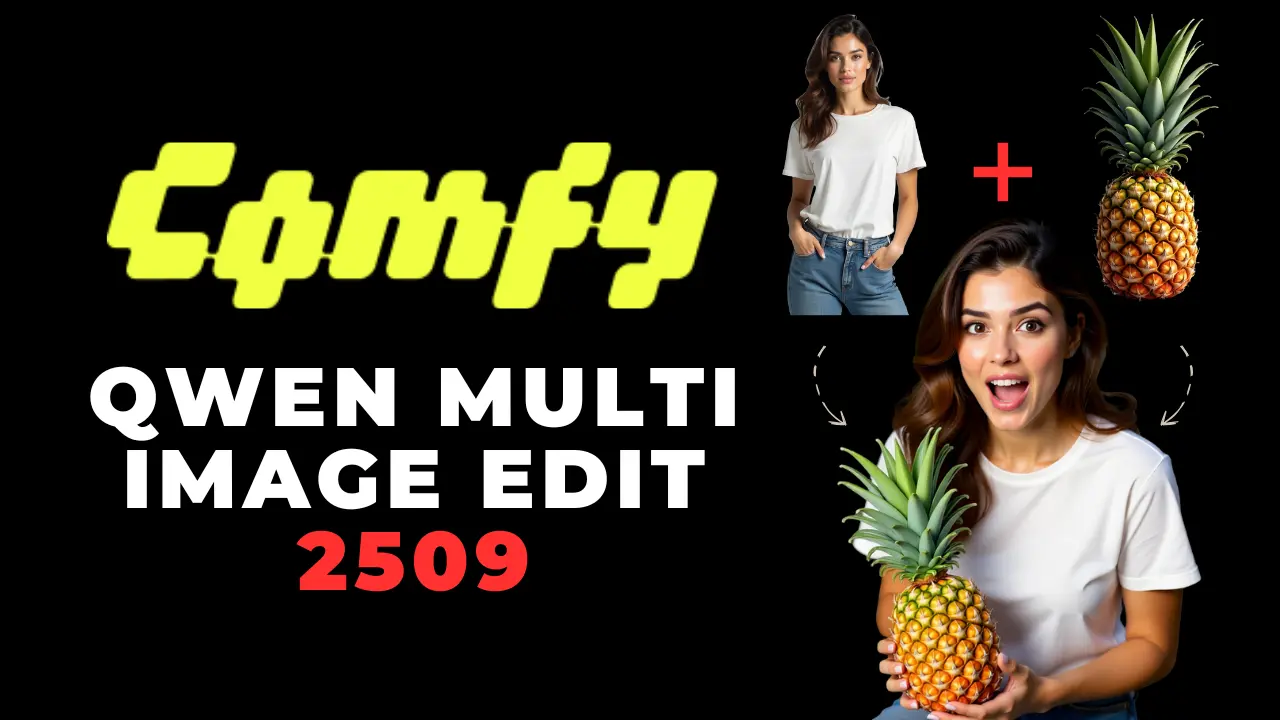
Welcome to this comprehensive tutorial on using Qwen Multi-Image Edit 2509 in ComfyUI! In the world of digital image editing, the ability to manipulate multiple images simultaneously can significantly enhance your creative workflow.
Qwen-Image-Edit is a powerful tool designed specifically for this purpose, allowing you to perform dual semantic and appearance editing tasks with ease. Whether you want to blend multiple characters, insert an object into an existing scene, or combine a background with a persona, Qwen Multi-Image Editing gives you the flexibility to work with two images and seamlessly merge them into a coherent result.
This tutorial will guide you through the entire process of setting up a multi-image workflow in ComfyUI, from downloading the necessary files to running your first multi-image edit. By the end of this guide, you will have a solid understanding of how to leverage Qwen-Image-Edit for your creative projects, enabling you to produce stunning results with precision and efficiency. Let's dive in!
Workflows Ready to RUN
Launch Qwen Mutli Image Editing on Next Diffusion
2. Requirements for Qwen Multi-Image Editing 2509
Before setting up Qwen Multi-Image Editing 2509, it’s important to make sure your system is properly configured. This includes installing ComfyUI, downloading the required model files, and verifying the correct folder structure so that everything runs smoothly.
Requirement 1: Install ComfyUI
To begin, you’ll need ComfyUI installed on your machine. If you haven’t set it up yet, you can either install locally or use a cloud GPU provider such as RunPod.
- Option 1: Local Installation How to Install ComfyUI Locally on Windows?
- Option 2: Cloud GPU (RunPod) How to Run ComfyUI on RunPod with Network Volume
Option 1: Local Installation How to Install ComfyUI Locally on Windows?
Option 2: Cloud GPU (RunPod) How to Run ComfyUI on RunPod with Network Volume
Requirement 2: Keep ComfyUI Updated
For full compatibility with the Qwen-Image-Edit workflow, ensure you are using the latest stable or nightly
For Windows Portable Users (Local)
- Open the folder: ...\ComfyUI_windows_portable\update
- Double-click update_comfyui.bat.
Open the folder: ...\ComfyUI_windows_portable\update
Double-click update_comfyui.bat.
For Runpod Users:
From the RunPod terminal, run the following command line in your terminal
1
2
3cd /workspace/ComfyUI && git pull origin master && /workspace/venv/bin/python3 -m pip install -r requirements.txt && cd /workspace
1
2
3cd /workspace/ComfyUI && git pull origin master && /workspace/venv/bin/python3 -m pip install -r requirements.txt && cd /workspaceRegularly updating ComfyUI ensures access to the newest features and nodes, along with important bug fixes and compatibility enhancements.
Requirement 3: Download Qwen Model Files
Next, download the required model files for Qwen Mutli Image Edit 2509. Place each file in the correct ComfyUI directory as shown below:
| File Name | Hugging Face Download Page | ComfyUI Directory |
|---|---|---|
| qwen_image_edit_2509_fp8_e4m3fn.safetensors | Download page | ../ComfyUI/models/diffusion_models/ |
| qwen_image_vae.safetensors | Download page | ../ComfyUI/models/vae/ |
| qwen_2.5_vl_7b_fp8_scaled.safetensors | Download page | ../ComfyUI/models/text_encoders/ |
| Qwen-Image-Edit-Lightning-4steps-V1.0.safetensors | Download page | ../ComfyUI/models/loras/ |
Requirement 4: Verify Folder Structure
1📂 ComfyUI
2└── 📂 models
3    ├── 📂 diffusion_models
4    │   └── qwen_image_edit_2509_fp8_e4m3fn.safetensors
5    ├── 📂 vae
6    │   └── qwen_image_vae.safetensors
7    ├── 📂 text_encoders
8    │   └── qwen_2.5_vl_7b_fp8_scaled.safetensors
9    ├── 📂 loras
10    │   └── Qwen-Image-Edit-Lightning-4steps-V1.0.safetensors
1📂 ComfyUI
2└── 📂 models
3 ├── 📂 diffusion_models
4 │ └── qwen_image_edit_2509_fp8_e4m3fn.safetensors
5 ├── 📂 vae
6 │ └── qwen_image_vae.safetensors
7 ├── 📂 text_encoders
8 │ └── qwen_2.5_vl_7b_fp8_scaled.safetensors
9 ├── 📂 loras
10 │ └── Qwen-Image-Edit-Lightning-4steps-V1.0.safetensorsBy ensuring that all these requirements are met, you will set a solid foundation for your multi-image editing endeavors.
3. Downloading and Loading the Qwen Multi-Image Editing Workflow
With the requirements completed, the next step is to download and load the Qwen Multi-Image Editing JSON workflow into ComfyUI. This workflow is designed to configure the model correctly and enable seamless multi-image editing functionality.
Step 1: Download the Workflow File
Start by downloading the workflow file built for Qwen Multi-Image Editing 2509. This JSON file includes the necessary nodes and connections tailored for editing multiple images.
👉 Download Qwen Multi-Image Editing Workflow JSON
Step 2: Load the Workflow in ComfyUI
After downloading the JSON file, open ComfyUI and drag-and-drop the file directly onto the canvas. This will automatically load the complete workflow, preparing your workspace for multi image editing.
### Step 3: Verify Workflow Configuration
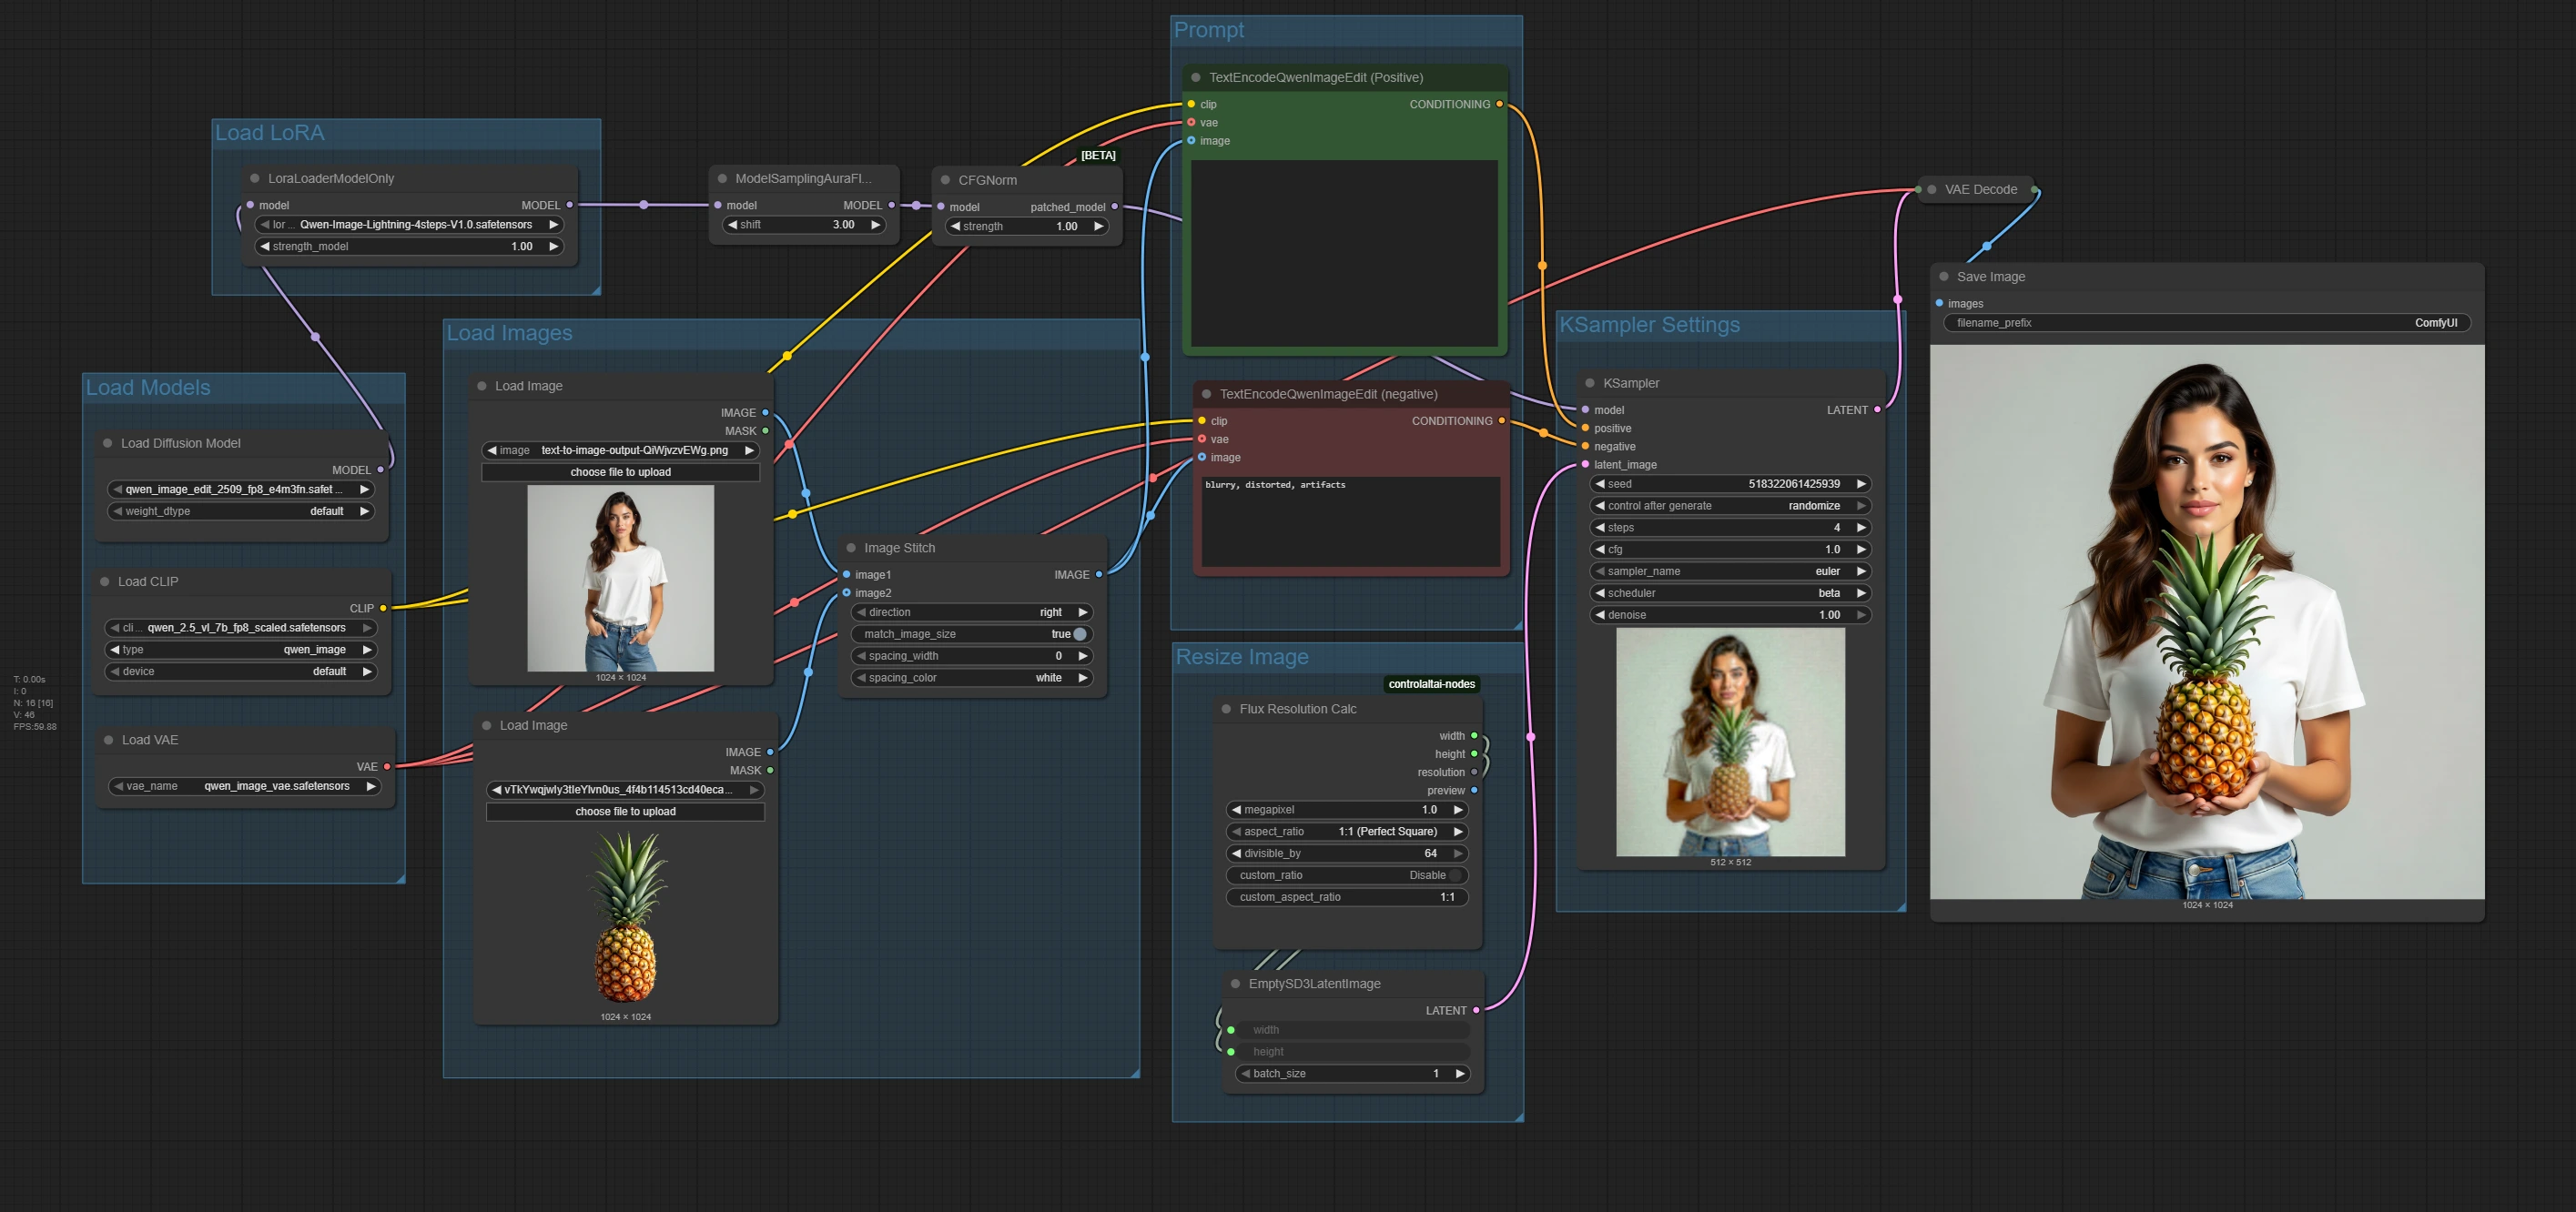
Once the workflow is loaded, review the nodes and ensure that all models are properly linked:
- Diffusion model → qwen_image_edit_fp8_e4m3fn.safetensors
- VAE → qwen_image_vae.safetensors
- Text Encoder → qwen_2.5_vl_7b_fp8_scaled.safetensors
- Lightning LoRA → Qwen-Image-Lightning-4steps-V1.0.safetensors
Diffusion model → qwen_image_edit_fp8_e4m3fn.safetensors
VAE → qwen_image_vae.safetensors
Text Encoder → qwen_2.5_vl_7b_fp8_scaled.safetensors
Lightning LoRA → Qwen-Image-Lightning-4steps-V1.0.safetensors
If any nodes appear missing or red, make sure your ComfyUI installation is up to date. You can also resolve this directly through the Node Manager by clicking Install Missing Custom Node. Once installed, you’ll be prompted to restart the ComfyUI server—after that, you’re all set and ready to go. This process automatically fetches and installs the required nodes, ensuring the workflow runs smoothly without errors.
Workflows Ready to RUN
Launch Qwen Mutli Image Editing on Next Diffusion
4. Setting Up and Running Your First Multi-Image Edit
With the workflow successfully loaded, it’s time to set up and run your first multi-image edit. Multi-image editing allows you to use more than one image as input, which can be particularly useful for combining elements, style transfers, multiple character scenes. Here’s how to configure your setup:
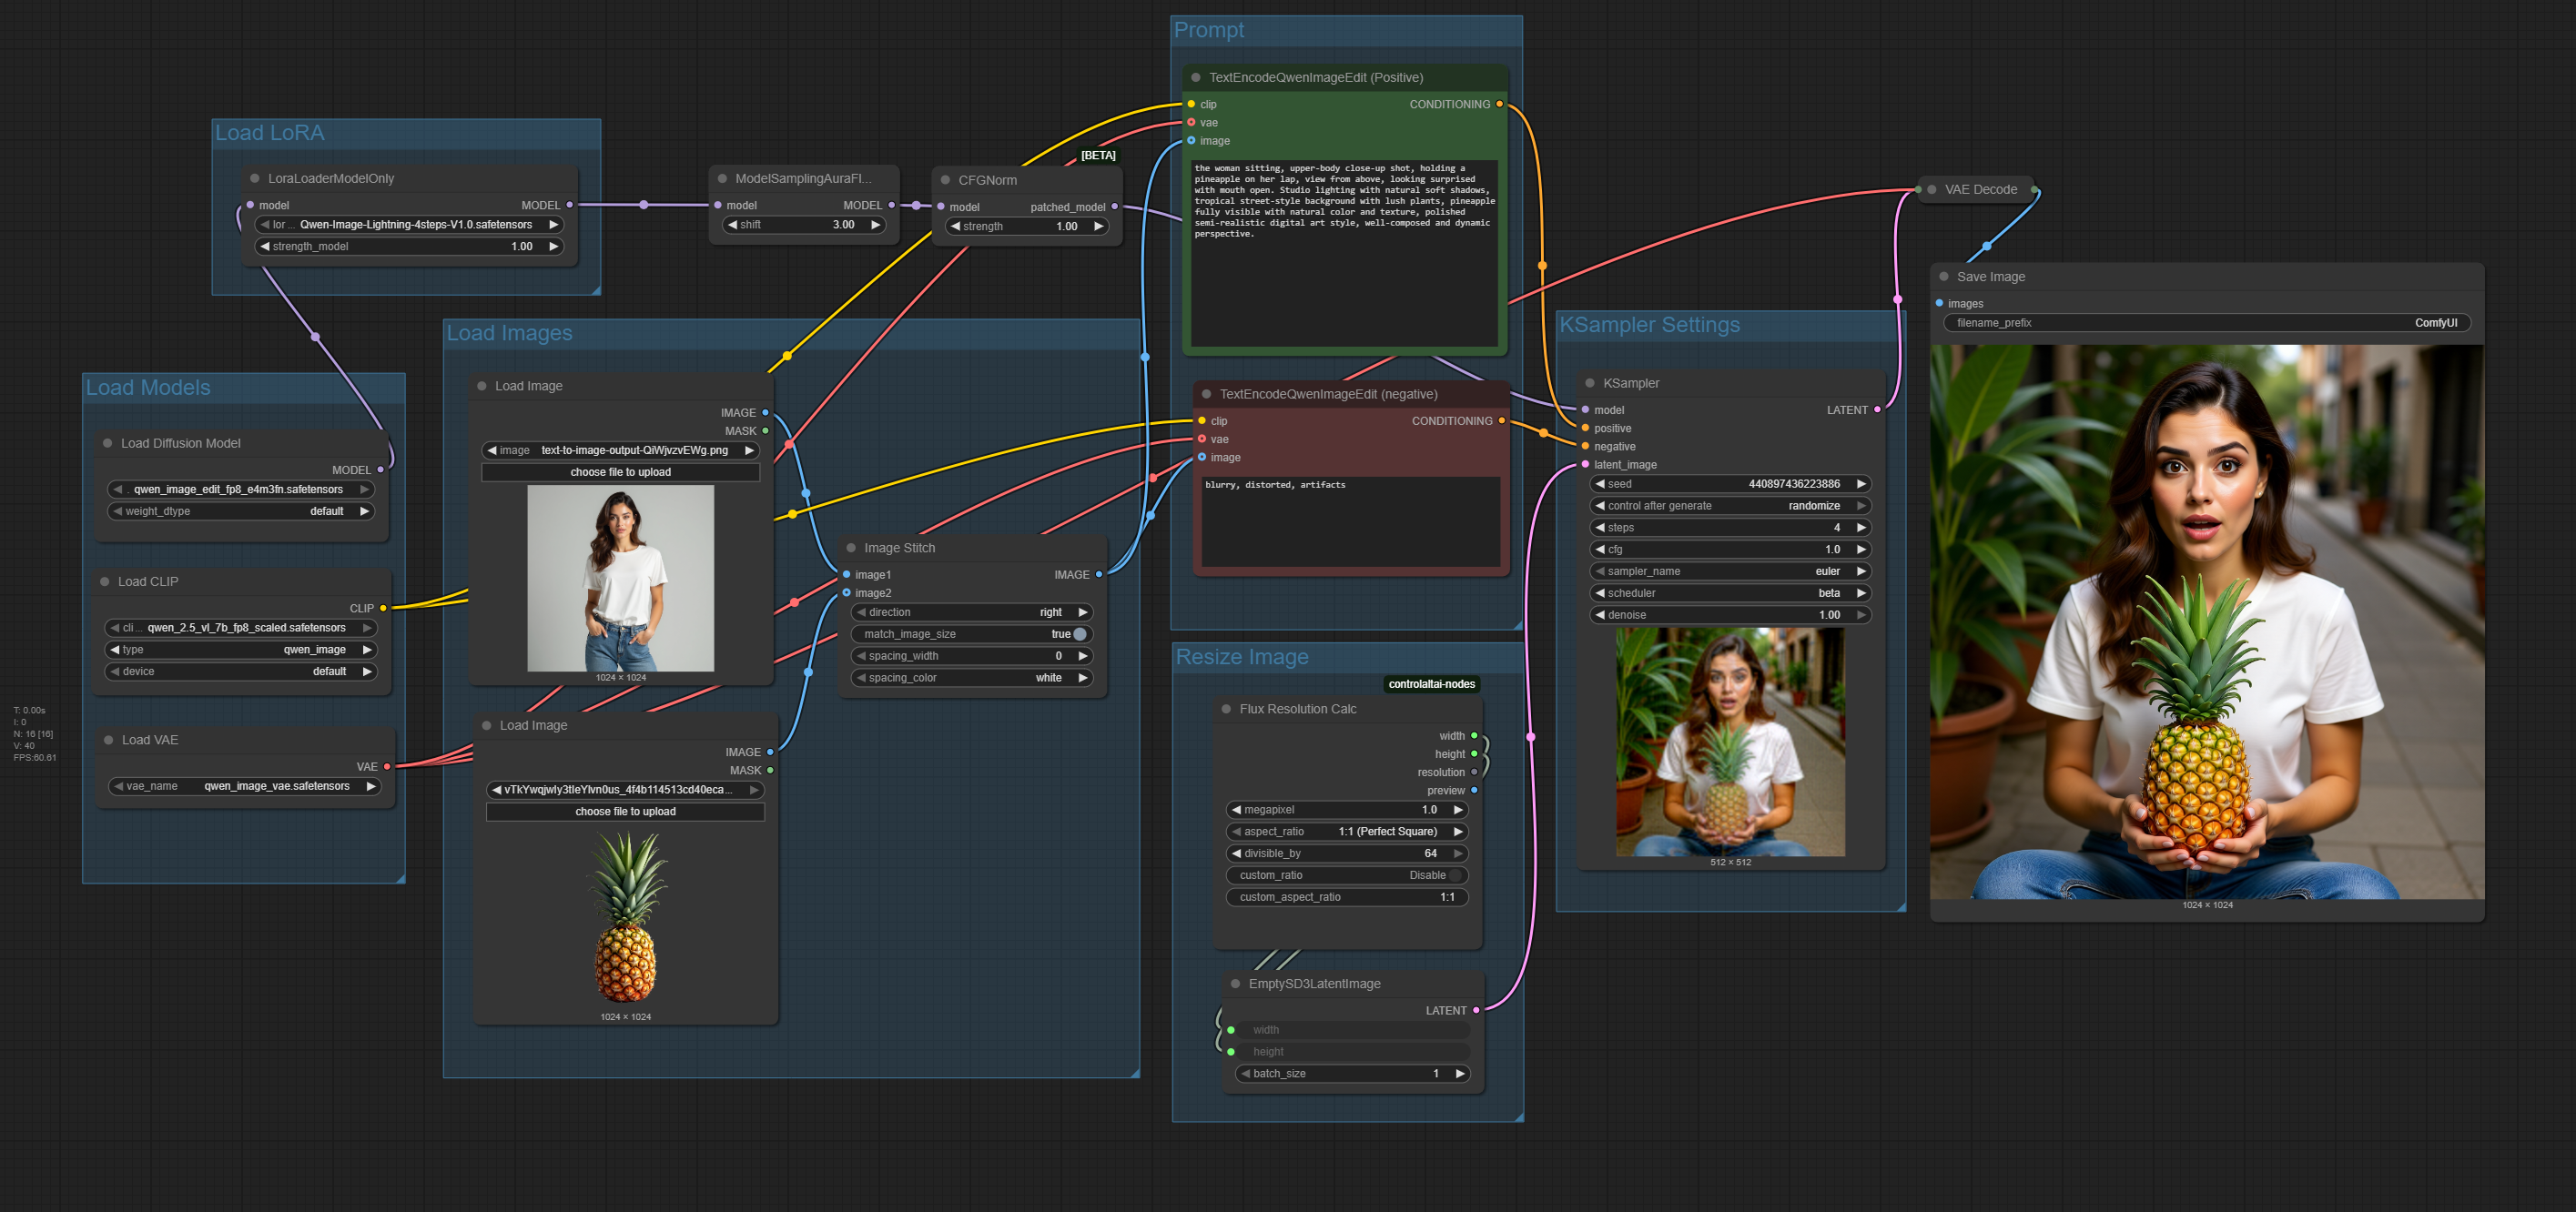
Load Models
- UNETLoader → Loads the editing model qwen_image_edit_2509_fp8_e4m3fn.safetensors
- qwen_image_edit_2509_fp8_e4m3fn.safetensors
- CLIPLoader → Loads the text encoder (turns prompts into conditioning) qwen_2.5_vl_7b_fp8_scaled.safetensors
- qwen_2.5_vl_7b_fp8_scaled.safetensors
- VAELoader → Loads the variational autoencoder (VAE) qwen_image_vae.safetensors
- qwen_image_vae.safetensors
UNETLoader → Loads the editing model
- qwen_image_edit_2509_fp8_e4m3fn.safetensors
CLIPLoader → Loads the text encoder (turns prompts into conditioning)
- qwen_2.5_vl_7b_fp8_scaled.safetensors
VAELoader → Loads the variational autoencoder (VAE)
- qwen_image_vae.safetensors
Load LoRA
- LoraLoaderModelOnly → Adds LoRA for faster / stylized results Model: Qwen-Image-Lightning-4steps-V1.0.safetensors Strength: 1 (full effect, lower if too strong)
- Model: Qwen-Image-Lightning-4steps-V1.0.safetensors
- Strength: 1 (full effect, lower if too strong)
LoraLoaderModelOnly → Adds LoRA for faster / stylized results
- Model: Qwen-Image-Lightning-4steps-V1.0.safetensors
- Strength: 1 (full effect, lower if too strong)
Model: Qwen-Image-Lightning-4steps-V1.0.safetensors
Strength: 1 (full effect, lower if too strong)
Load Images
- LoadImage (x2) → Import your source images (subject + background, etc.)
- ImageStitch → Combine them into one image Mode: right (place image2 to the right of image1) Match Image Size: true Spacing Color: white Spacing Width: 0
- Mode: right (place image2 to the right of image1)
- Match Image Size: true
- Spacing Color: white
- Spacing Width: 0
LoadImage (x2) → Import your source images (subject + background, etc.)
ImageStitch → Combine them into one image
- Mode: right (place image2 to the right of image1)
- Match Image Size: true
- Spacing Color: white
- Spacing Width: 0
Mode: right (place image2 to the right of image1)
Match Image Size: true
Spacing Color: white
Spacing Width: 0
Resize Image
- FluxResolutionNode → Defines output aspect ratio Example: 16:9 (Panorama) Scaling: 1.0
- Example: 16:9 (Panorama)
- Scaling: 1.0
- EmptySD3LatentImage → Creates blank latent at resolution Width: 1024 Height: 1024 Batch size: 1
- Width: 1024
- Height: 1024
- Batch size: 1
FluxResolutionNode → Defines output aspect ratio
- Example: 16:9 (Panorama)
- Scaling: 1.0
Example: 16:9 (Panorama)
Scaling: 1.0
EmptySD3LatentImage → Creates blank latent at resolution
- Width: 1024
- Height: 1024
- Batch size: 1
Width: 1024
Height: 1024
Batch size: 1
Prompt
- TextEncodeQwenImageEdit (Positive) → How you want the two images to be merged Input: Describe how you want the two images to be merged. Be specific about what elements you want to change, enhance, or preserve from the original images you uploaded.
- Input: Describe how you want the two images to be merged. Be specific about what elements you want to change, enhance, or preserve from the original images you uploaded.
- TextEncodeQwenImageEdit (Negative) → What to avoid Example: "blurry, distorted, artifacts"
- Example: "blurry, distorted, artifacts"
TextEncodeQwenImageEdit (Positive) → How you want the two images to be merged
- Input: Describe how you want the two images to be merged. Be specific about what elements you want to change, enhance, or preserve from the original images you uploaded.
TextEncodeQwenImageEdit (Negative) → What to avoid
- Example: "blurry, distorted, artifacts"
Model Flow
- ModelSamplingAuraFlow → Sampling adjustments Setting: 3
- Setting: 3
- CFGNorm → Normalizes CFG scaling Strength: 1
- Strength: 1
ModelSamplingAuraFlow → Sampling adjustments
- Setting: 3
CFGNorm → Normalizes CFG scaling
- Strength: 1
KSampler (Main Generation Node)
This is where most tuning happens.
- Seed: 916518398297193 Set to randomize for variation
- Set to randomize for variation
- Steps: 4 Higher = more detail, slower (good range: 4–30)
- Higher = more detail, slower (good range: 4–30)
- CFG Scale: 1 Controls adherence to prompt Low = creative freedom, High = strict prompt following
- Controls adherence to prompt
- Low = creative freedom, High = strict prompt following
- Sampler: euler
- Scheduler: beta
- Batch Size: 1
Seed: 916518398297193
- Set to randomize for variation
Steps: 4
- Higher = more detail, slower (good range: 4–30)
CFG Scale: 1
- Controls adherence to prompt
- Low = creative freedom, High = strict prompt following
Controls adherence to prompt
Low = creative freedom, High = strict prompt following
Sampler: euler
Scheduler: beta
Batch Size: 1
With Qwen Lightning LoRA, 4 steps is enough for fast, sharp results.
With Qwen Lightning LoRA, 4 steps is enough for fast, sharp results.
Decode & Save
- VAEDecode → Converts latent → image
- SaveImage → Exports final output to ComfyUI folder
VAEDecode → Converts latent → image
SaveImage → Exports final output to ComfyUI folder
Finally, run the workflow and inspect the output. If the results are not as expected, don’t hesitate to iterate by adjusting masks, prompts, or the emphasis on specific images. This iterative process is key to achieving the best results in multi-image editing.
5. Qwen Multi Image 2509 Examples
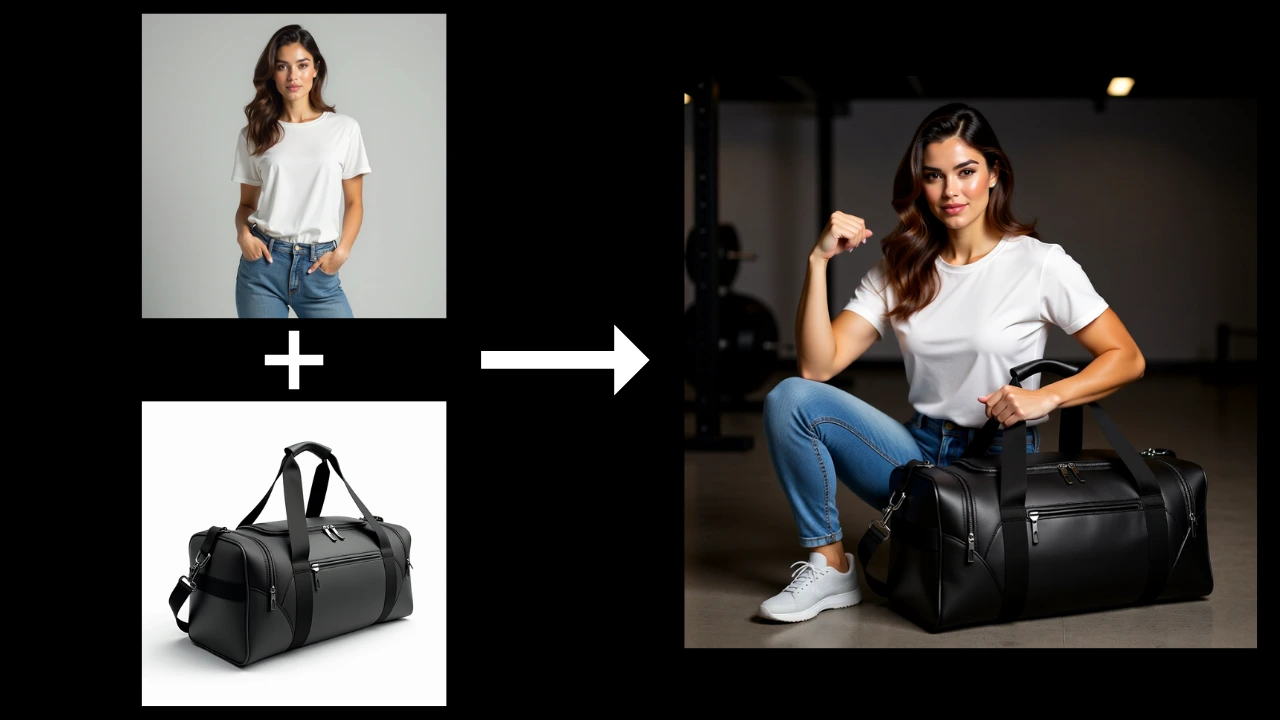
Example 1: Object Injection
Multi-image editing allows new items, like handbags, sports equipment, or gadgets, to be seamlessly added to an existing scene without recreating the entire composition. This ensures the original lighting, perspective, and shadows remain intact.
Prompt: she is looking in the camera, sqautting down, dynamic upper-body pose. with one arm she is flexing her muscles, sport bag between her legs, Studio lighting with natural soft shadows, gym interior background with equipment and subtle reflections, sports bag fully visible with detailed materials and textures.
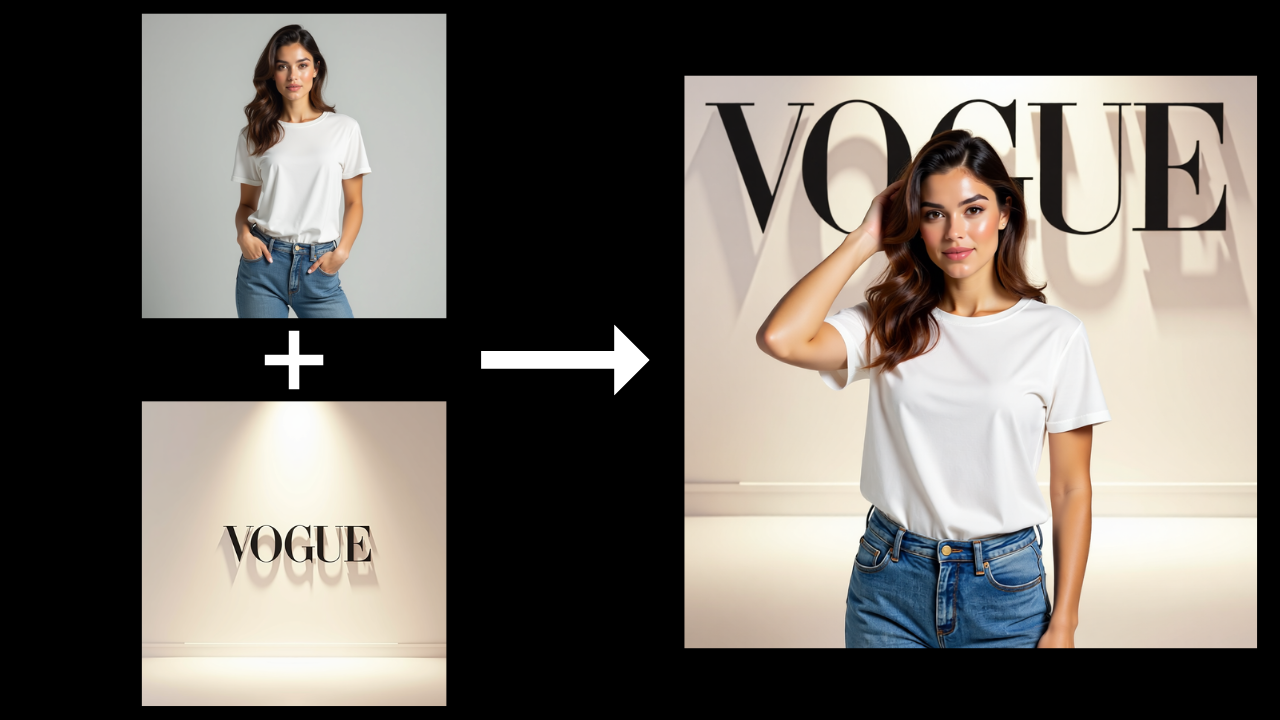
Example 2: Consistent Backgrounds Merge
You can maintain the same environment while changing poses, expressions, or outfits. This is perfect for fashion shoots, e-commerce, or cinematic sequences where background continuity is crucial.
Prompt: She is standing with one hand in her hair, positioned in front of the background image. Keep the background unchanged with the word 'VOGUE' visible above her. Maintain the same lighting as in the background image.
Example 3: Outfit / Costume Changes
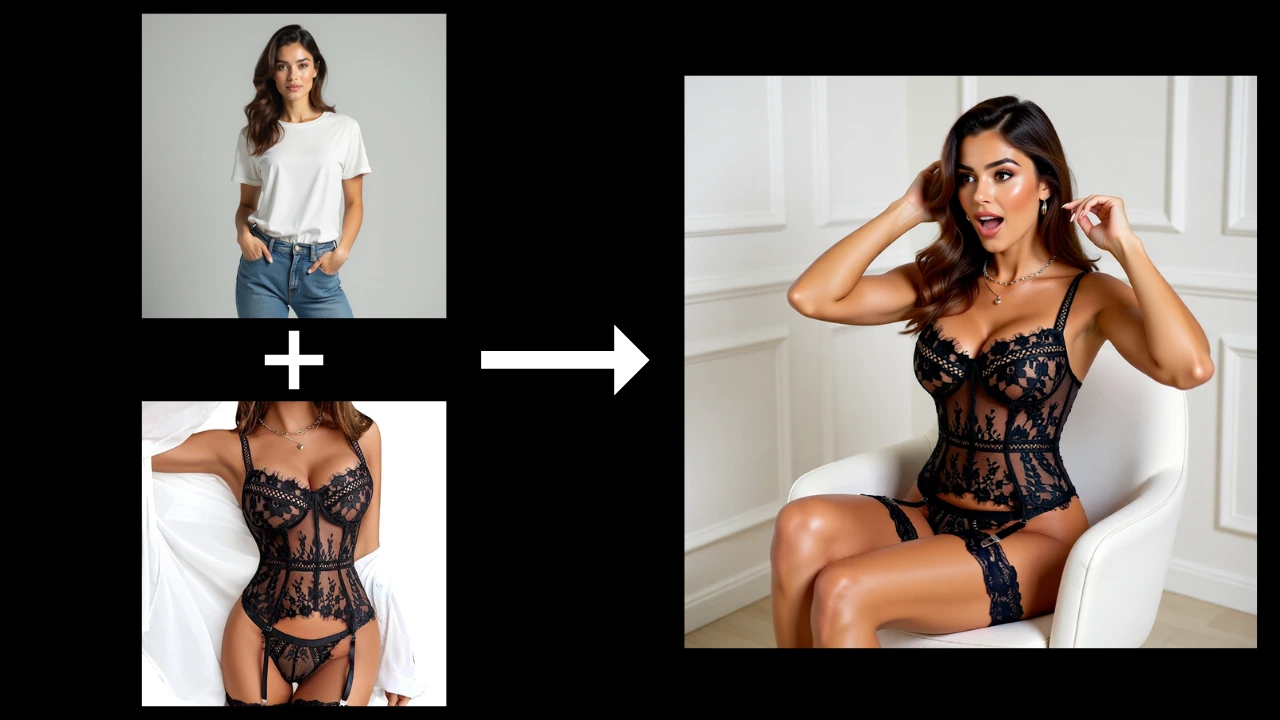
Easily swap or update a character’s clothing, while clothing is the main focus, you can also adjust the character’s pose, background, or facial expression if needed, giving you full flexibility to create multiple stylish variations without starting from scratch. This is perfect for testing different fashion looks, cosplay variations, or product displays, saving time while maintaining visual consistency.
Prompt: she is surprised, mouth open, she is wearing the exact same lingerie set as shown in the image. side view, close up, white classy room, sitting on chair, side view, hands in hair
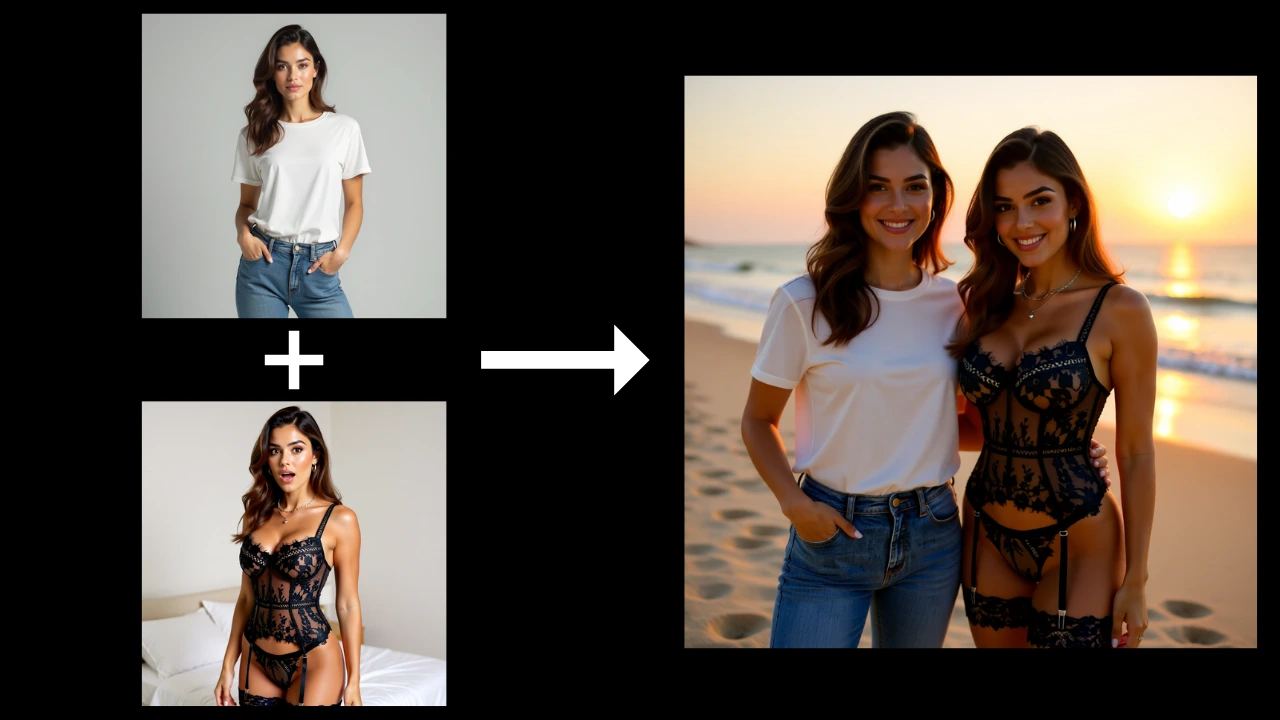
Example 4: Multiple Character Scenes / Interactions
Combine two characters—or a character and an animal—into a single coherent scene. This allows for natural interactions and dynamic storytelling without generating everything in one shot. You can also mix different styles, such as a cartoon character with a realistic character, creating unique and imaginative compositions.
Prompt: They are standing close together, holding each other, looking directly at the camera, smiling naturally. Studio lighting with soft, natural shadows. Merge seamlessly with a beach at sunset, golden sunlight reflecting on the sand and water, maintaining consistent lighting, perspective, and natural integration.
Workflows Ready to RUN
Launch Qwen Mutli Image Editing on Next Diffusion
6. Conclusion
Multi-image editing in ComfyUI with Qwen-Image-Edit 2509 opens up a wide range of creative possibilities, allowing you to enhance and modify scenes efficiently while maintaining visual consistency. Whether you are injecting objects, maintaining consistent backgrounds, swapping outfits, or combining multiple characters, the workflow we provided guides you through achieving professional-looking results without recreating the entire scene.
We hope you find this tutorial helpful and that it inspires you to explore the full potential of multi-image editing. By using the workflow and techniques outlined here, you can create dynamic, polished compositions suitable for fashion shoots, e-commerce, cinematic sequences, or imaginative storytelling.
Frequently Asked Questions
What is Qwen Multi-Image Editing 2509 in ComfyUI and how do I use it?
Can I swap outfits or change poses with Qwen Multi-Image Editing?
Is it possible to add objects to an existing scene using Qwen-Image-Edit 2509?
Enjoyed this article? Share it with your network.