
FAST Image to Video in ComfyUI (Wan2.2 & Lightning LoRA)
FAST Image to Video in ComfyUI (Wan2.2 & Lightning LoRA)
1. Introduction
Looking for faster image-to-video generation in ComfyUI? This setup uses the FP8 version of Wan2.2 paired with the LightX2V LoRA to significantly reduce render times while maintaining high visual quality. It includes an interpolation step, allowing you to lower the FPS and generate in-between frames, which further speeds up rendering without sacrificing smoothness. While this setup runs much faster than the default configuration, it still requires a decent amount of VRAM—we recommend using an RTX 4090 (24GB) or running it on RunPod for the best experience. In this guide, we’ll walk you through everything: installing the model files, setting up your environment, and loading the optimized workflow. We’ll also share example outputs and offer tips to help you get great results with minimal effort.
RunPod Special Offer
Load $10, get up to $500 in bonus credits randomly!
2. Requirements & Setup (Wan2.2 FP8 + LightX2V LoRA)
Before starting, ensure your system meets the hardware and software requirements to run the Wan2.2 FP8 Video Generation Model with LightX2V LoRA in ComfyUI. This model still requires a good amount of VRAM — we recommend at least an RTX 4090 (24GB VRAM) or using RunPod for cloud GPU access.
Requirement 1: ComfyUI Installed
To get started, you need ComfyUI installed locally or via cloud. For local Windows setup, follow this guide:
👉 How to Install ComfyUI Locally on Windows
If you don’t have a high-end GPU locally, consider running ComfyUI on RunPod with a network volume for persistent storage:
👉 How to Run ComfyUI on RunPod with Network Volume
Requirement 2: Download Wan2.2 FP8 Model Files
Download the following models and place them in the correct ComfyUI folders:
| File Name | Hugging Face Download Page | File Directory |
|---|---|---|
| wan2.2_i2v_high_noise_14B_fp8_scaled.safetensors | 🤗 Download | ..\ComfyUI\models\diffusion_models |
| wan2.2_i2v_low_noise_14B_fp8_scaled.safetensors | 🤗 Download | ..\ComfyUI\models\diffusion_models |
| umt5_xxl_fp8_e4m3fn_scaled.safetensors | 🤗 Download | ..\ComfyUI\models\text_encoders |
| wan_2.1_vae.safetensors | 🤗 Download | ..\ComfyUI\models\vae |
| Wan2.2-Lightning_I2V-A14B-4steps-lora_HIGH_fp16.safetensors | 🤗 Download | ..\ComfyUI\models\loras |
| Wan2.2-Lightning_I2V-A14B-4steps-lora_LOW_fp16.safetensors | 🤗 Download | ..\ComfyUI\models\loras |
Requirement 3: Verify Folder Structure
Confirm that your folders and files look like this:
1📁 ComfyUI/
2└── 📁 models/
3    ├── 📁 text_encoders/
4    │   └── umt5_xxl_fp8_e4m3fn_scaled.safetensors
5    ├── 📁 diffusion_models/
6    │   ├── wan2.2_i2v_high_noise_14B_fp8_scaled.safetensors
7    │   └── wan2.2_i2v_low_noise_14B_fp8_scaled.safetensors
8    ├── 📁 vae/
9    │   └── wan_2.1_vae.safetensors
10    └── 📁 loras/
11        ├── Wan2.2-Lightning_I2V-A14B-4steps-lora_HIGH_fp16.safetensors
12        └── Wan2.2-Lightning_I2V-A14B-4steps-lora_LOW_fp16.safetensors
1📁 ComfyUI/
2└── 📁 models/
3 ├── 📁 text_encoders/
4 │ └── umt5_xxl_fp8_e4m3fn_scaled.safetensors
5 ├── 📁 diffusion_models/
6 │ ├── wan2.2_i2v_high_noise_14B_fp8_scaled.safetensors
7 │ └── wan2.2_i2v_low_noise_14B_fp8_scaled.safetensors
8 ├── 📁 vae/
9 │ └── wan_2.1_vae.safetensors
10 └── 📁 loras/
11 ├── Wan2.2-Lightning_I2V-A14B-4steps-lora_HIGH_fp16.safetensors
12 └── Wan2.2-Lightning_I2V-A14B-4steps-lora_LOW_fp16.safetensorsOnce you have everything installed and organized, you’re ready to download and load the Wan2.2 workflow and start generating videos faster with LightX2V LoRA!
3. Load the Wan2.2 FP8 + LightX2V Workflow
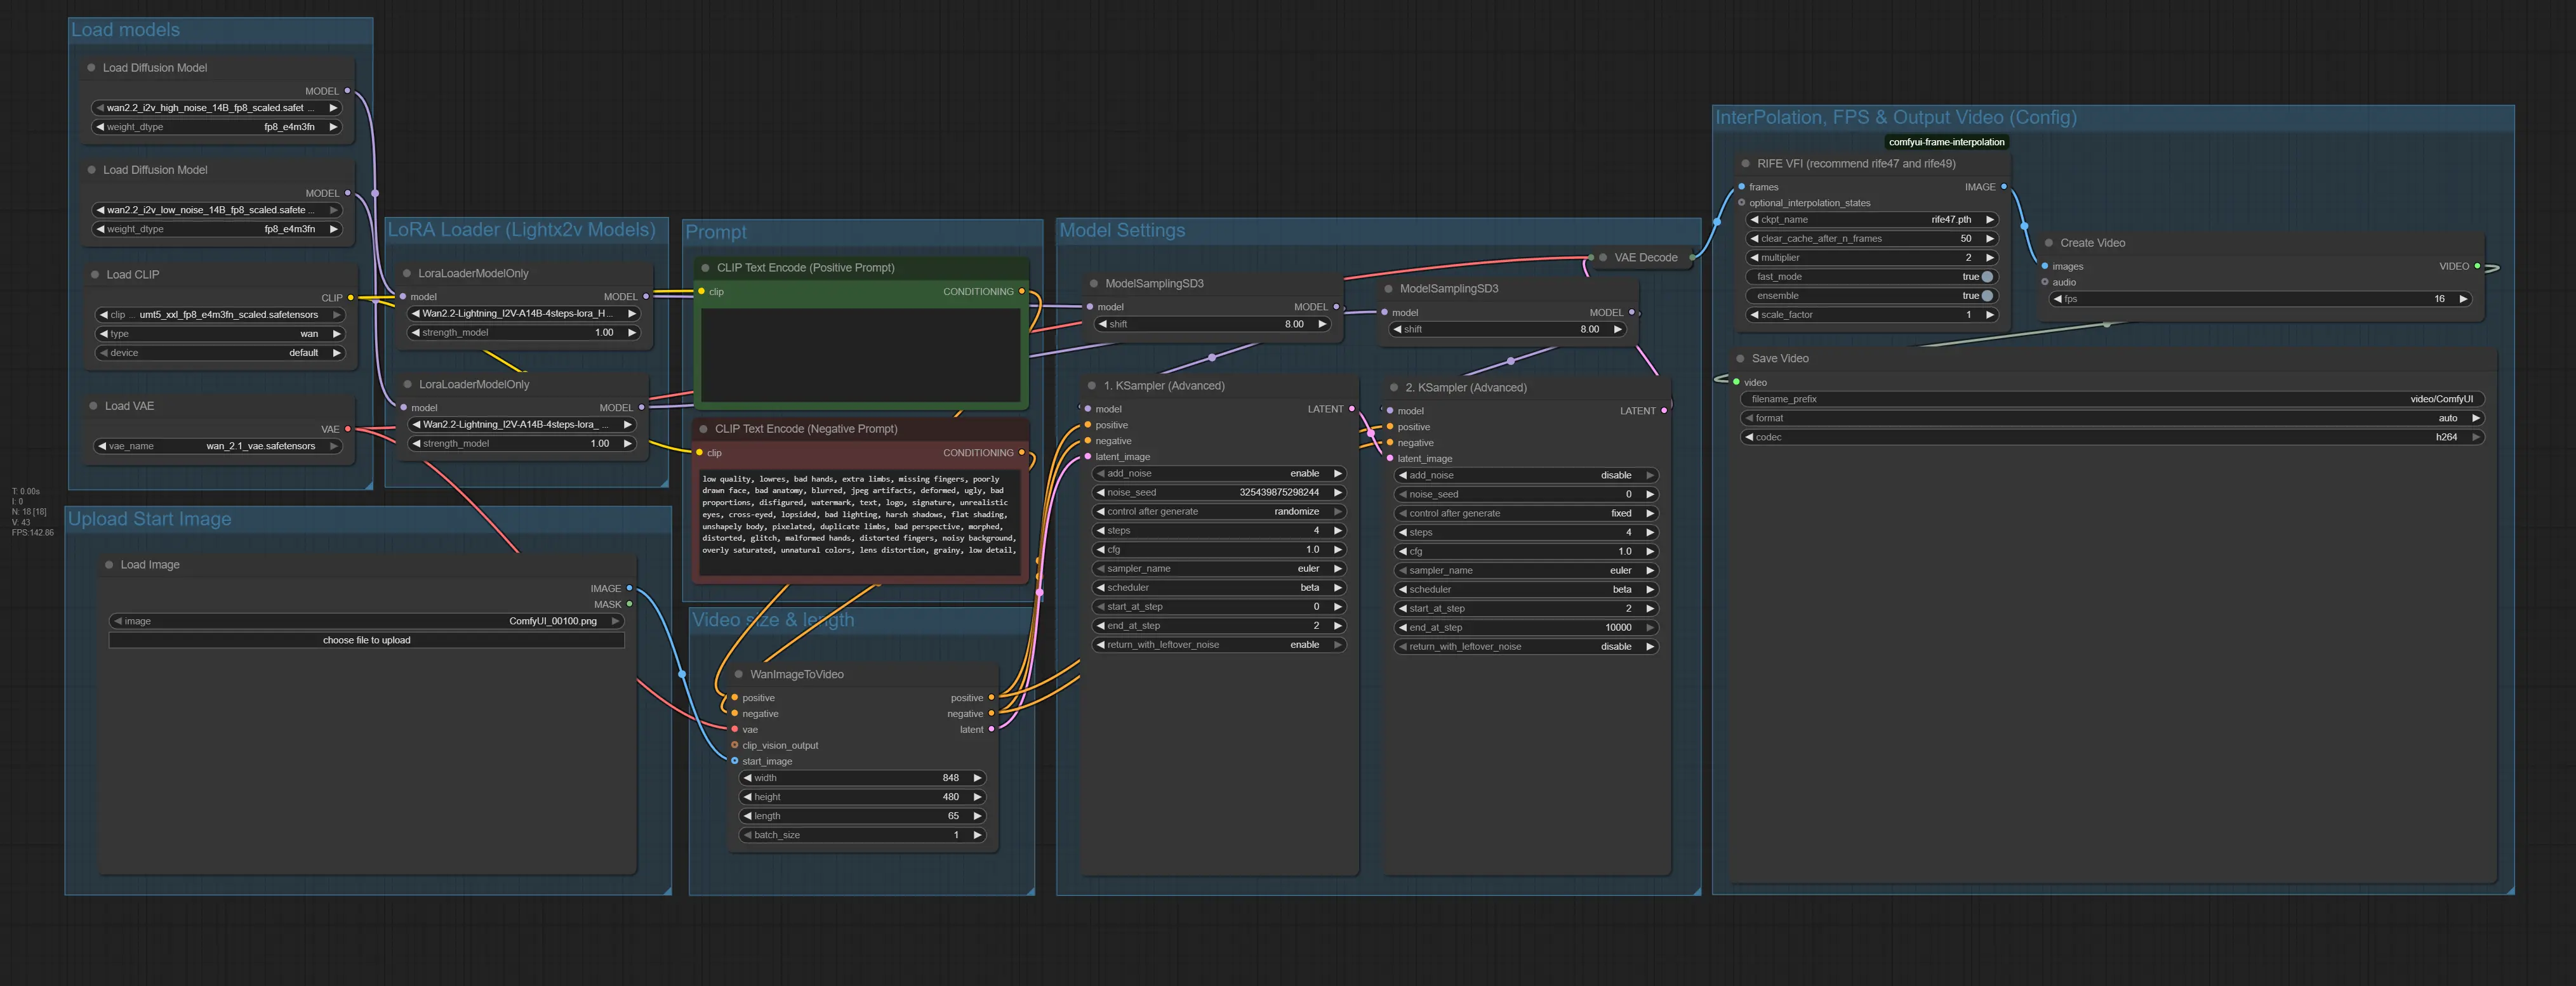
Now that your environment and model files are ready, it’s time to load and configure the Wan2.2 I2V FP8 LightX2V workflow in ComfyUI. This setup ensures all components work together smoothly for faster, high-quality image-to-video generation. Once configured, you’ll be ready to start creating stunning videos from your images.
Load the Wan2.2 I2V FP8 LightX2V workflow JSON file:
👉 Download the provided Wan2.2 I2V FP8 Lightning workflow JSON file and drag it into your ComfyUI canvas.
This workflow includes all the nodes and model references pre-arranged for smooth video generation. Next, we’ll dive into configuring the workflow settings for optimal results.
RunPod Special Offer
Load $10, get up to $500 in bonus credits randomly!
4. Wan2.2 Video Generation Settings (I2V)
With the Wan2.2 FP8 workflow loaded in ComfyUI and LightX2V LoRA enabled, it’s time to configure the settings for smooth, high-quality image-to-video generation. The LightX2V distillation LoRA allows us to cut total steps to just 6, speeding up render time significantly while preserving expressiveness.
Step 1: Load Models
Use the following ComfyUI nodes to load your models:
- Load Diffusion Model node (twice): wan2.2_i2v_high_noise_14B_fp8_scaled.safetensors wan2.2_i2v_low_noise_14B_fp8_scaled.safetensors
- wan2.2_i2v_high_noise_14B_fp8_scaled.safetensors
- wan2.2_i2v_low_noise_14B_fp8_scaled.safetensors
- Load CLIP node: umt5_xxl_fp8_e4m3fn_scaled.safetensors
- umt5_xxl_fp8_e4m3fn_scaled.safetensors
- Load VAE node: wan_2.1_vae.safetensors
- wan_2.1_vae.safetensors
- LoRALoaderModelOnly node (twice): wan2.2-Lightning_I2V-A14B-4steps-lora_HIGH_fp16.safetensors wan2.2-Lightning_I2V-A14B-4steps-lora_LOW_fp16.safetensors
- wan2.2-Lightning_I2V-A14B-4steps-lora_HIGH_fp16.safetensors
- wan2.2-Lightning_I2V-A14B-4steps-lora_LOW_fp16.safetensors
Load Diffusion Model node (twice):
- wan2.2_i2v_high_noise_14B_fp8_scaled.safetensors
- wan2.2_i2v_low_noise_14B_fp8_scaled.safetensors
wan2.2_i2v_high_noise_14B_fp8_scaled.safetensors
wan2.2_i2v_low_noise_14B_fp8_scaled.safetensors
Load CLIP node:
- umt5_xxl_fp8_e4m3fn_scaled.safetensors
Load VAE node:
- wan_2.1_vae.safetensors
LoRALoaderModelOnly node (twice):
- wan2.2-Lightning_I2V-A14B-4steps-lora_HIGH_fp16.safetensors
- wan2.2-Lightning_I2V-A14B-4steps-lora_LOW_fp16.safetensors
Step 2: Upload Base Image
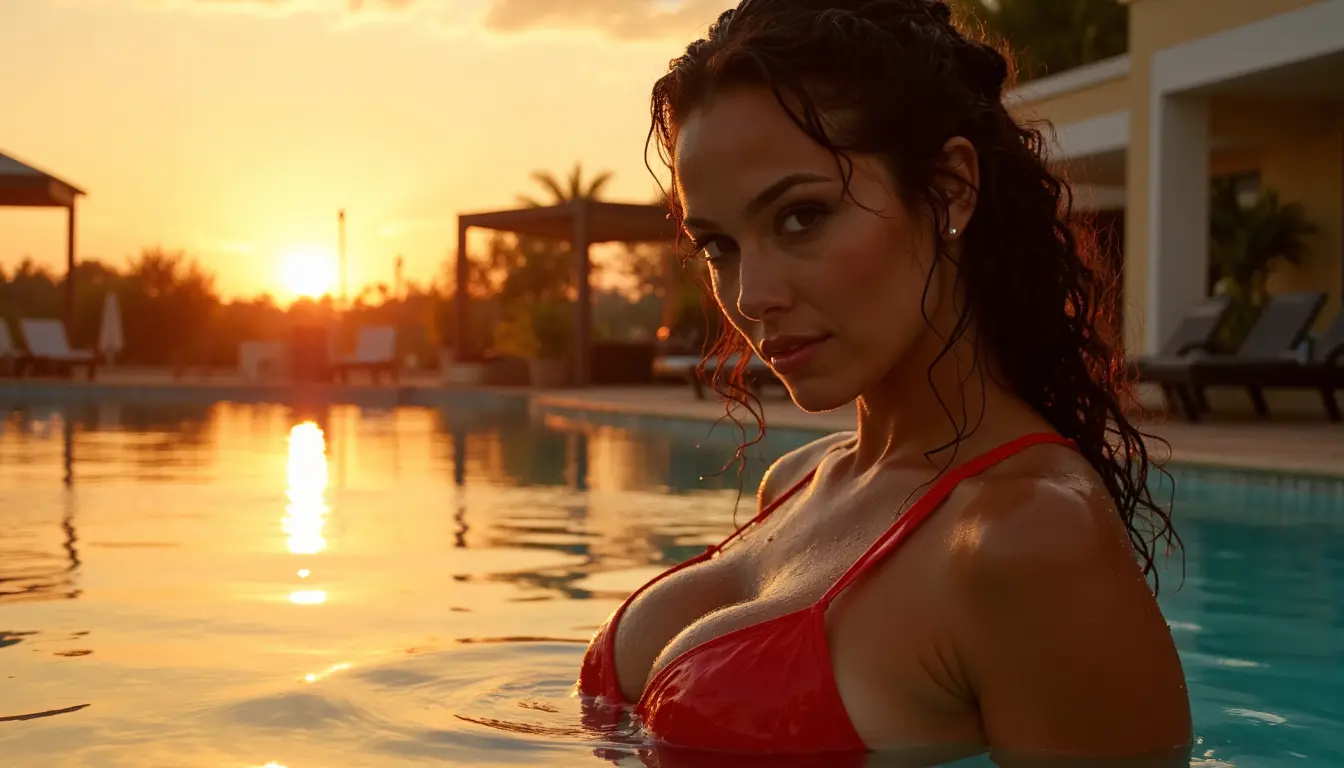
Import a base image that defines the initial pose, lighting, and character design. This will serve as the starting frame for the video animation.
Prompt Base Image (Flux Dev FP8 Generation): close-up shot, sultry cartel queen in pool at sunset, water dripping from large breasts, glowing red bikini top, wet curls slicked back, intense eye contact with camera, distant explosion reflecting in water.
Step 3: Write both Positive & Negative Prompts
Use a rich, descriptive prompt to guide animation behavior and camera motion.
Positive Prompt:
The camera slowly pans left as she floats in the water, her body bouncing gently with each wave, her large breasts rhythmically shaking. She smiles playfully, eyes sparkling with mischief, one hand reaching up to touch and caress her chest. Then, with a slow, sensual motion, she lifts that hand to run fingers through her wet curls. The camera continues to pan left, capturing water droplets shimmering on her sun-kissed skin, golden light highlighting every curve, while the distant explosion glows softly behind her.
The camera slowly pans left as she floats in the water, her body bouncing gently with each wave, her large breasts rhythmically shaking. She smiles playfully, eyes sparkling with mischief, one hand reaching up to touch and caress her chest. Then, with a slow, sensual motion, she lifts that hand to run fingers through her wet curls. The camera continues to pan left, capturing water droplets shimmering on her sun-kissed skin, golden light highlighting every curve, while the distant explosion glows softly behind her.
Use a Negative Prompt to avoid unwanted artifacts (e.g., blur, distortion).
Step 4: Set Resolution and Length
| Setting | Value |
|---|---|
| Width | 848 |
| Height | 480 |
| Length | 65 |
| Batch Size | 1 |
Maintains a 16:9 aspect ratio. With 16 FPS & Multiplier x2 (RIFE Interpolation), this gives a ~8-second clip.
Step 5: Load LoRA
Load the following LoRAs using the LoRALoaderModelOnly node (2x):
- Wan2.2-Lightning_I2V-A14B-4steps-lora_HIGH_fp16
- Wan2.2-Lightning_I2V-A14B-4steps-lora_LOW_fp16
Wan2.2-Lightning_I2V-A14B-4steps-lora_HIGH_fp16
Wan2.2-Lightning_I2V-A14B-4steps-lora_LOW_fp16
These LoRAs are designed to enhance motion quality and visual sharpness while keeping the animation fast and expressive with only 4 steps.
- Set the strength for HIGH to 1.0
- Set the strength for LOW to 1.0
Set the strength for HIGH to 1.0
Set the strength for LOW to 1.0
This configuration balances detail and fluid motion for optimal animation results.
Step 6: High Noise KSampler Settings (Motion Phase)
This phase injects motion and variation into the early part of the video generation:
| Setting | Value |
|---|---|
| Add Noise | ✅ Enabled |
| Control After Generate | Randomize |
| Total Steps | 4 |
| CFG | 1 |
| Sampler | Euler |
| Scheduler | Simple |
| Start at Step | 0 |
| End at Step | 2 |
| Return with Leftover Noise | ✅ Enabled |
Step 7: Low Noise KSampler Settings (Refinement Phase)
This phase refines structure and detail during the later part of generation:
| Setting | Value |
|---|---|
| Add Noise | ❌ Disabled |
| Control After Generate | Randomize |
| Total Steps | 4 |
| CFG | 1 |
| Sampler | Euler |
| Scheduler | Simple |
| Start at Step | 2 |
| End at Step | 10000 |
| Return with Leftover Noise | ❌ Disabled |
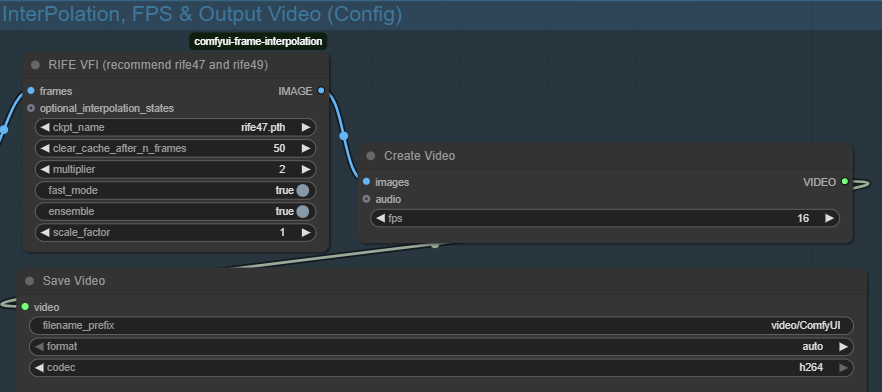
Step 8: Set Interpolation, FPS and Video Output Settings
In this step, we’ll configure the interpolation to generate smooth in-between frames using the RIFE method with a multiplier of 2. This effectively doubles the number of frames, making the video twice as long, but the original FPS stays the same. To keep the final video duration consistent, you can speed it up by 2x during playback if needed. Setting the FPS to 16 helps manage output speed and rendering performance. Below is where you can find these settings.
Final Step: Click RUN
Once everything is set, hit RUN in ComfyUI and let Wan2.2 + LightX2V bring your static image to life with cinematic motion — fast, lightweight, and stunning.
5. Wan2.2 Image to Video Example
After clicking RUN, the model begins generating your video example. It’s important to note that the generation process can take some time, especially if you are working with longer or higher-resolution videos. For instance, when we tested this process on an RTX 4090 GPU with a video length set to 56 frames and 4 total steps, we got the following 480p output video:
✨ This render took about ~60 seconds on an RTX 4090 (24GB VRAM). Note that the initial render may take a little longer as the system initializes. The final video is at 16 FPS and plays at double speed, shortening the duration from 8 seconds down to 4 seconds.
As you experiment with different images and prompts, you will discover a wealth of creative potential waiting to be unlocked. The results can be truly inspiring, encouraging you to dive deeper into the world of AI-driven video generation.
RunPod Special Offer
Load $10, get up to $500 in bonus credits randomly!
6. Wan2.2 Image to Video Examples (480p)
To give you a clearer sense of what’s possible with Wan2.2 and LightX2V LoRA, this section includes real example outputs rendered at 480p resolution. These videos showcase different prompt styles, camera movements, and character animations—demonstrating the speed and expressive visual quality achievable with this setup. Use these as inspiration for crafting your own animations or refining your workflow settings.
7. BONUS: Upscale Videos in ComfyUI
Want to take your Wan2.2 or LightX2V-generated videos to the next level? Whether you're working with AI-generated clips or low-res footage, video upscaling in ComfyUI can dramatically boost visual quality—up to 1080p, 2K, or even 4K.
Our step-by-step guide covers:
- 🔍 2x, 4× Upscaling with NMKD or AnimeSharp models
- 🧑🎤 Face enhancement using CodeFormer
- 🎞️ Smooth frame interpolation with RIFE
- ⚙️ Low VRAM optimization via batching
🔍 2x, 4× Upscaling with NMKD or AnimeSharp models
🧑🎤 Face enhancement using CodeFormer
🎞️ Smooth frame interpolation with RIFE
⚙️ Low VRAM optimization via batching
👉 Read the full tutorial here: How to Upscale Videos in ComfyUI
Perfect for polishing your Wan2.2 + LightX2V outputs, this workflow works fully within ComfyUI.
8. Conclusion
With Wan2.2 FP8 combined with the LightX2V LoRA, image-to-video generation in ComfyUI becomes significantly faster and more efficient—without compromising on visual fidelity. This optimized workflow reduces the number of steps needed, supports interpolation for smoother motion, and handles complex prompts with ease. Whether you're crafting dynamic action sequences, stylized character animations, or cinematic scenes, this setup unlocks a new level of creative potential.
By following this guide, you’ve learned how to install the necessary models, configure the workflow, and generate your own AI-powered videos quickly. Now it’s your turn to explore, experiment, and push the boundaries of what's possible with image-to-video generation.
Frequently Asked Questions
What is the Wan2.2 Video Generation Model in ComfyUI?
How do I set up interpolation and FPS settings for smooth video output in Wan2.2 workflows?
What hardware do I need to run Wan2.2 FP8 with LightX2V LoRA for image-to-video generation?
Enjoyed this article? Share it with your network.