
Consistent Character Pose Changes with Qwen Rapid AIO in ComfyUI
Consistent Character Pose Changes with Qwen Rapid AIO in ComfyUI
1. Introduction
In the world of digital art and animation, maintaining consistency in character poses is crucial for storytelling and visual coherence. This tutorial will guide you through the process of using Qwen Rapid AIO in conjunction with ControlNet Union within ComfyUI to achieve precise and uncensored pose changes. Unlike traditional editing methods that may alter the entire image, pose editing focuses solely on repositioning characters while preserving their identity, style, and background elements.
By utilizing a control image for pose guidance, you can ensure that limb placement, body proportions, and orientation remain accurate, leading to more natural and believable transformations.
In this step-by-step guide, we will cover everything from the initial setup and requirements to practical examples of pose editing. By the end of this tutorial, you will be equipped with the knowledge and skills to perform controlled pose transformations confidently, resulting in clean and professional outcomes.
RunPod Special Offer
Load $10, get up to $500 in bonus credits randomly!
2. Requirements for Qwen Rapid AIO Pose Editing in ComfyUI
Before you can start performing consistent character pose changes with Qwen Rapid AIO, it’s important to make sure your system is properly configured. For this guide, we will be using an RTX 5090 as the minimum GPU requirement, since this workflow relies on high VRAM and fast tensor performance for stable pose control and responsive generation. Ensuring your hardware meets this level will help avoid crashes, slow renders, or node execution failures during processing.
Requirement 1: ComfyUI Installed & Updated
First, you must have ComfyUI installed and running.
You can run it in two ways:
- Local Windows installation: Follow this guide: 👉 How to Install ComfyUI Locally on Windows
- Cloud GPU: If your GPU is limited, you can run ComfyUI in the cloud using a persistent network volume. Step-by-step instructions are available here: 👉 How to Run ComfyUI on RunPod with Network Volume
Local Windows installation: Follow this guide: 👉 How to Install ComfyUI Locally on Windows
Cloud GPU: If your GPU is limited, you can run ComfyUI in the cloud using a persistent network volume. Step-by-step instructions are available here: 👉 How to Run ComfyUI on RunPod with Network Volume
Make sure your ComfyUI version is fully updated so it supports newer nodes and model formats used by Qwen Rapid AIO workflows.
Requirement 2: Download the Required Model Files
Next, you’ll need to download the two required model files used for pose-guided editing with Qwen Rapid AIO. These files are hosted on Hugging Face and must be placed in the correct directories inside your ComfyUI installation. The main model handles image editing and generation, while the ControlNet model enables precise pose guidance. After downloading, move each file into its designated folder exactly as listed below.
| File Name | Download Page | File Directory |
|---|---|---|
| Qwen-Rapid-AIO-SFW-v23.safetensors | 🤗 Download Page | ..\ComfyUI\models\checkpoints |
| Qwen-Image-InstantX-ControlNet-Union.safetensors | 🤗 Download Page | ..\ComfyUI\models\controlnet |
Requirement 3: Verify Folder Structure
Finally, double-check that your folder structure is correct. Proper placement ensures that ComfyUI can automatically detect both the Qwen Rapid AIO model and the ControlNet pose model. If the directories don’t match exactly, the workflow may fail to load or the models may not appear inside node selection menus.
Your directory layout should look like this:
1📁 ComfyUI/
2└── 📁 models/
3    ├── 📁 checkpoints/
4    │   └── Qwen-Rapid-AIO-SFW-v23.safetensors
5    └── 📁 controlnet/
6        └── Qwen-Image-InstantX-ControlNet-Union.safetensors
1📁 ComfyUI/
2└── 📁 models/
3 ├── 📁 checkpoints/
4 │ └── Qwen-Rapid-AIO-SFW-v23.safetensors
5 └── 📁 controlnet/
6 └── Qwen-Image-InstantX-ControlNet-Union.safetensorsOnce this structure matches your local installation, you’re ready to load the workflow and start performing consistent character pose edits with full ControlNet guidance.
3. Downloading and Loading the Pose-Editing Workflow
Once you have confirmed that all requirements are met, the next step is to download and load the pose-editing workflow into ComfyUI. This workflow is designed to streamline the setup process by pre-connecting all essential nodes needed for effective pose guidance and image editing.
Step 1: Download Workflow File
Begin by downloading the JSON workflow file specifically created for Qwen Rapid AIO and ControlNet Union. This file contains all the necessary nodes and configurations to facilitate pose editing. You can find the workflow download link below:
👉 Qwen Rapid AIO + ControlNet DW Pose Workflow JSON.
Step 2: Load Workflow in ComfyUI
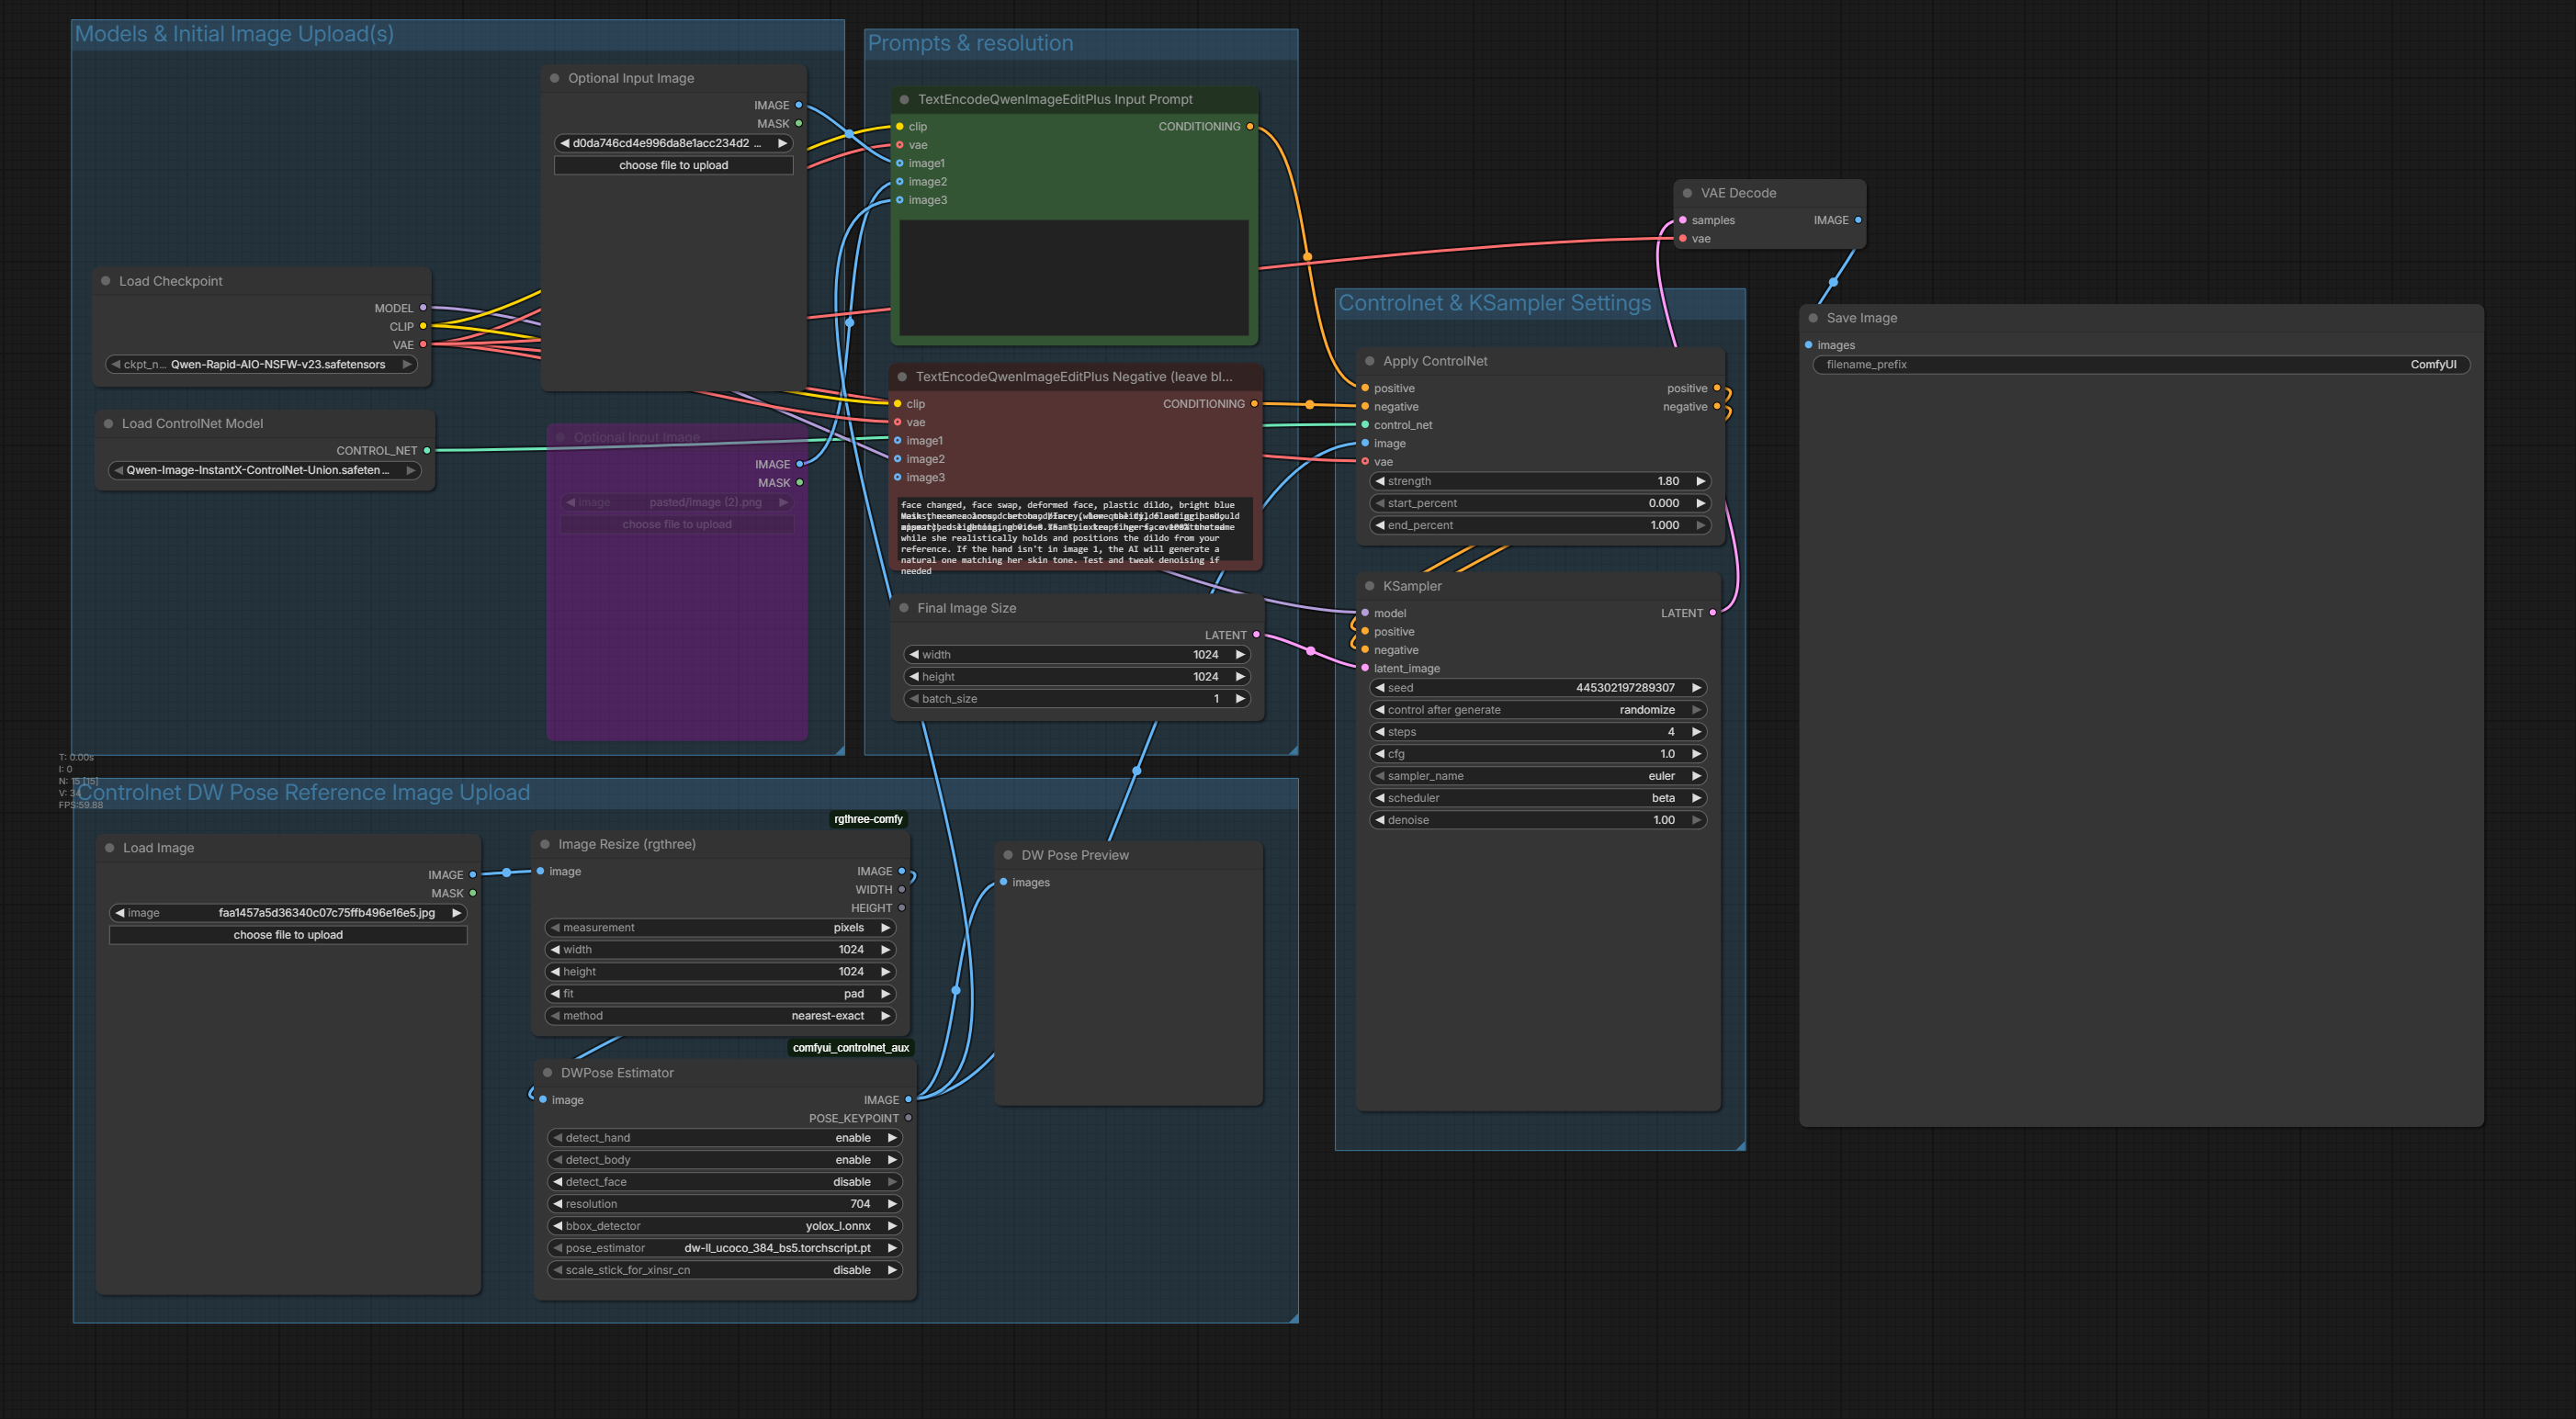
After downloading the workflow file, open ComfyUI and drag and drop the JSON file onto the canvas. This action will automatically load all the nodes required for the pose editing process.
Step 3: Verify Model Connections
It’s crucial to ensure that all model connections are correctly established. If any node appears red or is missing, you may need to install the required custom nodes and restart ComfyUI to ensure everything is functioning correctly. This step is vital for a seamless editing experience.
RunPod Special Offer
Load $10, get up to $500 in bonus credits randomly!
4. Running Your First Edit with Qwen Rapid AIO for Consistent Pose Changes
Now that your workflow is set up, it’s time to run your first edit. This stage focuses on loading the correct models, assigning reference images, and using prompts to control what should change or remain untouched. The system handles structural interpretation automatically, so your job is simply to describe the desired result clearly.\
Step 1: Load Required Models
Begin by loading the required models:
- Checkpoint: Qwen-Rapid-AIO-NSFW-v23.safetensors
- ControlNet: Qwen-Image-InstantX-ControlNet-Union.safetensors
Checkpoint: Qwen-Rapid-AIO-NSFW-v23.safetensors
ControlNet: Qwen-Image-InstantX-ControlNet-Union.safetensors
The AIO checkpoint already includes everything internally (UNET, CLIP, VAE), so no additional model loaders are needed.
Step 2: Add Input Images
This workflow accepts multiple images that influence generation:
| Input | Requirement | Purpose |
|---|---|---|
| Image 1 (Initial Image) | Required | Base image (main character or scene) |
| Image 2 | Optional | Secondary reference (background, object, clothing, etc.) |
| Image 3 (Pose Reference) | Required | Pose reference image (guides body orientation and limb placement automatically) |
The Image Resize node ensures consistency:
- Mode: pixels
- Resolution: 1024 × 1024
- Resize Method: pad
- Sampling: nearest-exact
Mode: pixels
Resolution: 1024 × 1024
Resize Method: pad
Sampling: nearest-exact
This guarantees that all references align correctly with the final render resolution.
Step 3: Write Your Prompt
Use the TextEncodeQwenImageEditPlus node to describe your edit.
Instead of describing what to generate, focus on:
- What must stay the same
- What should change
- What elements to insert or replace
What must stay the same
What should change
What elements to insert or replace
Step 4: Configure Detection Settings
The preprocessing node analyzes image structure automatically. The current workflow settings are:
- Body detection: enabled
- Hand detection: enabled
- Face detection: disabled
- Resolution: 704
Body detection: enabled
Hand detection: enabled
Face detection: disabled
Resolution: 704
These settings are optimized for stable edits and accurate feature preservation.
Step 5: ControlNet Strength
Inside ControlNetApplyAdvanced:
- Strength: 1.8
- Start: 0
- End: 1
Strength: 1.8
Start: 0
End: 1
Higher strength enforces closer adherence to pose reference image, while lower values allow more creative interpretation.
Step 6: Final Output Resolution
Set inside EmptyLatentImage:
- Width: 720
- Height: 1280
- Batch: 1
Width: 720
Height: 1280
Batch: 1
This determines the resolution of your final output image.
Step 7: KSampler Settings
Use these exact values:
- Seed: randomize
- Steps: 4
- CFG: 1
- Sampler: euler
- Scheduler: beta
- Denoise: 1
Seed: randomize
Steps: 4
CFG: 1
Sampler: euler
Scheduler: beta
Denoise: 1
These settings are optimized specifically for Qwen Rapid AIO to give fast, clean edits.
Click RUN to start. The system will process your input image(s) and prompts, applying edits automatically while preserving the elements you specified. Once the generation completes, you’ll have your first edited image ready — in the next section, we’ll explore practical examples.
5. Qwen Rapid AIO Pose Editing Examples
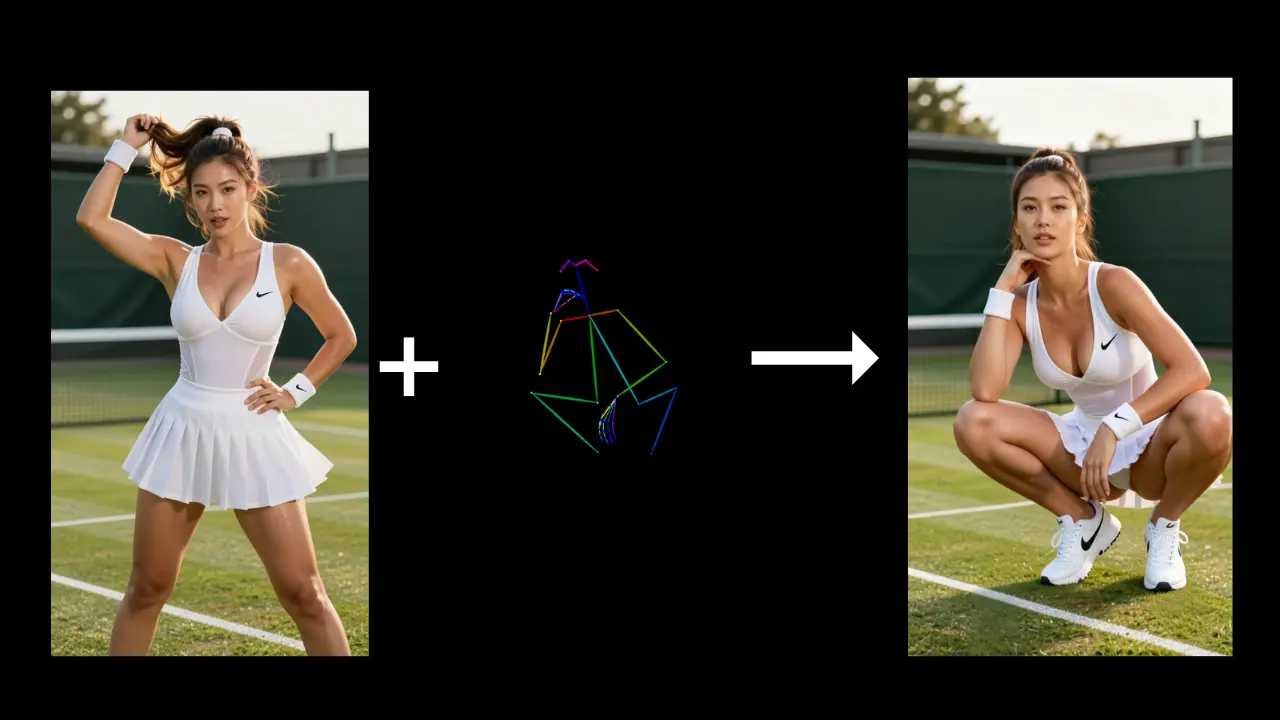
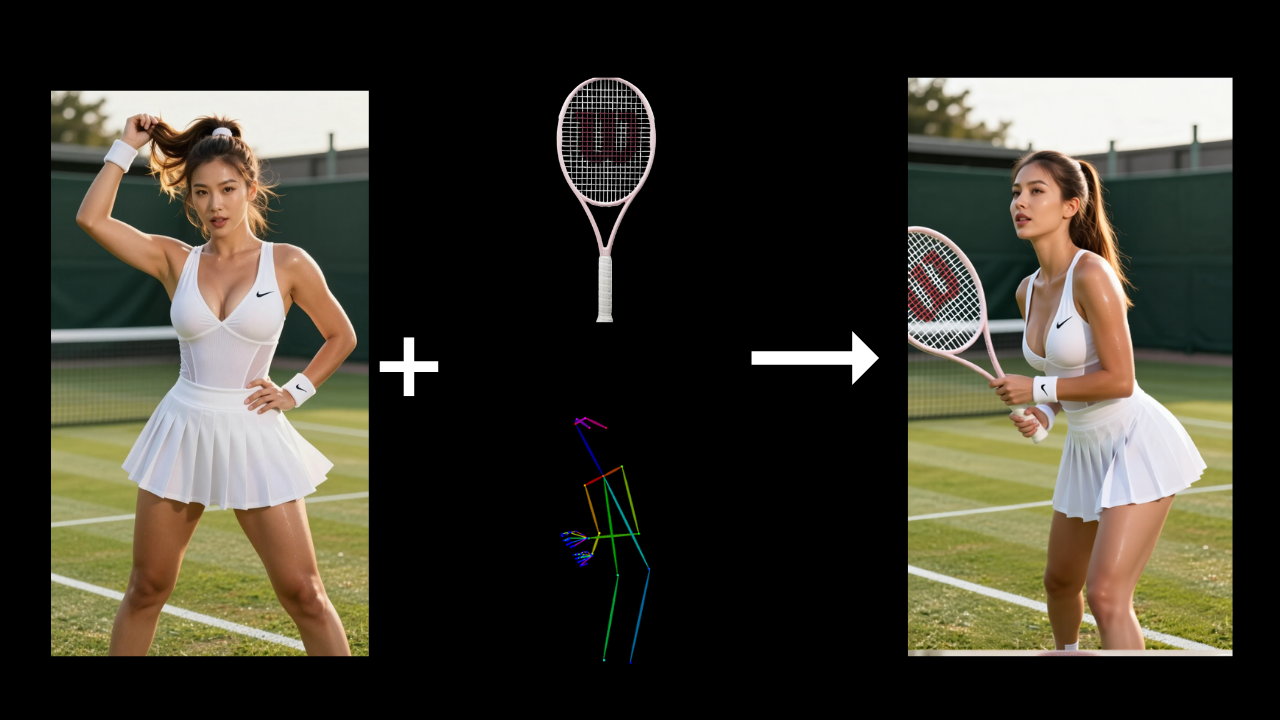
To illustrate the capabilities of Qwen Rapid AIO in pose editing, let’s explore several examples that showcase how poses can be altered while keeping the character’s identity intact. These examples highlight the versatility of the tool and the effectiveness of the workflow.
Example 1:
Example 2:
Example 3:
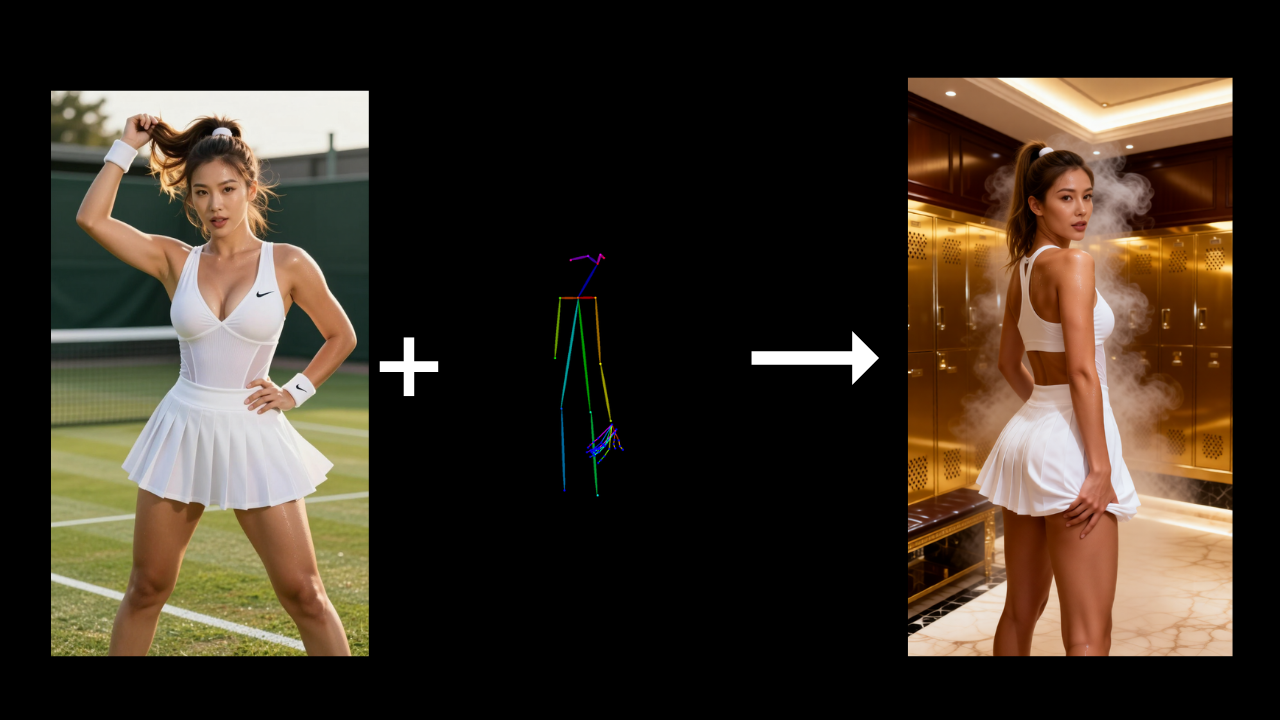
Example 4:
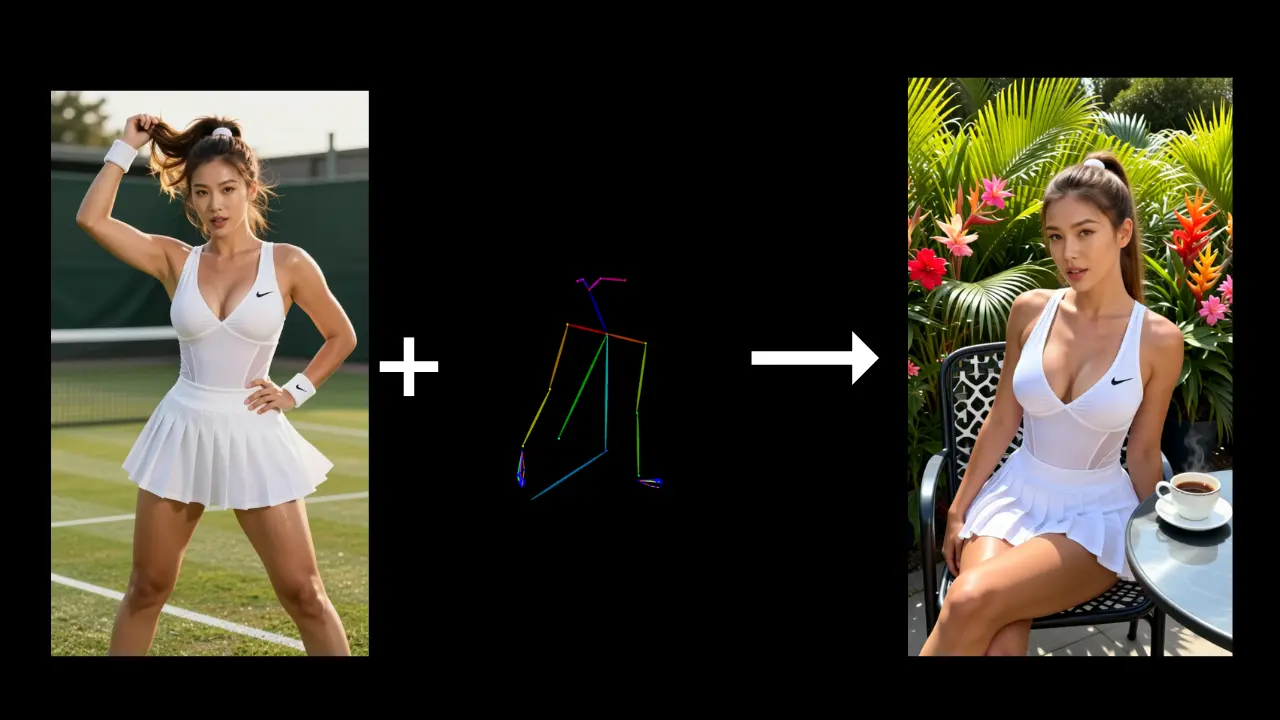
RunPod Special Offer
Load $10, get up to $500 in bonus credits randomly!
6. Conclusion
In conclusion, utilizing Qwen Rapid AIO alongside ControlNet Union provides a powerful solution for modifying character poses while preserving their style, identity, and environmental context. This workflow is particularly beneficial for animation preparation, character design, storytelling, and ensuring visual consistency across various scenes.
By balancing prompt clarity with control strength, you can achieve precise pose edits without introducing unwanted changes. However, it’s important to remember that pose detection may not always be perfect. If you encounter issues with skeleton extraction, simply try using a different reference image to improve results.
Thank you for following this tutorial! With these techniques, you should be well-equipped to produce consistent and professional pose transformations for your creative or production projects.
Frequently Asked Questions
What are the system requirements for using Qwen Rapid AIO with ComfyUI?
Can I edit multiple elements in one generation with Qwen Rapid AIO?
**Do I need to manually adjust the character’s pose for Qwen Rapid AIO?**
Enjoyed this article? Share it with your network.